You are viewing the RapidMiner Radoop documentation for version 9.7 - Check here for latest version
Hadoop Cluster Networking Overview
The data stored in a Hadoop cluster is often confidential, so it is important to ensure that your data is safe from unauthorized access. Many companies decide to deploy the Hadoop cluster to a separate network, behind firewalls. The sections below provide some suggested ways to make sure that RapidMiner Radoop can connect to these clusters.
Note: You must have a fully functioning Hadoop cluster before implementing RapidMiner Radoop. Hadoop cluster administrators can use the following tips and tricks, which are provided only as helpful suggestions and are not intended as supported features.
To operate properly, the RapidMiner Radoop client needs access to the following ports on the cluster. To avoid opening all these ports, we recommend to use Radoop Proxy, the secure proxy solution shipped with RapidMiner Server, or as a standalone Docker container. See details on Radoop Proxy below.
| Component | Default Port | Notes |
|---|---|---|
| HDFS NameNode | 8020 or 9000 | Required on the NameNode master node(s). |
| ResourceManager | 8032 or 8050 and 8030, 8031, 8033 | The resource management platform on the ResourceManager master node(s). |
| JobHistory Server Port | 10020 | The port used for accessing information about MapReduce jobs after they terminate. |
| DataNode ports | 50010 and 50020 or 1004 | Access to these ports is required on every slave node. |
| Hive server port | 10000 | The Hive server port on the Hive master node; use this or the Impala port (below). |
| Impala daemon port | 21050 | The Impala daemon port on the node that runs the Impala daemon; use this or the Hive port (above). |
| Application Master | All possible ports | The Application Master uses random ports when binding. You can specify a range of allowed ports for this purpose by setting the yarn.app.mapreduce.am.job.client.port-range property on the Connection Settings dialog. |
| Timeline service | 8190 | This is needed for Hadoop 3. Details can be found on the hadoop parameter yarn.timeline-service.webapp.address. |
| Kerberos | 88 | Optional: If the cluster is Kerberos enabled, it will need to be accessible to the client. (TCP and UDP are both used) |
| Key Management Services | 16000 | Optional: If the cluster utilizes a Key Management Services (KMS), it will need to be accessible to the client, the connection uri info is at the hadoop parameter dfs.encryption.key.provider.uri. |
RapidMiner Radoop automatically sets the version-specific default ports when you select a Hadoop Version on the Manage Radoop Connections window. These defaults can always be changed. If you can access the ports on your cluster from the RapidMiner Radoop clients, you can skip this section.
The following options describe some ways to secure these ports and make sure that only the RapidMiner Radoop clients can access them.
The most common way of securing a Hadoop cluster is to organize it into a private network and close ports to all entities outside of the network. To use this model, you must ensure that the RapidMiner Radoop clients can connect to the private cluster/network through a gateway node that provides an SSH tunnel and optionally a SOCKS proxy for the users. Setting up a SOCKS proxy for Hadoop and an SSH tunnel for Hive (or Impala) is a two-step process:
Start a SOCKS proxy and an SSH tunnel for Hive
The following steps set up a tunnel and create a SOCKS proxy on the client — the SOCKS proxy is for Hadoop APIs, the tunnel is for the Hive/Impala JDBC connection.
-
Select two free ports above 1024 on the local client computer. This example uses ports 1234 and 1235 as the free ports and 10000 for the Hive Server port. Optionally, you can add a second tunnel for Impala.
-
From your SSH client connect to the gateway node, set up an SSH tunnel and create a SOCKS proxy. For example:
- Create a SOCKS proxy on port 1234.
- Set up an SSH tunnel from the local port (1235) to the Hive Server node port (10000).
- If you plan to additionally use Impala, add a third tunnel from local port 1236 to an Impala node port (default 21050).
Open your SSH application. This example uses the free SSH client PuTTY and the sample port numbers from above.
- Configure port forwarding on the user interface. For example:
- Add
1234as a Dynamic forwarded port. - Add
1235as the Source port - Add
hive-internal-address:10000as the Destination.
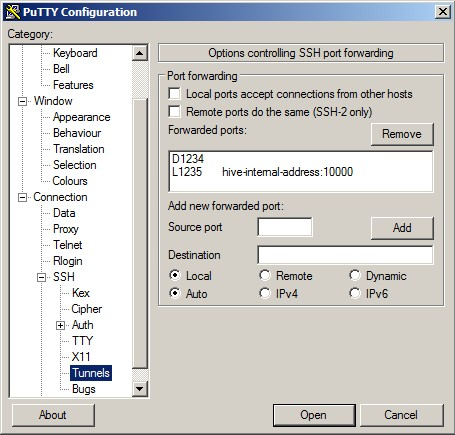
- Add
-
The SSH tunnel must remain running for as long as you are using RapidMiner Radoop with the remote cluster. To keep the tunnel open, set the
Seconds between keepalivesproperty on theConnectionpanel in PuTTY to a value greater than zero (for example, 60 seconds). -
If you also want to use Impala, add an additional tunnel:
- Add
1236as the Source port - Add
impala-internal-address:21050as the Destination.
- Add
To set up SSH on a Linux-based system, run the following commands from the terminal. These examples use the sample port numbers from above (1234 and 1235).
-
If you are using a private key for authentication, add
-i /path/to/private.key.ssh -N -D 1234 -L 127.0.0.1:1235:hive-internal-address:10000 user@gateway-public-address -
The SSH tunnel must remain running for as long as you are using RapidMiner Radoop with the remote cluster. To keep the tunnel open, set the
ServerAliveIntervalin~/.ssh/config. Typically, an interval of 60 seconds between keepalive requests is sufficient. Note that you can setServerAliveIntervalin the system-wide config file, a user config file, or on the SSH command line (with the-ooption). -
If you also want to use Impala, add an additional tunnel.
-L 127.0.0.1:1236:impala-internal-address:21050
Configure RapidMiner Radoop advanced settings for SOCKS and SSH
The RapidMiner Radoop connection, when using SOCKS proxy and SSH tunneling, requires additional configuration settings.
-
From the Connections menu, select Manage Radoop Connections.
-
Click the
 Configure button from the Manage Radoop Connections window to open the Connection Settings dialog.
 -
Complete the settings as follows:
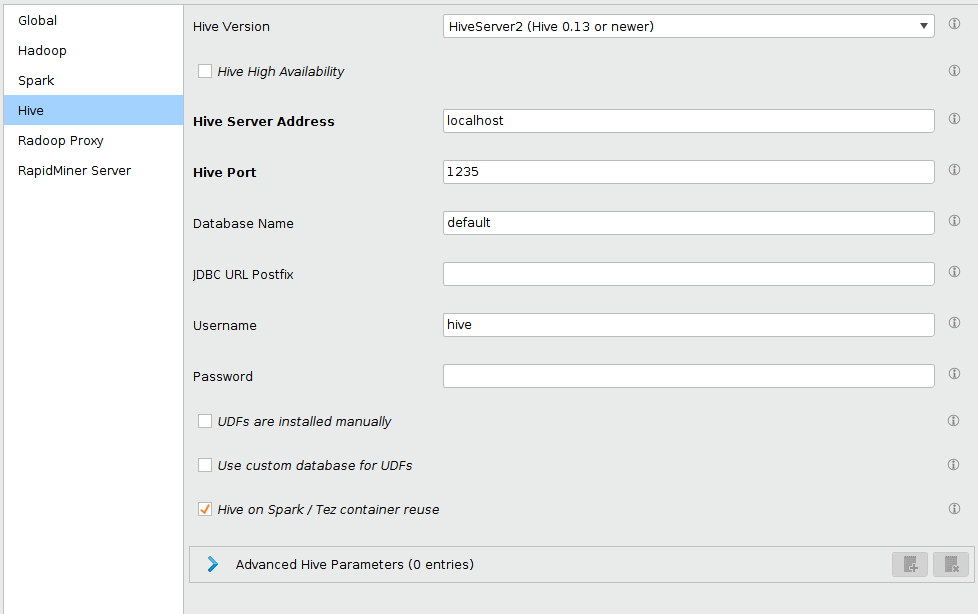
Field Setting NameNode Address Enter the private hostname/IP address of the HDFS master node. Resource Manager Address Enter the private hostname/IP address of the YARN master node. Hive Server address Enter localhost. (Only available if Hive Version is not set to Impala.)Impala Address Enter localhost. (Only available if Hive Version is set to Impala.)NameNode port Defaults to Hadoop value; no change needed. Resource Manager port Defaults to Hadoop value; no change needed. Hive Server Port 1235(default) or your configured port number. (Only available if Hive Version is not set to Impala.)Impala Daemon Port 1236(default) or your configured port number. (Only available if Hive Version is set to Impala.)Advanced Hadoop parameters Key: hadoop.rpc.socket.factory.class.default
Value:org.apache.hadoop.net.SocksSocketFactory
Enabled: yesAdvanced Hadoop parameters Key: hadoop.socks.server
Value:localhost:1234
Enabled: yesAdvanced Hadoop parameters (to avoid bug HDFS-3068 when using a proxy) Key: dfs.client.use.legacy.blockreader
Value:true
Enabled: yes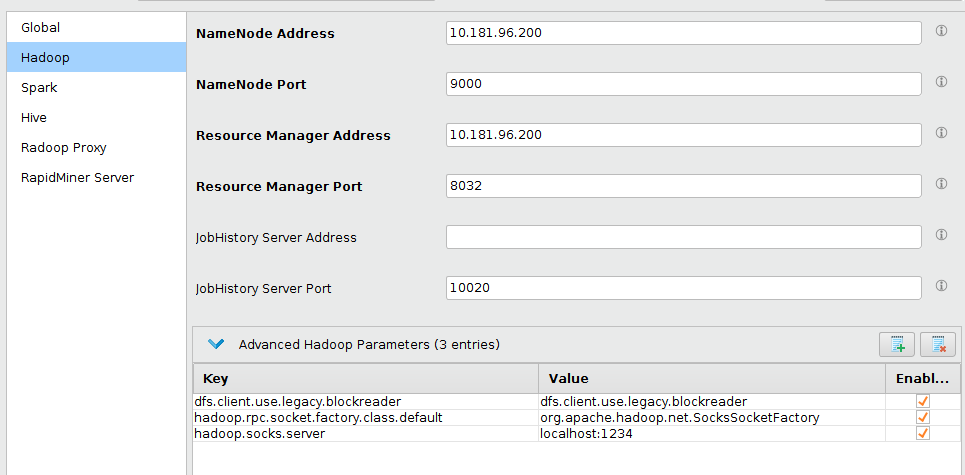
- Click
 OK and
  Save to save this connection.
 - Click the
 Quick Test button to test the connection. If the test is successful, you have properly set up a secure connection to your Hadoop cluster.
An alternative method for bringing your client node into a private network is to define a Virtual Private Network (VPN). To do so, refer to the OpenVPN documentation or consult with your network administrator for further details. After defining the VPN and connecting your client computer to it, you can access all the necessary Hadoop ports from the client; there is no need for further configuration.
If you have Hadoop nodes that are not protected within a private network and are not isolated from the Internet, you must protect your data with proper firewall settings. Because a Hadoop cluster usually consists of many nodes, and the services on one node communicate with other services on other nodes, if there is a firewall, all those service ports must be open. A common practice is to open all ports among Hadoop nodes within your cluster.
In addition, you must open the required ports for all RapidMiner Radoop clients. Note that these settings can become complicated and difficult to maintain as you add more nodes to your cluster. It is preferable to organize all Hadoop nodes into a private network, as described in the section on SOCKS proxy.
Networking with Radoop Proxy
Radoop Proxy makes the networking setup significantly simpler: only a handful of ports need to be opened on the firewall for the Radoop client to access a Hadoop cluster. See the table below for details.
| Default Port # | Notes |
|---|---|
| 1081 | This port is used by the Radoop Proxy and is configured during Radoop Proxy installation |
| 88 | Optional: If the cluster is Kerberos enabled, it will need to be accessible to the client. If Radoop Proxy is utilized, Kerberos token provider/authenicator still must be exposed to the client. (TCP and UDP are both used) |
| 16000 | Optional: If the cluster utilizes Key Management Services (KMS), it will need to be accessible to the client. The connection URI info is at the Hadoop parameter dfs.encryption.key.provider.uri. |
| 8190 | Optional: For Hadoop 3 based clusters, the Timeline service provider needs to be exposed and accessible to the Radoop client to obtain job status info. The Hadoop parameter yarn.timeline-service.webapp.address can provide connection information. |
The Radoop Proxy can be secured using the RapidMiner Server authenication setup and/or its own staticly defined username/password. In the case of RapidMiner server authenication being SAML, and the Radoop Proxy Connection setup to use SAML, the token used will be from the Remote Repository the Radoop Proxy Connection is associated with.
For configuring a Radoop Proxy for a Radoop connection in Studio, check the guide Configuring Radoop Proxy Connection. For customizing the installation in Server, or deploying a standalone Radoop Proxy, see Custom Radoop Proxy installation section in the Server documentation.