You are viewing the RapidMiner Server documentation for version 9.7 - Check here for latest version
Mirror groups
If you want to manage group memberships via LDAP/SAML and not via RapidMiner Server, you can create a mirror group. A mirror group keeps group memberships in sync between LDAP/SAML and RapidMiner Server by using LDAP/SAML logins to update the group information stored on RapidMiner Server.
Any regular group can be turned into a mirror group. Once the group is turned into a mirror group, it loses all the users that were assigned to it, but it gains new members automatically when an LDAP/SAML-authenticated user logs in.
If the administrator group is turned into a mirror group, it is recommended to remove the ‘admin’ user afterwords, as this account will no longer be needed.
Defining mirror groups
You can change a group to a mirror group in the web interface of RapidMiner Server, under Administration > User management.
Under Administration > User management, select the Groups tab.

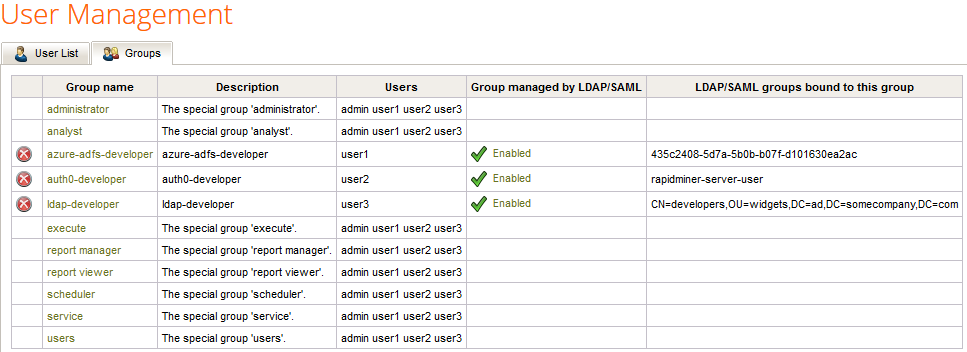
Select any of the groups. Please note the column Group managed by LDAP/SAML that indicates the mirrored status and the column LDAP/SAML groups bound to this group that indicates the corresponding LDAP/SAML group.
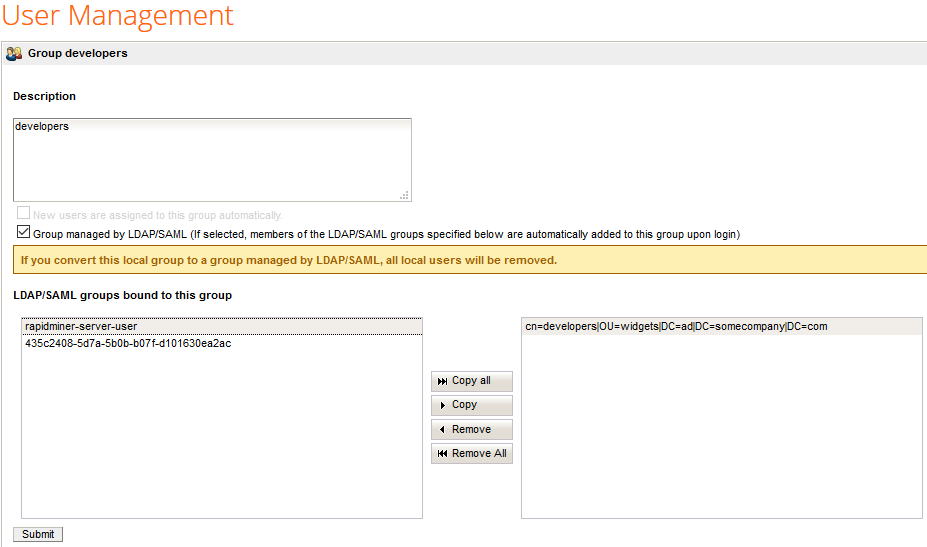
Check Group managed by LDAP/SAML to turn a regular group into a mirror group, or uncheck it to change it back to a non-mirrored group. If selected, members of the LDAP/SAML groups specified below are automatically added to this group when they log in.

When a group is mirrored, current RapidMiner users get removed from it, and a new entry appears in LDAP/SAML groups bound to this group. These LDAP/SAML groups may be automatically or manually created.
The left side contains the available and the right side contains the already associated LDAP/SAML groups. You can use the buttons in the middle to change the association. If you do not find the required LDAP/SAML group in the list you can create it manually.
Creating LDAP/SAML groups manually
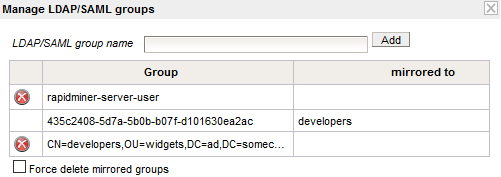
The admin user can create/delete LDAP/SAML groups established inside RapidMiner Server by opening the group management screen and selecting the Manage LDAP/SAML groups action on the right side.

- To add a new LDAP/SAML group: If the group you wish to use is not present in the LDAP/SAML management list, enter the name of the LDAP/SAML group and click on Add. Afterwards the new group should be displayed in the table.
- To remove an LDAP/SAML group: Click on the
 Delete icon next to the group you want to remove. If you want to delete an LDAP/SAML group which is already used, check the Force delete mirrored groups checkbox to be able to remove these groups as well.
Keep in mind the LDAP/SAML group name should always reflect the name of the group on the LDAP server or in the SAML response.