You are viewing the RapidMiner Studio documentation for version 10.2 - Check here for latest version
Generative AI
The Generative Models extension for RapidMiner allows anyone not just to use generative AI models but also to build such models. Easily, and without writing a single line of code. The current version of the extension focuses on so- called Large Language Models (LLM). For many enterprises those models provide the most value compared to image models, video models, or audio models. There are other extensions on the RapidMiner marketplace which will cover those non-textual use cases and future versions of this extension may cover those, too. If you use this extension to utilize the hundreds of thousands of models on Huggingface.com or OpenAI’s ChatGPT or finetune those – have fun and be creative. Generative AI offers solutions for many new use cases beyond other machine learning methodologies like classification or regression.
Table of contents
Installation and setup
The following paragraphs describe the requirements of the Generative Models extension. Please make sure that you provide the package manager, the exact Python environments, and are using the correct versions as described below since otherwise the operators in this extension will likely not work.
RapidMiner extension dependencies
This extension requires RapidMiner Studio version 10.2 or higher. This extension also depends on two other RapidMiner extensions which need to be installed before this one can be used:
- Python Scripting >= 10.0.1
- Custom Operators >= 1.1.0
For RapidMiner Studio. please go to the menu Extensions > Marketplace and install both those extensions before you proceed with installing this extension. For RapidMiner AI Hub, please follow the instructions in the AI Hub documentation for installing all three extensions there.
The Python scripting extension needs to be properly configured, i.e., in RapidMiner settings please specify a working Python installation together with a default environment which needs to contain at least the Pandas package. Please refer to the documentation for detailed information about how to set up Python with RapidMiner Studio.
Setup of Python environments
This extension will install missing packages into a specified Conda environment automatically. Those packages will be installed into the currently selected environment (which is a parameter of all the operators). So, if you do not want to make changes to an environment used elsewhere, we do recommend generating a new environment specifically for usage with this extension.
Also, and because of this, you will need to use Conda as the package manager which needs to be installed first. Please refer to Installing Miniconda for a how to if you have not yet installed Conda.
After installing Conda, we advise to create a new environment with Conda which only will be used by this extension. This is also recommended since you will need very specific package versions to ensure that everything is working. You must be using the following Python versions and basic packages with the specified versions for the packages:
- Python 3.10.8
- Numpy 1.23.2
- Pandas 1.5.2
- Torch 2.0.0
- Torchvision 0.15.1
- Torchaudio 2.0.1
The installation of the correct environment will depend on your operating system and whether you have access to a CUDA-enabled Graphics Processor Unit (GPU) on the system or not. Please follow the commands below that are applicable to your system and GPU setup.
Hint: For the Conda environment, we do recommend using the name rm_genai
exactly as follows. This way all the operators in this extension will work out
of the box since this name is the default parameter value for all the operators
in this extension. But if you absolutely want to (or must) use a different
environment name, you can do this. In this case you would need to set this
different name then as parameter value for all the “Conda environment”
parameters of all the operators.
Windows / Linux:
The command to set up the right Conda environment depends on whether you have a CUDA-enabled GPU on your system or not. Please follow the instructions below for your system.
CPU computation
If you do not have a CUDA-enabled GPU, the extension will run on CPUs, and you
need to run the following commands in a command shell after installing Conda.
Using Conda in a command line shell, please create a new environment
called rm_genai:
conda create -n rm_genai python=3.10.8 numpy=1.23.2 pandas=1.5.2 -c conda-forge

conda activate rm_genai

pip install torch==2.0.0 torchvision==0.15.1 torchaudio==2.0.1 --index-url https://download.pytorch.org/whl/cpu
GPU computation
If you do have a CUDA-enabled GPU, the extension will run on GPUs automatically,
and you will need to run the following commands in a command shell after installing Conda.
Using Conda in a command line shell, please create a new environment called rm_genai:
conda create -n rm_genai python=3.10.8 numpy=1.23.2 pandas=1.5.2 -c conda-forge

conda activate rm_genai

pip install torch==2.0.0+cu117 torchvision==0.15.1+cu117 torchaudio==2.0.1 --index-url https://download.pytorch.org/whl/cu117
Mac
Note: You won’t be able to use GPUs on a Mac, but if you have Apple’s new M chips you will be able to use the so-called MPS device for most of the language models. Please follow the CPU-based installation above for Macs.
Using Conda in a command line shell, please create a new environment called rm_genai:
conda create -n rm_genai python=3.10.8 numpy=1.23.2 pandas=1.5.2 pytorch==2.0.0 torchvision==0.15.1 torchaudio -c conda-forge -c pytorch
That’s it. You can now use this dedicated environment as the execution environment for all the operators in this extension. Missing packages will be automatically downloaded and installed into this environment.
Note on data transfers
A core idea of generative AI and large language models is to use so-called foundation models which have been trained on massive amounts of data but do not necessarily solve any specific task. Those models will then be finetuned on specific training data to solve a specific task. Either way, and as the name suggests, both the foundation models and the finetuned variants are typically large.
RapidMiner fetches both foundation models and previously finetuned models from Huggingface.com. You will need to specify which model should be used as a starting point and it will be downloaded with the corresponding operator (see below for details). Those models will then be stored locally. Be careful though since many of these models can have a size of many gigabytes! You can monitor the download process in the log window of RapidMiner since it will take a while to download those large models.
And obviously you need to be able to connect to the internet wherever this extension is running to fetch the necessary packages and foundation models.
Note on GPUS
Using or finetuning large language models is very compute-intensive and can be drastically accelerated by using GPUs for the calculations. This extension will make use of GPUs automatically, so long as supported GPUs are detected and GPUs have been correctly set up. Even with GPUs, the finetuning of larger models or the usage of larger finetuning data sets can take days if not weeks. But without GPUs, larger models will always require days, weeks, if not months to finish. Please also note that Apples new M chip architecture (called MPS) is supported as well. However, we noticed that not all models work well with this architecture which is why we do not enable it automatically. You can change the device parameters in all operators from “Automatic” to “MPS” if you want to try it for your model and use case.
Note on tokens
You will see the term token quite often in the Generative Models extension and in this documentation. For most language models a token is not necessarily the equivalent of a word. It is closer to a syllable or a part of a word. That also means that sometimes words can consist of multiple tokens. So, if you see a parameter “max_target_tokens” that means how many tokens a model answer can be. A value of 16 there does therefore not mean 16 words but 16 tokens. The average length of a token also will depend on the language. For English, the average length of tokens is around 4 characters so you can expect about 4 x 16 = 64 characters as the expected maximum length.
Using the extension
The extension offers two groups of operators:
- One group is for working with models from the fantastic Huggingface.com portal, and
- the other group uses the commercial models from OpenAI.
Both groups of operators work differently though. For all Huggingface models, you will need to download a model from Huggingface and finetune or simply use it locally. This is more like typical workflows in RapidMiner where you work with data and models locally and store them locally.
For the OpenAI models, on the other hand, things will happen remotely on OpenAI’s cloud infrastructure. Instead of downloading the model, you will upload your data and model application, or finetuning will happen remotely. It will also happen asynchronously. This means that most long-running operations such as fine-tuning will return quickly, and you will get a job ID. You will be notified when the job is finished and then you can start utilizing the new model defined by the ID. We will discuss the details later in the section about the OpenAI operator group.
Generative AI with Huggingface models
Let’s start with the Huggingface models first. As mentioned above, the overall flow is more like normal RapidMiner workflows. In general, you will either point to a model from Huggingface or even download a model from there and then will use an operator to apply this model on your data. You will also be able to finetune such a model based on your own data. Let’s see how this works.
Using a large language model
We will begin by simply using a model which somebody has uploaded to the Huggingface portal here:
At the time of this writing, more than 300,000 models have been uploaded to Huggingface, so you will often find a model that exactly solves your task. If not, you may still use a model you find there as the foundation for finetuning a model to your task. More about that later.
The first thing to note is that there are many more tasks for generative AI models than there are for traditional machine learning. In machine learning, we often have only a handful of different task types such as classification or regression. But for generative AI, there are already around ten different task types just for natural language processing. And then additional task types for other data formats such as images, video, or audio.
As stated before, we will focus with this extension first on natural languages. For those, we know and support the following task types:
- Conversational: these models can provide answers to conversational input. For example, a model could answer to “Hi, how are you?” with “Thanks, I am good. How about yourself?”
- Fill Mask: these models have been trained to fill in gaps in texts. For example, a model could predict that the gap in “Paris is the <gap> of France” should most likely be filled with “capital”.
- Question Answering: these models can answer questions about a given context. For example, if the context is “My name is Ingo, and I live in Houston” and the question is “Where do I live?” the model would produce the answer “Houston”.
- Summarization: these models have been trained to summarize longer texts into shorter ones. For example, a model could turn a complete Wikipedia article into a short paragraph.
- Text2Text Generation: these models have been trained to transform one text into another text. For example, a model could turn the sentence “Fix grammar: this sentences has has bads grammar” into “this sentence has bad grammar”.
- Text Classification: these models have been trained to predict a most likely class for new documents. For example, a sentiment classification model could predict if a sentiment is more likely to be “positive” or “negative”.
- Text Generation: these models have been trained to extend a given text with the next word. For example, a model could predict that the next word after “Once upon a time in a dark forest lived an evil...” should be “witch”.
- Token Classification: these models have been trained on predicting the type of all input tokens. Such models can for example be used for named entity recognition or part-of-speech tagging.
- Translation: these models have been trained to translate from one language into a difference one. For example, a model could translate “I love machine learning” into the German “Ich liebe maschinelles Lernen”.
- Zero-Shot Classification: these models are text classification models, but without being trained on predefined classes. Instead, the classes are only defined when the prompt is sent to the model. You could for example send the text “My laptop is broken; I need a replacement asap” together with the classes “urgent” and “not urgent” to the model and would get the result “urgent”. But you can also send the same text with the classes “software” and “hardware” and would get the result “hardware” – from the same generic model! Zero-shot classification is certainly one of the more fascinating among the generative AI task types.
If you think about it, some of these task types can be seen as specialization of other task types. The boundaries are often somewhat fluid. You could for example treat a translation task as a text-to-text generation task. The same goes for summarization. Or you could argue that even a text classification could be solved with a text-to-text generation model. The output texts would just be very simple, namely the possible classes.
Similarly, you could argue that text generation is just a special case of fill mask where the gap, also called mask, is at the end of the sentence. Or even a conversational model can be seen as a text generation use case where the beginning of an answer is fed into another text generation run to predict the next word.
This also explains why foundation models are so powerful and how the same model can be finetuned into solving one or several of these somewhat related tasks. Although some of these task types are quite similar, we decided to keep them as separate task and operators also for the Generative Models extension. This allows you to think about new use cases using those task types. And it will also make it easier to identify the models on the Huggingface portal since the same terminology is used there.
Hence, in the Generative Models extension, there is one operator for each of the task types. Each operator only works with a corresponding model type and sometimes requires special prompts or input formats. Please refer to the tutorial processes and the in-product documentation for each of the operators to learn the details.
You can see the task types for a model on the Huggingface portal:
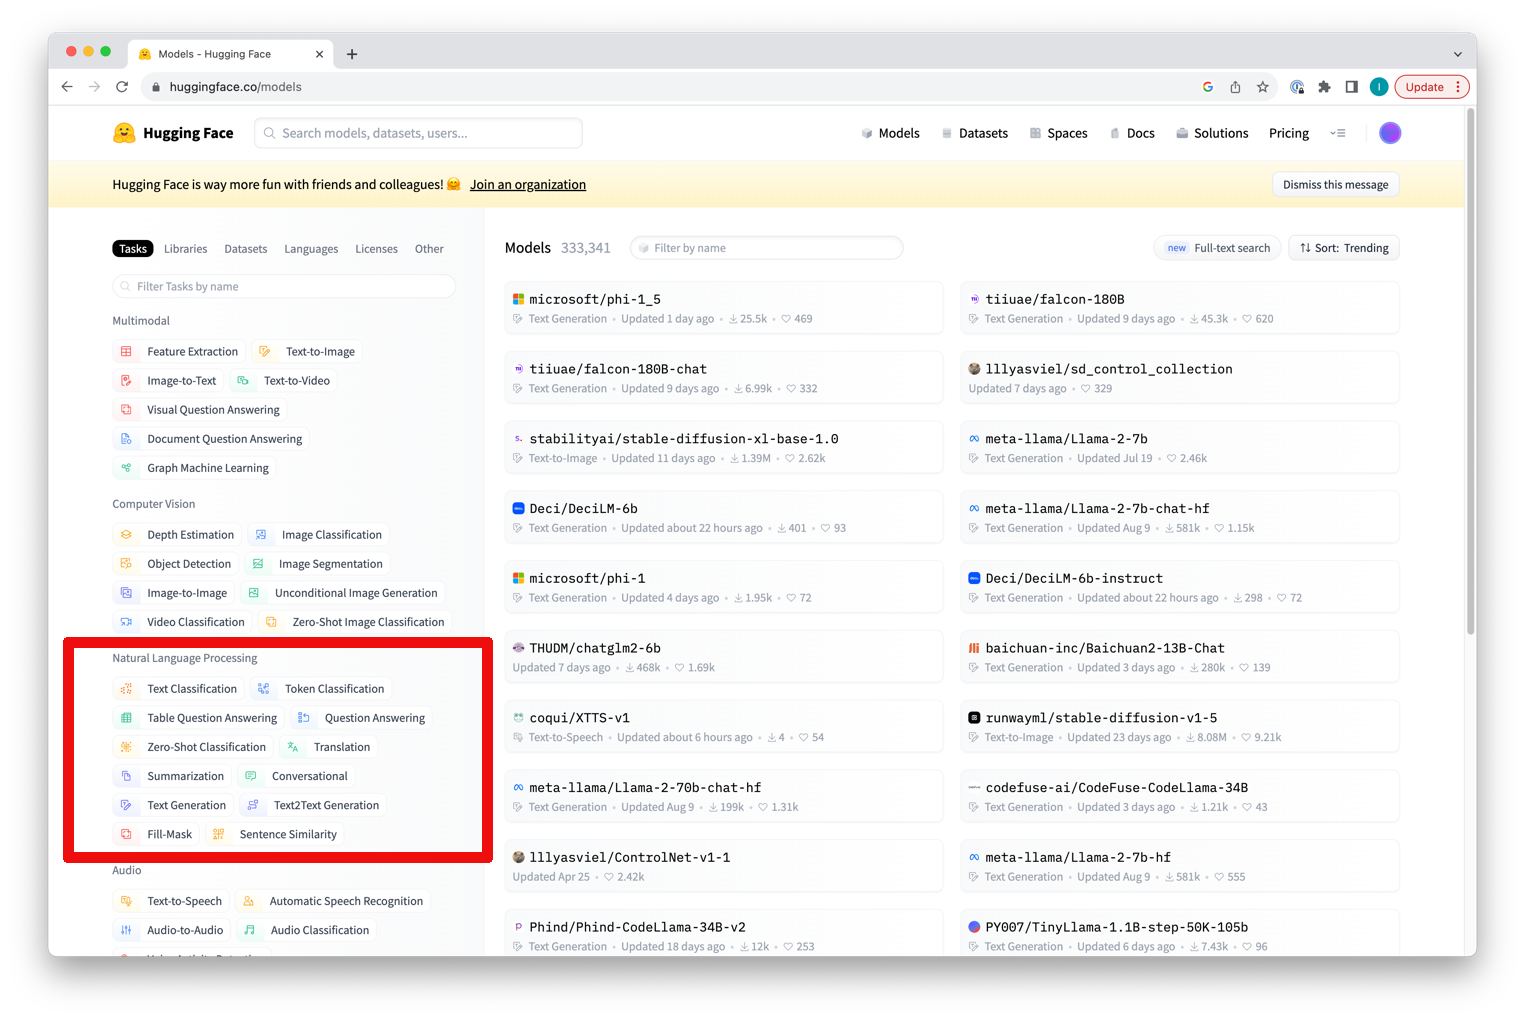
Clicking on any task will show you all models supporting this task type. You can then change the sorting and filtering settings in the top right corner. Please note that the Generative Models extension currently supports all Huggingface task types for natural languages except for Sentence Similarity and Table Question Answering.
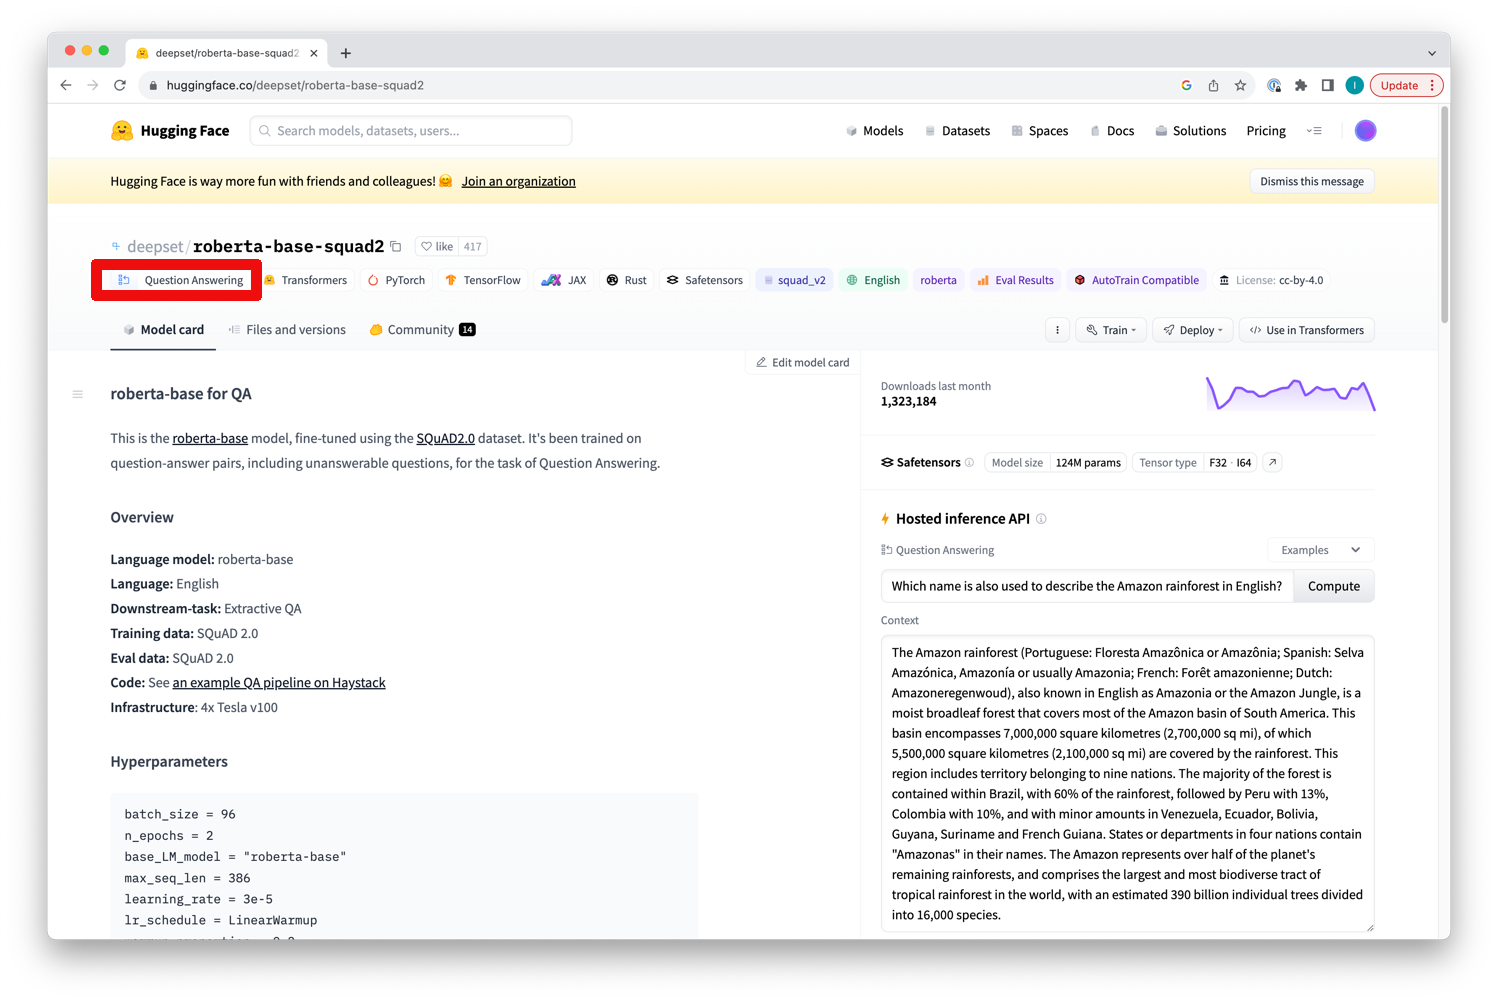
You can also see the task type for a specific model on its model card after clicking on the model:
We will use a simple example here for which we will download a small translation model which will translate sentences from English to Dutch. We will provide a data set with English sentences and the model will create the Dutch translations as a result. Those translations will be added as new column for which you will specify the desired name as a parameter of the operator below.
The basic process setup will look like this:
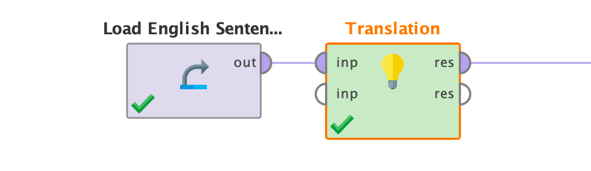
In this case the input data is simply a one-column data set with some English texts.
Unlike most other RapidMiner models, you cannot use the Apply Model operator but will need to use the special task operators for using LLMs. The reason is simply that this allows you to just download a model from Huggingface by specifying its name or train or finetune such a model outside of RapidMiner and could still just point the storage directory to use the model within RapidMiner processes.
If you check the operators in the Generative Models extension, you will note a folder called “Tasks” which contains all the application operators for each supported task. Since we want to solve a language translation problem, we have used the Translation operator. But there are many more. Just explore all tasks yourself, each operator comes with a tutorial process showing how to use it with a simple example.
Back to our Translation operator. The operator simply takes the data set as an input. You may have noticed that the task operator also has a second input port. This must be used if you are using a local storage folder for the model instead of specifying it via parameters (see below). The operator will take any data table as the first input. The result of the operator will be the original input data plus an additional column which contains the results from the queried model based on the prompt parameter. In our example, this additional column would contain the Dutch translations of the English input texts.
Each task operator will also deliver the model directory file object as a second result which can be useful if you, for example, want to clean the model directory with the Delete Model operator after model application. This output will only be generated if a) you have provided a model directory as a second input and b) switched on the parameter “use local model” (see below for details). All task operators receive data and the model directory as inputs and deliver those as outputs. In many cases you will simply specify the desired model name as a parameter though and do not need to worry about dealing with the local storage folders. We will come back to this later when we discuss the Download Model operator.
Let’s have a look at the parameters of the Translation operator:
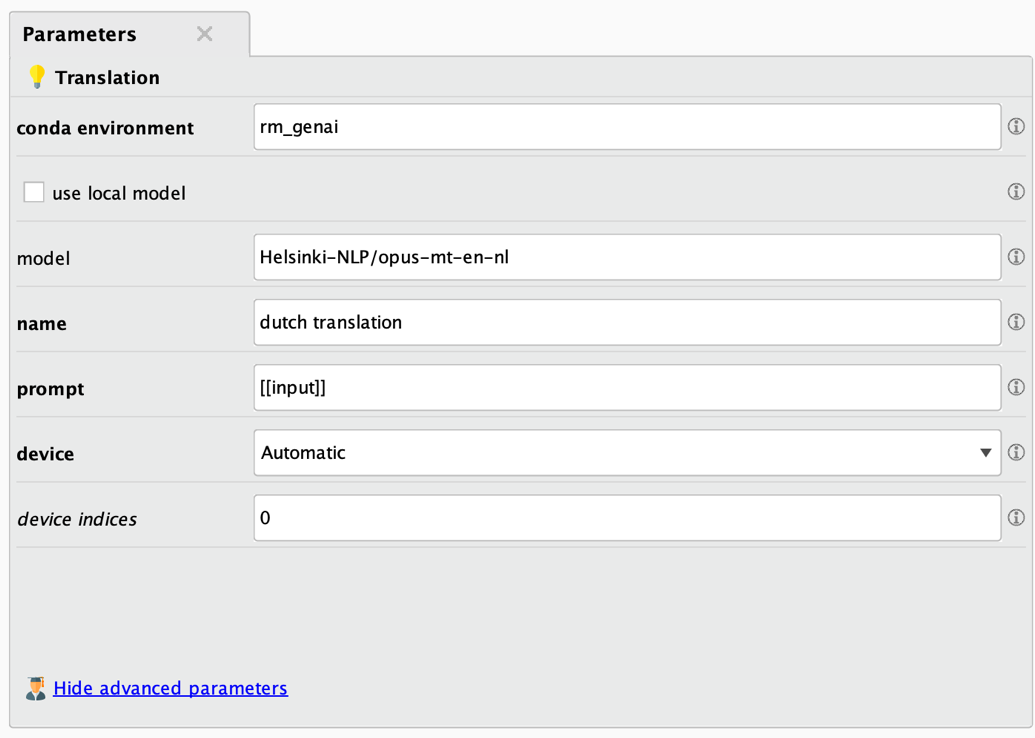
The first parameters in bold are the most important ones. Here are the parameter descriptions:
- Conda environment: See above for details. Typically, the same environment will be used as the one you used for finetuning.
- Use local model: Indicates if a local model should be used based on a local file directory or if a model should be used from the Huggingface portal. If a local model is to be used, all task operators require a file object referencing to the model directory as a second input. If this parameter is unchecked, you will need to specify the full model name coming from the Huggingface portal for the “model” parameter below.
- Model: The model from the Huggingface portal which will be used by the operator. Only used when the “use local model” parameter is unchecked. The model name needs to be the full model name as found on each model card on the Huggingface portal. Please be aware that using large models can result in downloads of many gigabytes of data and models will be stored in a local cache. More on this in the section about the Download Model operator.
- Name: The name of the new column which will be created as a result.
- Prompt: The prompt used for querying the model. Please note that you can reference the values of any of the input data columns with [[column_name]]. You may need to use a prompt prefix such as “Translate to Dutch: [[column_name]]” to tell the model what it is supposed to do.
- Device: Where the model application should take place. Either on a GPU, a CPU, or Apple’s MPS architecture. If set to Automatic, the training will prefer the GPU if available and will fall back to CPU otherwise.
- Device indices: If you have multiple GPUs and computation is set up to happen on GPUs, you can specify which ones are used with this parameter. Counting of devices starts with 0. The default of “0” means that the first GPU device in the system will be used, a value of “1” would refer to the second and so on. You can utilize multiple GPUs by providing a comma-separated list of device indices. For example, you could use “0,1,2,3” on a machine with four GPUs if all four should be utilized. Please note that RapidMiner performs data-parallel computation which means that the model needs to be small enough to be completely loaded on each of your GPUs.
After setting all parameters correctly, you can execute the workflow and the result will be the original data set plus the additional column with the specified name. This column contains the desired translations:
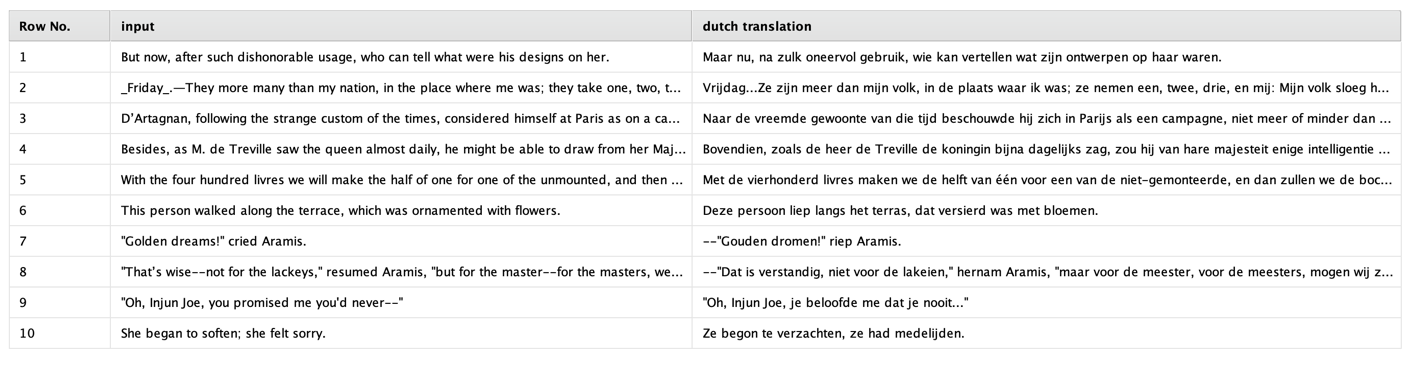
For those of you who do not speak Dutch: those translations are pretty accurate.
One important parameter we need to discuss is the “prompt” parameter. The trick is that the prompt itself is variable, i.e., it can contain one or several values of the existing data columns. This means that for each row in the input data we send one prompt to the model and add the result in the new column. And the results can be different for each row since the specific prompt can depend on other columns’ values as well.
Let’s have a look at an example. We will stay in our English to Dutch translation exercise here. We used a special translation model called “Helsinki-NLP/opus-mt-en-nl”. Please note that we must use the full model name including “Helsinki-NLP/”. This model has already been finetuned to translate from English to Dutch. It is only about 300Mb in size and it is doing a good job. But it is also only doing this one job in contrast to bigger models such as ChatGPT.
Some models need to be told in the prompt what they should be doing. This is important if you work with a model which has been finetuned to solve multiple tasks. In this case, you would write a prompt like “Translate to Dutch: ...” followed by the text which should be translated. Let’s assume our original texts in English are stored in the column named “input”. The corresponding prompt you should use is then “Translate to Dutch: [[input]]”.
As you can see, you can simply refer to the values of one of the data columns by placing them in two (2) brackets as part of the prompt. This way you could write prompts like “What is the GDP of [[country]]?” or “What is the capital of [[state]]?”.
For the Opus model we are using in this example, you do not need to preface the prompt with anything since the only thing the model can do and will be doing is to create a translation from English to Dutch. So, the whole prompt becomes simply “[[input]]”.
Important: If you use this operator or any of the task operators for a model which you have been finetuning yourself, for example with the “Finetune Text2Text Generation” operator, your prompt must start with the prompt prefix you have specified during the finetuning. The default for the RapidMiner operator is “Translate RMIn to RMOut: “. You will need to use this prompt prefix followed by the text which is supposed to be processed. Again, this text can then be taken from other columns with the [[column]] format. For example: “Translate RMIn to RMOut: [[english_texts]]”.
Before we move to the next section, let’s also have a quick look at how you would use any of the task operators when using a local model stored in a directory. This model can either have been downloaded before or be the result of a finetuning. You will learn in the next sections how you can download and store models locally if you need to do so. A workflow making use of local models may look like this:

In general, all task operators in the Generative Models extension work very similar to the one used in this translation example. Please refer to the in-product operator documentation as well as the tutorial processes coming with each task operator to see how they work in detail. We recommend playing around a bit with those tutorial processes for the task operators before continuing. This will help you to better understand how large language models work.
Downloading a model from HuggingFace
You probably have noticed that you can simply refer to a model by using its full name as the model parameter of all the task operators. But what happens in the background? The task operator automatically downloads the model into a local cache managed by Huggingface. It is used from there and even if you run the same task operator using the same model multiple times, it will only download the model the first time (and again whenever it got deleted from the cache).
This makes the task operators very easy to use and makes it simpler to distribute workloads for example to remote job agents connected to a Real-Time Scoring Agent of RapidMiner.
Please note that all large language models are stored in the file system instead of the RapidMiner repository. This has multiple reasons (size, folder structure and model complexity, lack of versioning options among others) but the biggest is that this allows us to use (finetuned) models built elsewhere and from third parties as well. Whenever you use the model name as a parameter of a task operator all of this is hidden from you, and you do not need to worry about it.
However, there are situations where you may need to download a model and store it at a specific location. The most important reason why you want to do this is to use the downloaded model as a foundation for a finetuning. More about this later. But you may also simply need to control where those models – which can be quite large – are stored locally.
This is exactly what the operator Download Model does. All you need to do is to set the model parameter by using the full name of the model used on Huggingface. You can use any model from Huggingface by simply entering the full model’s name which can be found on the top of the model card of Huggingface’s web portal:
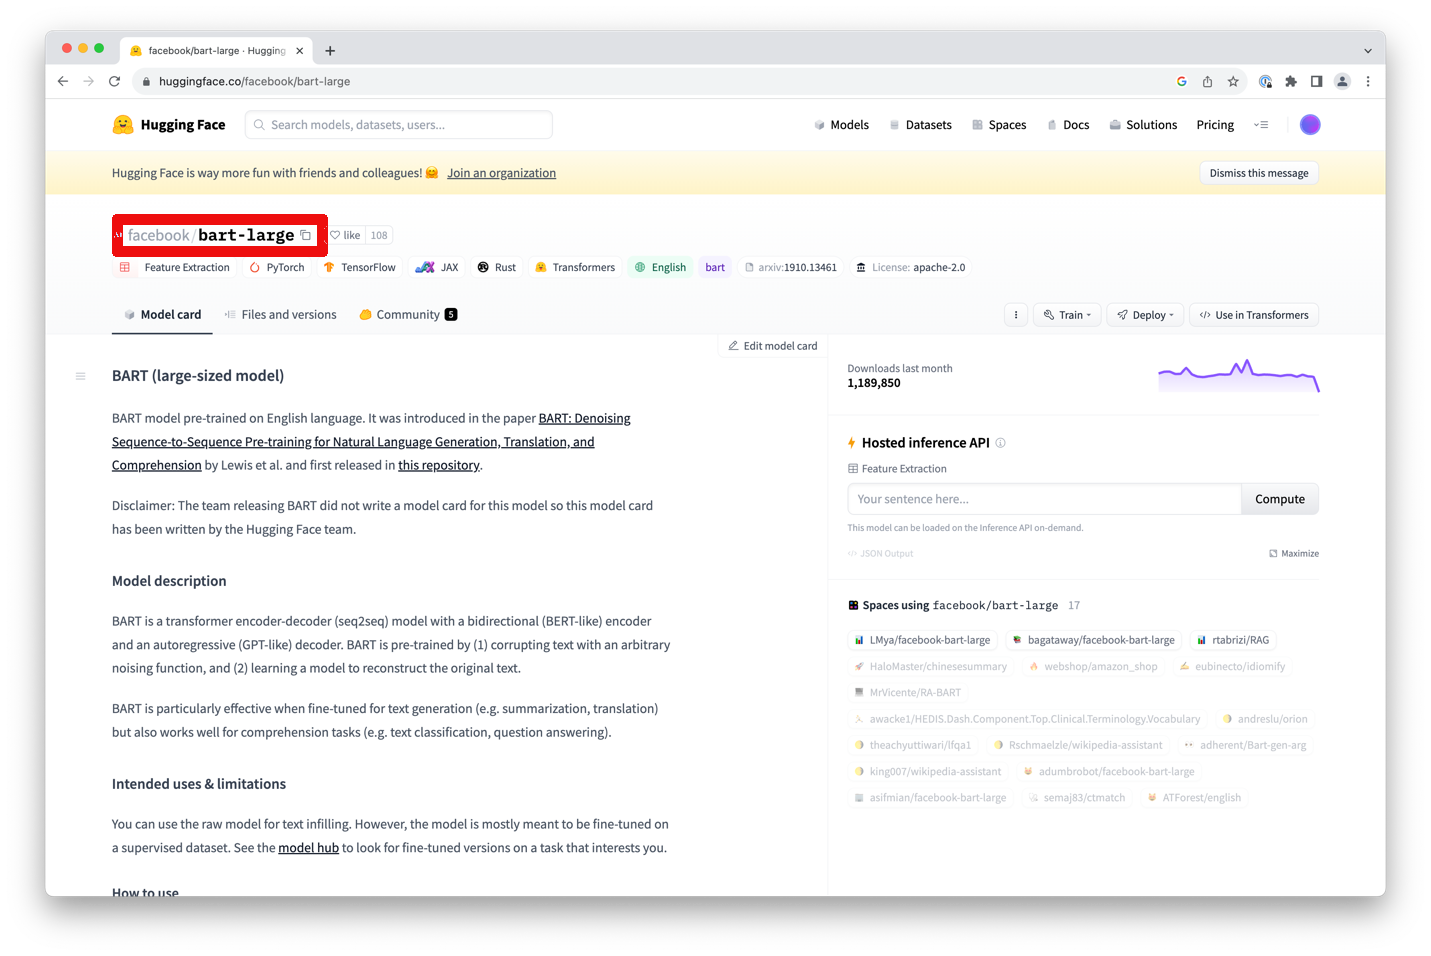
Please note that you will need to specify the full name, e.g., “facebook/bart-large” in this example, not just “bart- large”. You can also click on the small copy icon next to the name to copy the full name into your clipboard.
Finally, you will need to specify the directory in which the model should be saved. The operator will then download the model and store it there. Alternatively, you can simply store it in a temporary directory in your operating system.
While using a temporary directory is quick and easy and will also work better when you run this workflow remotely on let’s say a RapidMiner Real-Time Scoring Agent, you may want to stay in control about where to store your models whenever possible and clean up models you are no longer using. Otherwise, every application of this download operator would also result in a new copy of the model in your filesystem. As mentioned before, large language models can get very large. One way of cleaning up those model folders is the Delete Model operator which will be discussed later.
Another note on this: downloaded models are also automatically cached in ~/.cache/huggingface/hub to avoid duplicate downloads if you execute a task operator or even the Download Model operator multiple times. It is a good idea to clean this cache in your file system also from time to time if you no longer need to have a model in the cache.
The Download Model operator is very easy to use and only has a few parameters:
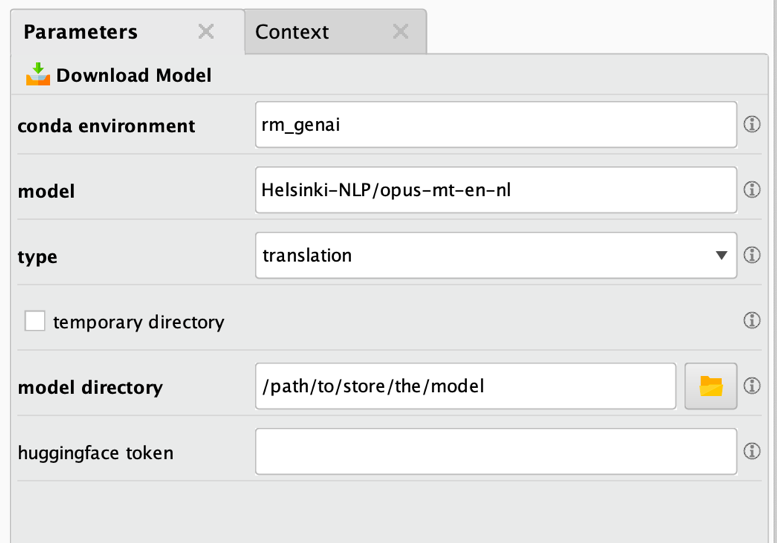
As before, the bold parameters at the top are the most important ones and must be changed / defined in all cases. Here is the parameter description:
- Conda environment: The Conda environment used for this downloading task. Additional packages may be installed into this environment, please refer to the extension documentation for additional details on this and on version requirements for Python and some packages which have be present in this environment. Typically, you will use the environment you created when you installed the extension.
- Model: The model which will be downloaded which will often be a base or foundation model but can also be a model which has been already finetuned for specific tasks. Please be aware that using large models can result in downloads of many gigabytes of data.
- Type: This parameter must be set to the correct type of the model and the task it is supposed to solve. Failing to do so will likely result in unexpected results or execution failures.
- Temporary directory: Indicates if this model should be stored in a temporary directory of your operating system. While this is useful for situations where you may not be able to control the file system like in a remote execution, it also creates a new folder every time the operator is executed. We therefore recommend using a temporary directory only when needed.
- Model directory: The directory in which the downloaded model will be stored. Please note that larger models will require multiple gigabytes of disk space. This parameter is only shown if temporary directory is unchecked.
- Huggingface token: This token may be used for downloading some of the models on Huggingface. If the model requires signing in into Huggingface.com and requesting permission to download the model, you will be able to create this token on the Huggingface web portal. This token then needs to be provided here to be able to download such a model.
The Download Model operator will deliver a file object referencing the storage directory. You can then use this file object then as input for one of the task operators or a finetuning operator (see below). See the screenshot below and note the purple file output delivered by the operator.

It is important to select the correct type of model for a specific task (see above for a description of all supported tasks). If the task is not selected correctly during the download, the model may not work correctly or not at all. However, sometimes some models do still work even if a wrong task is selected. You will find that some conversational models for example still require to be used as a text-to-text generation model. Unfortunately, there is no way to tell which task type is going to work or not. In general, the task type of the model is stated correctly on the Huggingface portal but if you run into problems, it may be worth to try a different task type and see if this solves the issue. You do not usually run into these problems if you use the model name as parameter of the task operators directly which is another reason why we recommend doing this whenever you can.
Loading a local model
After you have downloaded a model to your local file system, you may need to load it from the file system again in later workflows to use it for model application or finetuning. Here you will use the Load Model operator. It simply creates the same file reference as the one delivered by the Download Model operator, just without downloading it in the first place and simply by pointing to the local folder. This directory reference can then be fed into one of the task operators or finetuning operators.
The parameters of the operator are extremely simple, in fact there is only one:
- Model directory: The directory from which the downloaded model will be loaded.
Deleting a local model
Finally, you may want to clean up models from your file system. This can be especially useful if a model is only used once or if temporary storage directories have been used. You can delete a model directory with the Delete Model operator. This operator does not have any parameters, but it requires the model directory as file object input as they are expected or delivered by all other operators in this extension working on local models.
Finetuning a model
As you have seen above, there are multiple operators for each large language modeling task. There also could be the same amount of finetuning operators for each model type. Each finetuning would require its own parameters and input data format. It turns out, however, that most enterprise use cases for finetuning can be solved with only one model type: the text-to-text generation task type.
This makes sense if you think about it: there is often not much value in finetuning, let’s say, a model which translates from one human language into another one. Sure, you may want to adapt the tone or introduce new vocabulary. But in such cases, you will find that you can also use a text-to-text generation finetuning instead. This is true for most enterprise use cases which is why the Generative Models extension currently only offers a finetuning operator for this task type. We have already seen above that many of the other task types can be seen as a special case of a text-to-text generation.
The one other finetuning task you may encounter is to finetune a conversational model such as ChatGPT. Since those models are typically extremely large, and to be useful at all require specialized infrastructure with hundreds of GPUs, you are more likely to use a finetuning service such as the one from OpenAI instead. We will cover this in the section about OpenAI models later, but for now let’s focus on finetuning a text-to-text generation model locally using a model from Huggingface.
The usage of the Generative Models extension for this finetuning is very simple. The basic idea of finetuning a model is to use a large pretrained model as a starting point and then only teach this model a specific task. This large pretrained model is also referred to as foundation model. For example, you could start with a model which has been pretrained on texts in multiple languages including English and Japanese. This pretraining often happens in sort of an unsupervised way, e.g., by leaving out random words from large documents and train the model to fill in the gaps with the most likely missing word.
This foundation model by itself cannot translate from one language to another, but it has a good statistical model for all the languages it has been trained on because of the unsupervised pretraining.
It is the second step where the magic happens. This step is called finetuning.
During the finetuning step you start with the pretrained foundation model which has a basic understanding of one or more natural languages. And then you provide some examples for how to solve specific tasks. For example, you could finetune a text-to-text generation model to:
- Translate from one natural language into another one by providing pairs of translations,
- Summarize a text in any of the known languages by providing pairs of full texts as well as shorter summaries,
- Improve grammar or writing in general by providing pairs of original texts and optimized versions,
- Map texts to a predefined class, i.e., basically a text classification task,
- Determining the sentiment of a text by mapping texts to a sentiment class (a special case of the previous point),
- Write code based on human requests by providing pairs of comments and the corresponding source code,
- Create 3D designs based on natural language descriptions by providing enough pairs of describing texts and designs,
- And many more.
As you can see again and as we have said before, many of the other special tasks such as translation or summarization can also be treated as a text-to-text generation scenario.
Please note that for some of the tasks above, using a large language model is not necessary. Text classification and sentiment analysis can be done by other and simpler machine learning approaches. We have added them above nevertheless to show you how broad the range of use cases is which you can solve with the concept of translation models.
You can also see that the target of a text-to-text generation does not necessarily have to be natural language again. Programming code or 3D product designs are not natural languages per se. So, some of the tasks above are only “text generation” tasks in a more abstract sense. But this is the power of large language models – you can start with a good foundation model and finetune it so that it can solve many use cases based on the same foundation.
Before continuning, let’s discuss why this two-phase approach of building a foundation model and then performing finetuning is so powerful. The reason is that finetuning requires significantly fewer training examples and less training time since the model already comes with a good statistical understanding of the used language(s). While training a foundation model may require hundreds of compute nodes with thousands of GPUs, finetuning a model can often be done on commodity hardware in reasonable time.
Using a finetuning operator
As you have seen in the use case examples above, most finetuning tasks will require an input data set with additional training examples for the new task. In our example of text-to-text generation tasks, this input data needs to have at least two columns. One column which contains values used as input texts and another column with the target text of the generation task at hand.
Although we know that there are good translation models available, we will continue with our English-to-Dutch use case from before. We will use an example here where we provide pairs of texts in English and Dutch to a model which has been pretrained on those languages among many others but not on this particular translation task. This data set has two columns only: one which contains the English originals (the input) and one for the Dutch translations (the target).
Let’s also assume that you have already downloaded a foundation model such as "T5-base" from Huggingface using the Download Model operator, as described above.
You then simply connect the data as well as the location of the downloaded foundation model to the Finetune LLM (Translate) operator then:
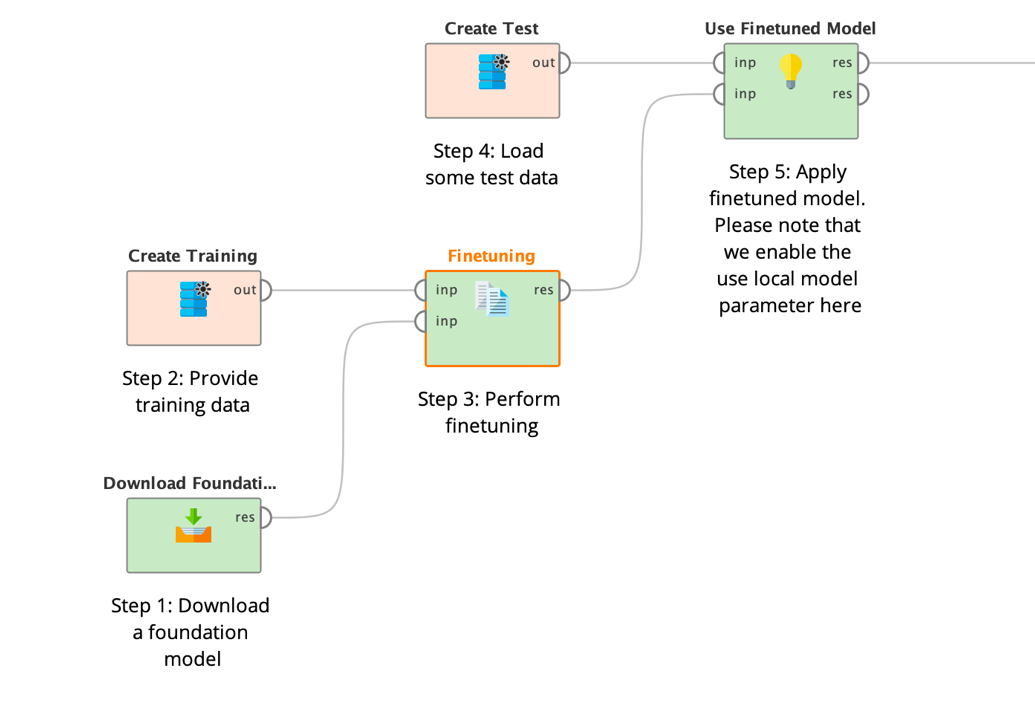
As you can see, the Finetuning operator does not produce a model object like many other machine learning operators in RapidMiner but again a file directory containing the contents of the large model. Please refer to the section about the Download Model operator for details about model storage.
The file object is delivered as input to the application operator (step 5 above) afterwards. See all parameters of the Finetuning operator below:
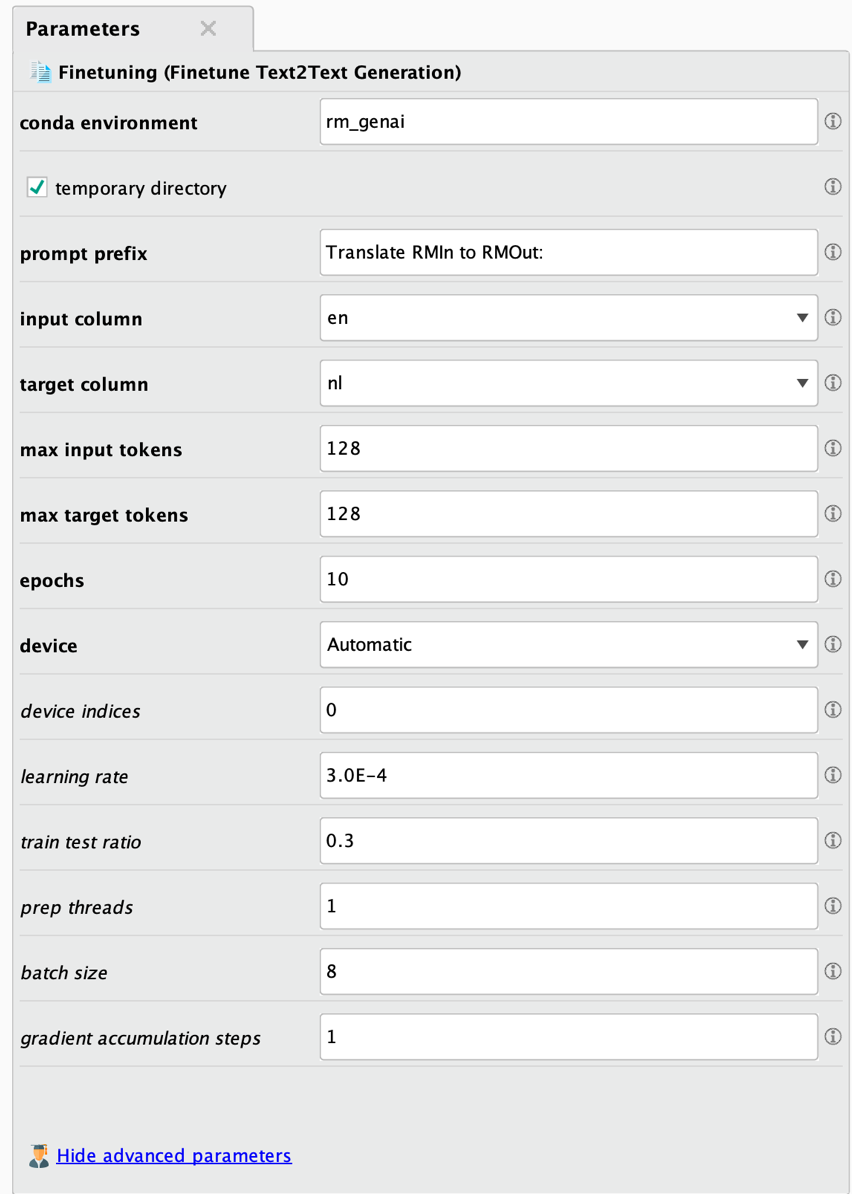
As always, the bold parameters at the top are the most important ones and must be changed / defined in all cases. Here are the parameter descriptions:
- Conda environment: The Conda environment used for this model task. Additional packages may be installed into this environment, please refer to the extension documentation for additional details on this and on version requirements for Python and some packages which have be present in this environment. Typically, you will use the environment you created when you installed the extension. Make sure that Python, Numpy, and Pandas are all installed but nothing else and that those three have the correct versions.
- Temporary directory: Indicates if the results should be stored in a temporary directory which will be delivered as output of this operator.
- Results directory (not shown above): The directory in which the resulting model, i.e., the fine-tuned model, will be stored in. Please note that larger models will require multiple gigabytes of disk space. This directory will only be used if no temporary directory shall be used. It will then be delivered as output of this operator.
- Prompt prefix: This prefix is used in front of each input to tell the finetuned model the task of this finetuning. This way the same model can solve multiple tasks by using different prefixes such as “Translate to German: “ or “Summarize this: “ or “Correct the grammar: “ etc.
- Input column: The name of the column which should be used as input for the finetuning.
- Target column: The name of the column which should be used as the target for this finetuning. Since this is a translation task, the model will try to learn how to translate the values from the input column to those in the target column.
- Max input tokens: The maximum number of tokens allowed for the inputs. Longer sequences will be ignored. Please note that larger numbers will increase runtimes so you should try to use numbers as small as possible. Also note that some models can only work with specific maximum numbers of tokens. Please refer to the model documentation pages on Huggingface for more information about such limits.
- Max target tokens: The maximum number of tokens allowed for the target or output of the finetuned model. Longer sequences will be ignored. Please note that larger numbers will increase runtimes so you should try to use numbers as small as possible. Also note that some models can only work with specific maximum numbers of tokens. Please refer to the model documentation pages on Huggingface for more information about such limits.
- Device: Where the finetuning should take place. Either on a GPU, a CPU, or Apple’s MPS architecture. If set to Automatic, the training will prefer the GPU if available and will fall back to CPU otherwise.
- Device indices: If you have multiple GPUs and computation is set up to happen on GPUs you can specify which ones are used with this parameter. Counting of devices starts with 0. The default of “0” means that the first GPU device in the system will be used, a value of “1” would refer to the second and so on. You can utilize multiple GPUs by providing a comma-separated list of device indices. For example, you could use “0,1,2,3” on a machine with four GPUs if all four should be utilized. Please note that RapidMiner performs data-parallel computation which means that the model needs to be small enough to be completely loaded on each of your GPUs.
- Epochs: The number of epochs for this finetuning. Values between 4 and 15 typically deliver the best results.
- Learning rate: The learning rate for this finetuning.
- Train test ratio: The ratio of rows which is used for testing the finetuned model.
- Prep threads: The number of parallel threads used for the data preprocessing.
- Batch size: The batch size for this fine-tuning. The number of GPUs x batch size x gradient accumulation steps should usually be a multiple of 8.
- Gradient accumulation steps: The gradient accumulation steps used for this fine-tuning. The number of GPUs x batch size x gradient accumulation steps should usually be a multiple of 8.
After setting the mandatory parameters, you typically want to minimize the number of input and target tokens based on your data and use case to reduce unnecessary runtimes. You may then try to optimize the other parameters and try different model types to optimize the results for your use case.
If you execute such a process, the training operator will first check if additional packages are required and, if yes, will download and install them. This may take some time before the finetuning even starts and you can check the progress in the log window of RapidMiner. Future runs will not repeat this download and installation process again.
After everything is ready the finetuning begins. Again, you can check the progress in the log window. After the operator is done it will store the final model into the specified model directory.
Generative AI with OpenAI
An alternative to using a specialized or finetuned local model as described above is to use a broad general-purpose model such as ChatGPT by OpenAI. The Generative Models extension contains an operator called Send Prompt which works exactly like the task operators described before, but it uses ChatGPT to get the answers to the specified prompt.
And what is even bigger: you can even finetune OpenAI’s models such as ChatGPT for yourself! More about this later in this section.
Please note that you will need an account with OpenAI. If you do not have one yet, please visit the web site and create a new account.
You will also need your organization ID as well as an API key. Get them here:
- Organization ID: https://platform.openai.com/account/org-settings
- API key: https://platform.openai.com/account/api-keys
You will very likely run into limits very soon, since OpenAI only allows a few queries for free. You can buy more requests on the OpenAI billing page.
Sending a prompt to OpenAI
After you have set up your account and gotten your organization ID and your API key, the usage of the Send Prompt operator is quite simple and very much like using one of the task operators described above. The main difference is that you do not provide a Huggingface model name or a local model directory as input to the OpenAI operators. But you can still select which of OpenAI’s models you want to use. If you want to use your own finetuned model, you can specify this here, too. Then all you need to do is to provide some input data and a prompt which can be send to OpenAI:
The parameters are also similar to the Huggingface task operators. As mentioned before, you will need to specify the organization ID and API key:
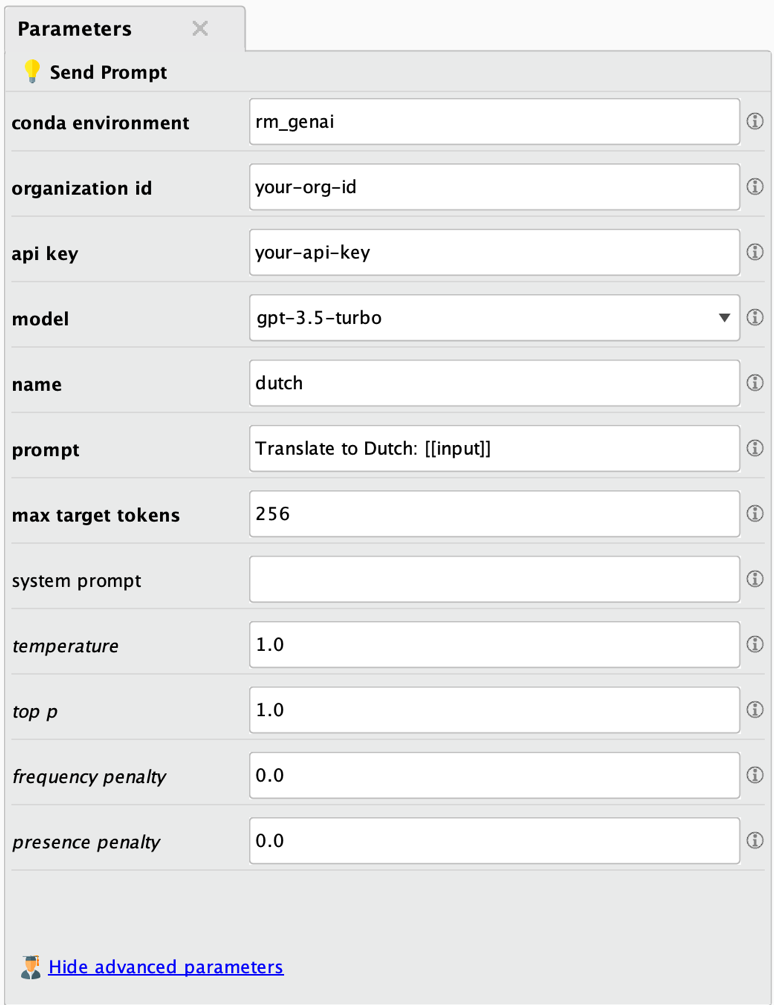
Here are the descriptions:
- Conda environment: See above for details. Typically, the same environment will be used as the one you used for finetuning, downloading, or any other task solved with an operator of this extension.
- Organization ID: The OpenAI organization ID which you can get from https://platform.openai.com/account/org-settings
- API Key: The OpenAI API key which you can create at https://platform.openai.com/account/api-keys
- Model: the name of the OpenAI model to use. If you want to use one of your own finetuned models, you will need to specify its model ID here.
- Name: The name of the new column which will be created as a result.
- Prompt: The prompt used for querying the model. Please note that you can reference the values of any of the input data columns with [[column_name]].
- Max target tokens: the maximum number of tokens which are produced by the model as answer.
- System prompt: The system prompt is an initialization prompt which can be sent to OpenAI to start a conversation. It often is used to let ChatGPT use a certain persona or style in answering such as “You are a factual chatbot which prefers short answers.”
- Temperature: Controls the randomness used in the answers. Lower values will lead to less random answers. A temperature of 0 represents a fully deterministic model behavior.
- Top P: Controls diversity via nucleus sampling. A value of 0.5 means that half of all likelihood-weighted options would be considered.
- Frequency penalty: How much to penalize new tokens based on their frequency in the answer so far.
- Presence penalty: How much to penalize new tokens based on their presence in the answer so far. Increases the model's likeliness to talk about new topics.
And just for sake of completeness here are the results of the same translation task we have seen before:

You may not speak Dutch but let me tell you that the results are of similar quality to the ones from the pretrained and downloaded Opus model. Powerful generic models such as GPT-3.5 or GPT-4 are certainly impressive; they can solve many different tasks. However, they are also massive in size and resource intensive. Therefore, we always recommend exploring smaller and more resource-saving models as an alternative, such as the Opus model which is only a fraction of the size.
Finetuning a model with OpenAI
Although OpenAI’s GPT models are very powerful and can solve many different tasks out of the box, you may encounter a need to finetune a GPT model. Keep in mind that the first step should be what is called prompt engineering, i.e., optimizing the prompts in a way to get the desired result.
But if prompt engineering fails, or the required output is unknown to the model, or you need a special answer structure, or the prompts get too long and unwieldy, this is where finetuning the model can be the best idea. The good news is that thanks to RapidMiner’s Generative Models extension, even finetuning a 175 billion parameter model such as ChatGPT becomes a matter of a few clicks!
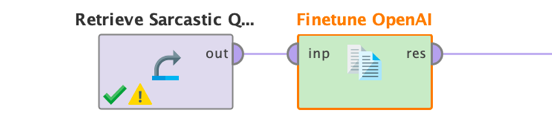
Let’s use a somewhat silly use case here. Suppose that you do not like the tone of GPT’s answers and would prefer a bit more sarcastic tone instead. All you need is a few examples of queries together with the desired output:
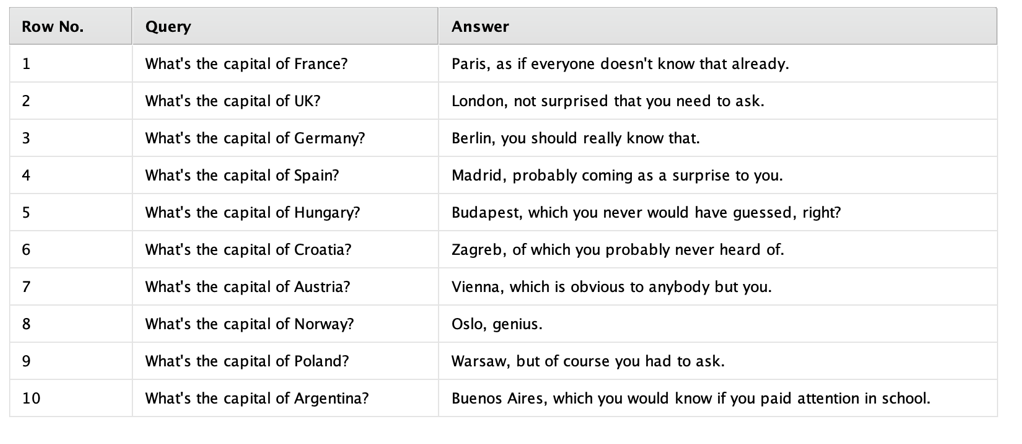
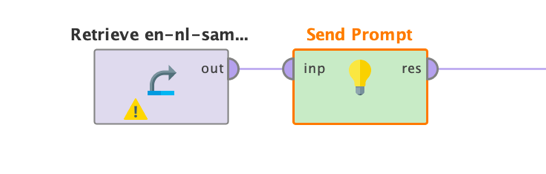
Perfect. Not nice to do such a thing, but let’s go with it for now. Such a data set can then be fed into the Finetune OpenAI operator like this:
That is easy enough. Now we simply need to set a few parameters of this operator:
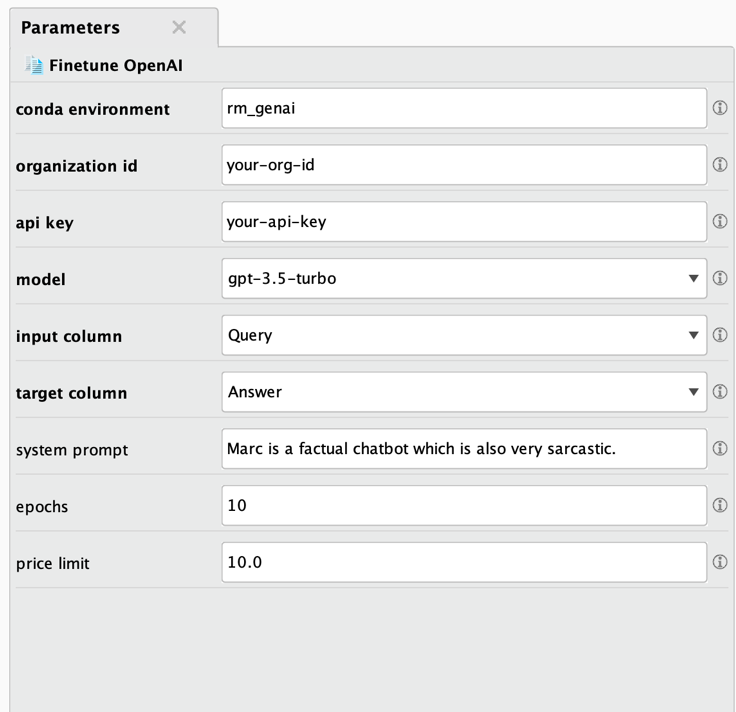
As always here are the descriptions:
- Conda environment: See above for details. Typically, the same environment will be used as the one you used for finetuning, downloading, or any other task solved with an operator of this extension.
- Organization ID: The OpenAI organization ID which you can get from https://platform.openai.com/account/org-settings
- API Key: The OpenAI API key which you can create at https://platform.openai.com/account/api-keys
- Model: the name of the OpenAI model to use. Please note that at the time of writing this document only a few of OpenAI’s models can be finetuned and that a finetuned model cannot be finetuned again.
- Input column: The name of the column containing the queries or prompts.
- Target column: The name of the column containing the desired answers to those queries or prompts.
- System prompt: The system prompt is an initialization prompt which can be sent to OpenAI to start a conversation. It often is used to let ChatGPT use a certain persona or style in answering such as “You are a factual chatbot which prefers short answers.”
- Epochs: The number of training epochs. Good values are typically between 5 and 20 epochs. Higher numbers can lead to overfitting but also would result in longer and more expensive finetuning jobs.
- Price limit: OpenAI charges for finetuning jobs per 1,000 processed tokens. Please refer to https://openai.com/pricing for the latest pricing information. Before finetuning is started, this operator will estimate the expected total price. If that estimation exceeds this limit (in USD), the finetuning will not be started and an error will be thrown to prevent too costly finetuning runs. You can find the details of the calculations in the log window of RapidMiner.
Please note that if you execute this process, it will upload your data to OpenAI and submit a finetuning job. This may take a while. After everything has been checked and if the estimated cost is below the defined price limit, the job is started and will work asynchronously on OpenAI’s cloud infrastructure. The operator will return a job overview like the following:
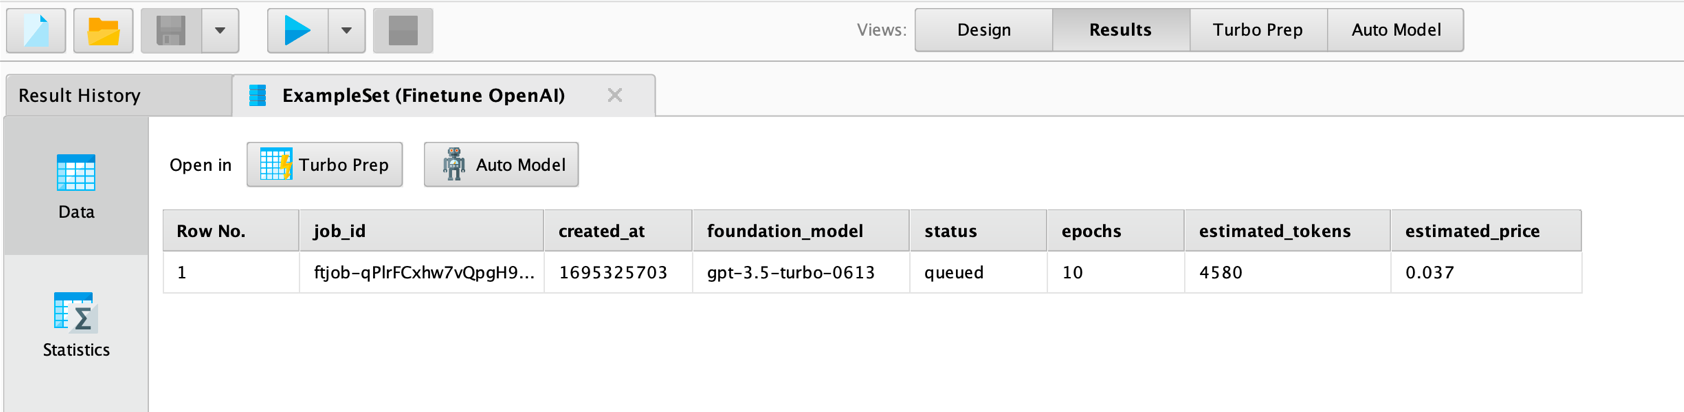
Please take note of the job_id column above. You will need it to retrieve the
status of the finetuning job and, after it has finished, also for retrieving
the model ID of the finetuned model. You will find the job ID also in the logs
of RapidMiner.
Now you could simply wait until OpenAI is done with the finetuning. You will receive an email to the address associated with the organization you have used. That email will also contain the model ID which you will need to use your finetuned model.
Another option you have is to use the operator Check Job Status with your job ID and see what is going on with your finetuning job:
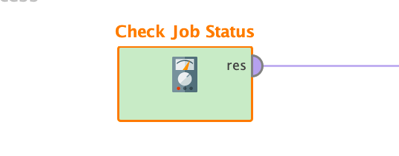
The operator has only a few parameters: your organization ID, your API key, and the job ID which was the result of the Finetune OpenAI operator as shown above. When you execute it, you will get information about your job and if it succeeded:
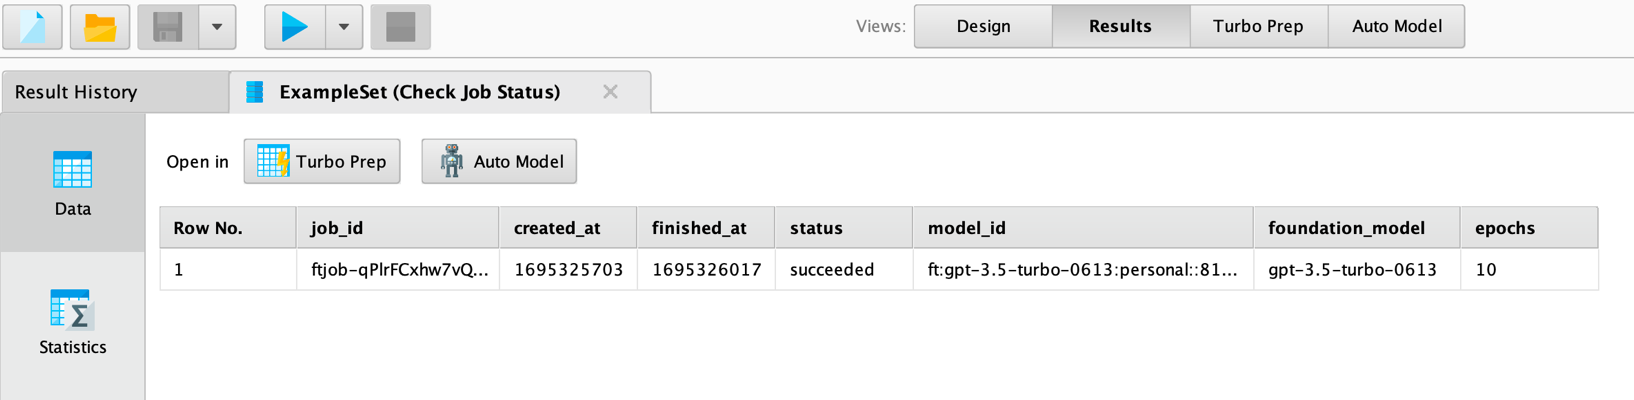
As you can see, the job we have submitted has succeeded. In this case you will also get a value for the model ID, otherwise it is empty. This model ID is then what you would use for the “model” parameter in the Send Prompt operator.
There are two more operators which can be helpful: Get Models and Delete Model. Get Models delivers all models you have finetuned with your organization so far. The result would also contain the IDs of the models. And Delete Model takes a model ID and deletes a model so that you can orchestrate your model management with RapidMiner workflows.
Next to Send Prompt you can also inspect your finetuned models in the OpenAI playground at https://platform.openai.com/playground. Here is how our finetuned model responds to some queries:
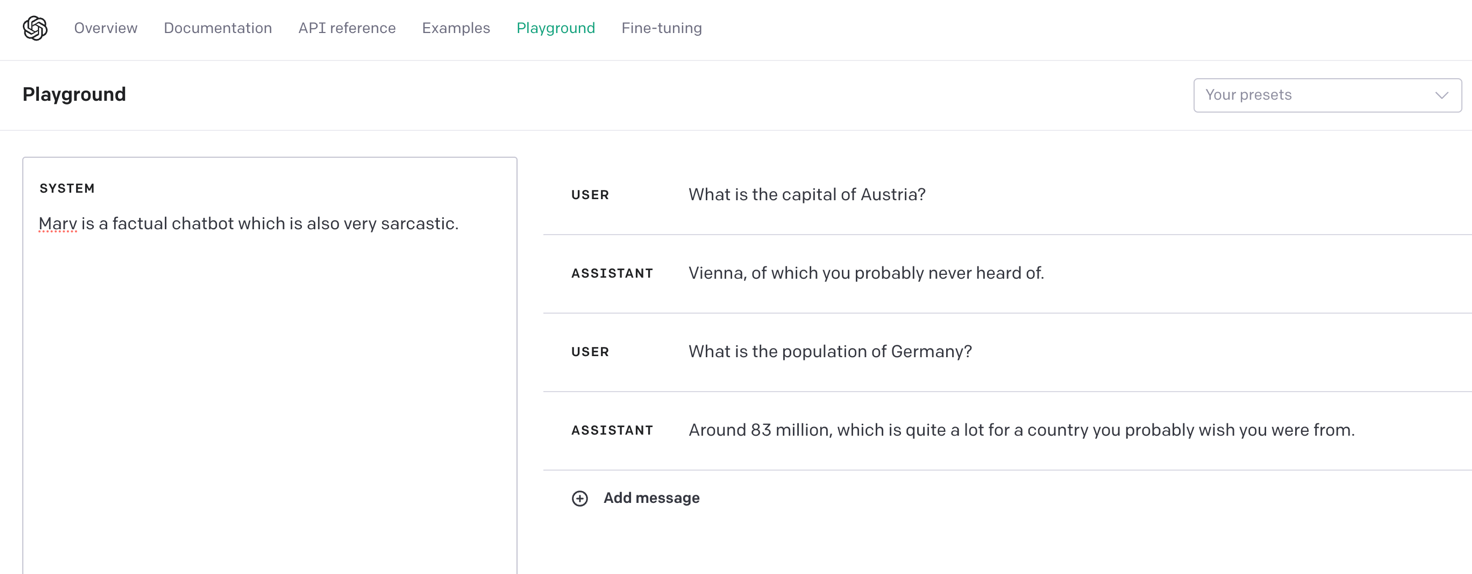
It is fair to say that our finetuned version of ChatGPT is more sarcastic than the normal one.
Bonus: Enriching your data with prompts
Sometimes people struggle to see how they can use large language models on their data, especially in combination with a powerful general purpose conversational model such as ChatGPT without a need for finetuning. One of the most useful use cases is the enrichment of your existing data with additional information.
Imagine you have a table in which one column contains the names of countries. And you would like to add additional columns with the countries’ GDP, population, capital and so on. Of course, you could do a web search and add the information yourself, but this can be done much more elegantly (and more efficiently, especially if you need to do something like this for thousands or millions of rows). Large language models to the rescue.
You can use the Huggingface models for some of these tasks, but this is really where models like ChatGPT can shine.
You can simply use the task operators for Huggingface or the Send Prompt operator for OpenAI on your data and can utilize the dynamic prompts of this extension. Using the Send Prompt operator, for example, is straightforward then:

We feed a list of countries as input to the Send Prompt operator. We can use prompts like these:
- Operator “Add Capital”: “What is the capital of [[Country]]? Only the answer, no prose”
- Operator “Add Population”: “What is the population of [[Country]]? Only give an exact number. No prose. No text.”
We also used a temperature of 0 to reduce the variability in the answers. Both, prompt like the one above as well as a lower temperature will deliver more factual answers without the “chat” around it. You also can experiment with different system prompts or even finetuning to achieve this. Finally, we can parse the numbers so that the textual answers become numerical columns in RapidMiner.
As you can see, you sometimes need to be a bit creative with your prompts to get the desired answers. But the result is impressive and can save a lot of time, in particular for more complex data enrichment or even data cleansing tasks.
Summary
As you have seen, it is extremely easy to use Generative AI models with RapidMiner. You have access to all Huggingface’s models for natural language processing. You can solve all new tasks such as summarization or text- to-text generation. Plus, you can use all these models as the foundation for your own finetuning. And as always with RapidMiner, all of this is possible without writing a single line of code.
The second group of operators gives you access to OpenAI’s very powerful conversational models and even allows you to finetune those, too. And, again, without the need for any coding skills.
It may take a while to get used to all the new use cases and tasks you can tackle with Generative AI. Unlike with traditional machine learning, generative AI allows you to become more creative and tackle more complex use cases where the desired outputs go beyond the prediction of simple classes (classification) or numbers (regression).
But with great power also comes great responsibility. Large language models are very resource-intensive and not always necessary for tackling your use case. Bigger also does not always mean better. Of course, you can use ChatGPT to translate a text. But you could also use one of the Opus models which are significantly smaller and perform just as well for translation tasks.
And always keep in mind that those models often have been trained on public sources from the internet. This introduces bias in those models and potentially could lead to copyright infringements. We truly believe in open approaches where not just the model but also the training data has been published to ensure that no harm is done. We do recommend that you put in the necessary caution and make sure that only trustworthy models are used.
But if you are cautious and use the right models, you can solve new and more complex problems than you could before. Have fun tackling new use cases with the Generative Models extension for RapidMiner!