You are viewing the RapidMiner Developers documentation for version 2024.0 - Check here for latest version
Bundle sample data with your extension
This article will guide you through:
- Assembling sample data
- Preparing the extension resources
- Adding data to the extension resources
- Registering a sample repository
Assembling sample data in your repository
First, create a new folder in your local repository, e.g., //Local Repository/Myextension Samples. Now add your data into this folder. You can add data via the wizard behind the ![]() Add data button, or use a process with a Store operator, or copy an existing repository entry. For our example, we choose the second option.
Add data button, or use a process with a Store operator, or copy an existing repository entry. For our example, we choose the second option.
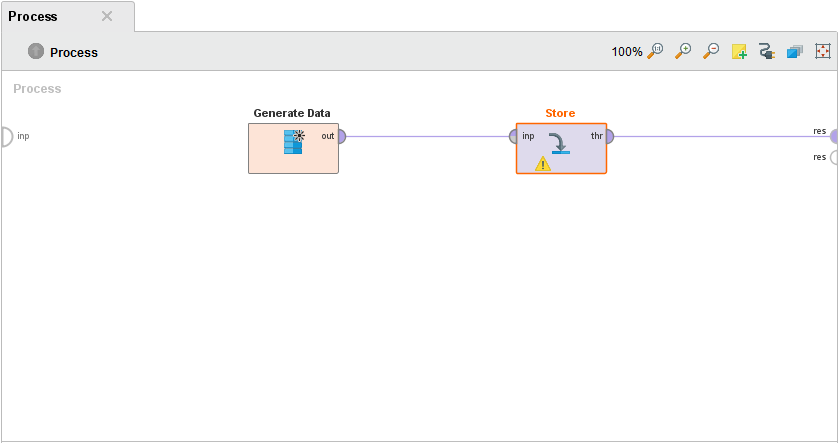
Drag and drop a Generate Data operator onto the process panel add a Store operator and connections.

Configure the Store operator to store the data set in the new folder, e.g., as //Local Repository/Myextension Samples/Custom data, and run the process.
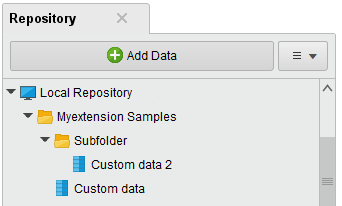
Add a subfolder, in our example called "Subfolder", to the Myextension Samples folder, copy the Custom data into it and rename it to Custom data 2. Your repository should now look like this:

Now that we have assembled the data we want to ship, we need to prepare a package in the extension, where the data will be copied to.
Preparing the extension resources
If you have no experience with writing extensions yet, please refer to our guide Create your own extension. Sections 1-3 cover all you need to know to build an extension that can be used to distribute sample repositories.
By convention build tools such as Maven and Gradle look for resources in the src/main/resources directory.
We recommend using this structure for Altair RapidMiner extensions as well.
Let us assume that you chose org.myorg.myextension as group id.
Then your resources should be located under src/main/resources/org/myorg/myextension.
Thus, you could choose the folder …/org/myorg/myextension/myextension_samples as location for your sample data:
my_extension
├── README.md
├── build.gradle
├── …
├── src
│   └── main
│       ├── java
│       │   └── …
│       └── resources
│           ├── org
│           │   └── myorg
│           │       └── myextension
│           │               └── myextension_samples
│           └── …
└── …
Note that the last part of the directory name, in our case myextension_samples, must be unique. If another extension uses the same name then your data might get substituted by the data from the other extension. In particular, the name cannot be samples as this name is already in use by Altair AI Studio itself.
Altair RapidMiner will not search for resources in that directory unless you register the location as resource source.
This can be easily done in the initialization code of your extension.
All you need to do is to add the following line to the initPlugin() method:
/**
 * This method will be called directly after the extension is initialized. This is the first
 * hook during start up. No initialization of the operators or renderers has taken place when
 * this is called.
 */
public static void initPlugin() {
    // register extension resources
    Tools.addResourceSource(new ResourceSource(PluginInitMyExtension.class.getClassLoader(),
        "org/myorg/myextension/"));
}
Adding data to the extension resources
Now, we copy the data assembled in the first step into the resources folder myextension_samples in the extension. For that, alternative-click on the Myextension Samples folder in the repository and choose Open in file browser. Copy its content and paste it into the resources folder myextension_samples:
 …
 └── myextension_samples
     ├── Subfolder
     │   ├── Custom data 2.ioo
     │   ├── Custom data 2.md
     │   └── Custom data 2.properties
     ├── Custom data.ioo
     ├── Custom data.md
     ├── Custom data.properties
     └── Subfolder.properties
In order for the content to get loaded there needs to be an additional CONTENTS file describing the file structure in every folder. The folder myextension_samples contains one folder and one file, so we add a file called "CONTENTS" with the following lines:
FOLDER Subfolder
ENTRY Custom data.ioo
Analogously, to the folder Subfolder we add a file called "CONTENTS" with the line:
ENTRY Custom data 2.ioo
The resulting file structure looks like this:
 …
 └── myextension_samples
     ├── Subfolder
     │   ├── CONTENTS
     │   ├── Custom data 2.ioo
     │   ├── Custom data 2.md
     │   └── Custom data 2.properties
     ├── CONTENTS
     ├── Custom data.ioo
     ├── Custom data.md
     ├── Custom data.properties
     └── Subfolder.properties
Registering a sample repository
To register the data added in the previous step, you need to add two more lines to the plugin initialization code:
public static void initPlugin() {
    // register extension resources
    Tools.addResourceSource(new ResourceSource(PluginInitMyExtension.class.getClassLoader(),
        "org/myorg/myextension/"));
    // create a new repository pointing to the resource folder
    Repository repository = new ResourceRepository("MyExtension Samples", "myextension_samples", false, false);
    // register the repository
    RepositoryManager.getInstance(null).addRepository(repository);
}
Please note that the second parameter of
new ResourceRepository("MyExtension Samples", "myextension_samples", false, false)
must the name of folder containing your data while the first parameter is the display name of your new repository. The last two parameters should be set to false to prevent your repository from containing a copy of the Templates and Tutorials subfolders that are already contained in the Samples repository in Altair AI Studio.
Testing the sample repository
There are no further special steps involved in testing the bundled repository.
All you need to do is to build a new version of your extension, e.g., via the command gradle clean installExtension.
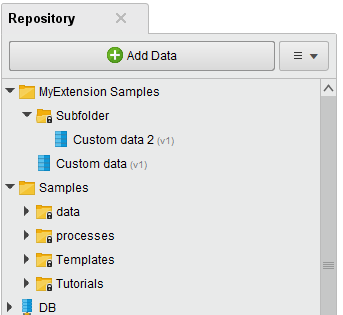
After a restart of Altair AI Studio your repository should look like this:
