You are viewing the RapidMiner Radoop documentation for version 8.0 - Check here for latest version
Operation and Maintenance
Installing RapidMiner Radoop functions manually
RapidMiner Radoop functions are installed automatically in the Hive database configured in the Radoop connection. The following manual installation steps are only required if Radoop (more precisely, the Hadoop user configured in the Radoop connection) is not allowed to create functions from jar files uploaded to the HDFS.
RapidMiner Radoop automatically uploads two files (radoop_hive-vX.jar and rapidminer_libs-<version>.jar) to the HDFS and uses them to define custom Hive functions (UDFs). For secure Hadoop clusters, this may be prohibited, so the Hadoop administrator needs to install these UDFs. There are two ways to do this:
- when using a Cloudera Distribution, use the Parcel provided by RapidMiner (recommended);
- distribute and install the jar files manually.
The following two step-by-step guides describes these two options.
First option: Installing the jar files using Cloudera parcel
RapidMiner Radoop UDFs are also available in Cloudera parcel format. The parcel can be obtained from the following URLs. Please note that you have to choose the URL based on RapidMiner Studio / Server version and not Radoop extension version.
| RapidMiner version | URL |
|---|---|
| 8.0 (latest) | https://radoop-parcel.rapidminer.com/latest/ |
| 7.6 | https://radoop-parcel.rapidminer.com/7.6.1/ |
| 7.5 | https://radoop-parcel.rapidminer.com/7.5.0/ |
The parcel can be installed through Cloudera Manager by clicking the parcel icon on the top toolbar:

Here you can see all the installed/configured/available parcels
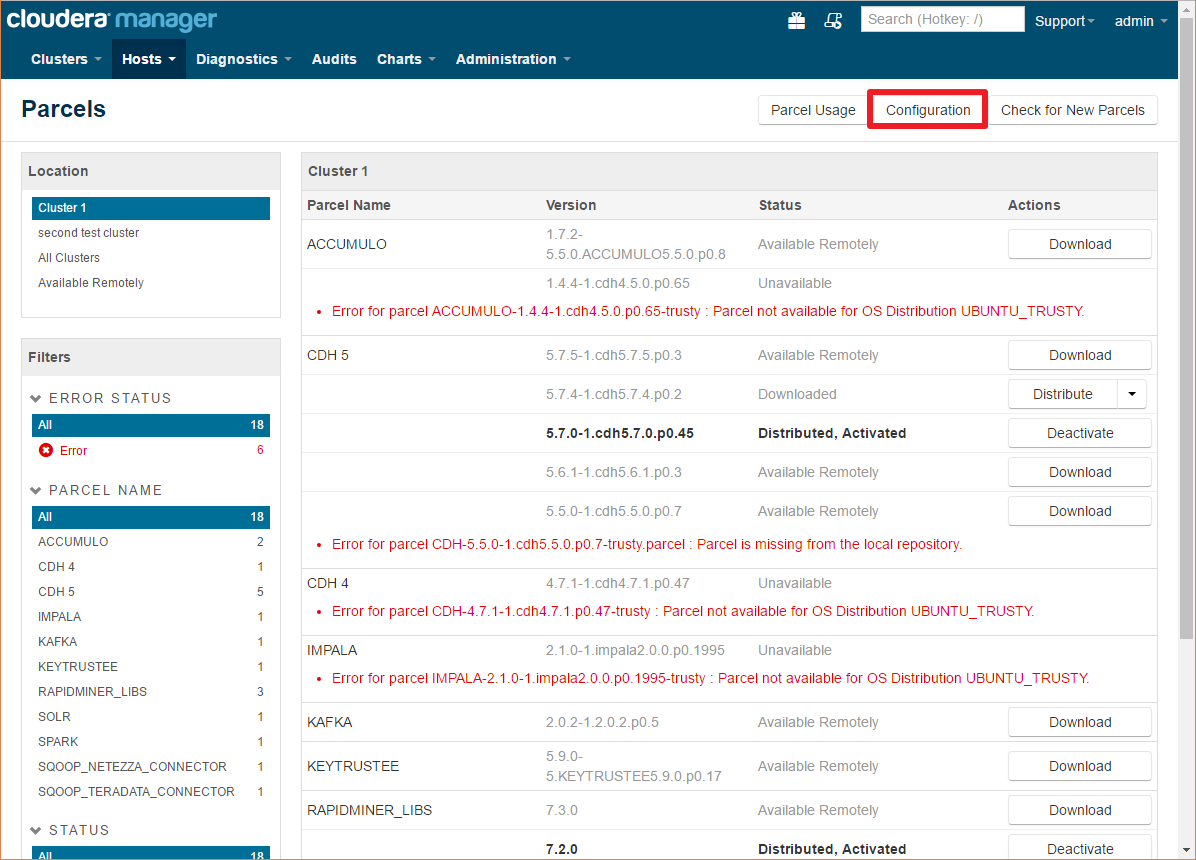
Click on the Configuration button and add the following URL to the Remote Parcel Repository URLs list by clicking any of the plus buttons:
https://radoop-parcel.rapidminer.com/latest/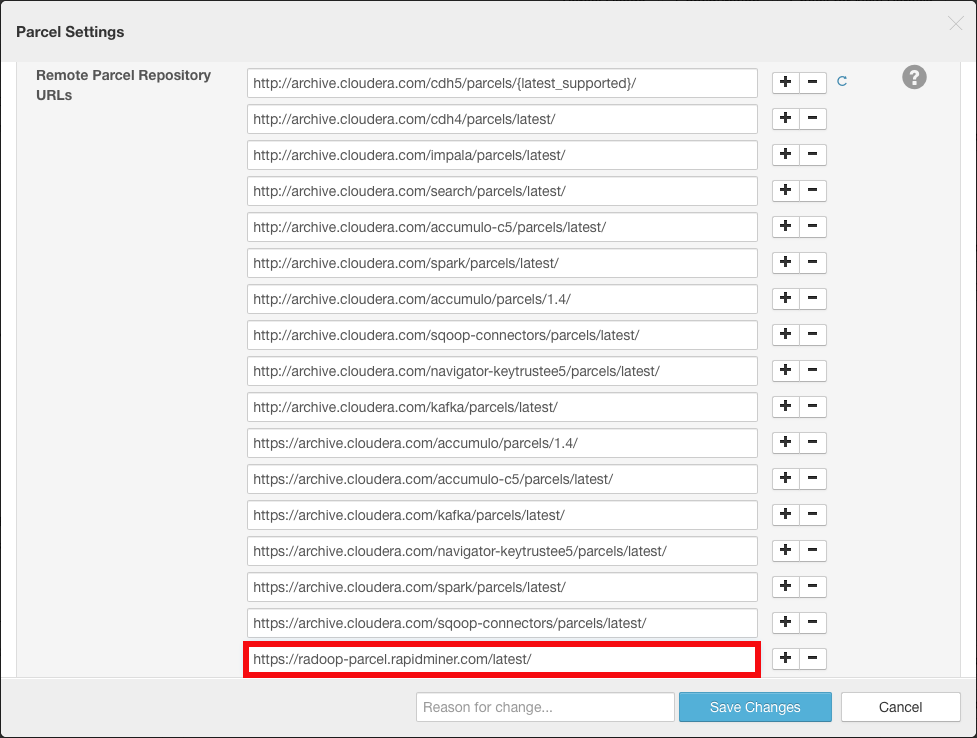
Depending on your configuration you may have multiple versions of the parcel listed with different statuses.
Click Download for the latest version


After the parcel has been downloaded you have to Distribute it to the nodes


The last step is to Activate the parcel

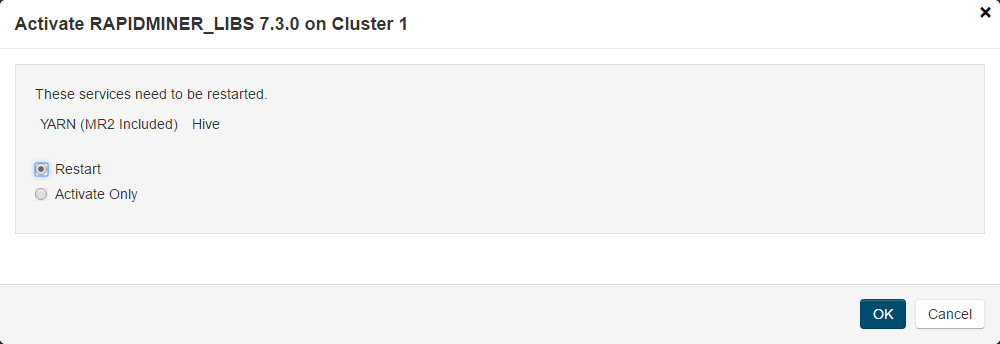
If the activate dialog does not display service restart options, you have restart Yarn and Hive services manually.
Create the UDFs in Hive with the script matching your Radoop Version
For more information about installing and managing Cloudera parcels please visit the Cloudera Manager documentation
Second option: Installing the jar files manually
RapidMiner Radoop automatically uploads two files (radoop_hive-vX.jar and rapidminer_libs-<version>.jar) to the HDFS and uses them to define custom Hive functions (UDFs). For secure Hadoop clusters, this is usually prohibited so the Hadoop administrator needs to install these UDFs manually. Even in case of a Hadoop cluster without security, you may decide to install these UDFs manually for performance reasons so they does not get distributed for each and every job. Note that a RapidMiner Radoop upgrade in this case may also require manual steps.
Download the two RapidMiner Radoop UDF JAR files. Please note that you have to choose the URL based on RapidMiner Studio / Server version and not Radoop extension version.
RapidMiner version Links 8.0 (latest) Model scoring UDF, Hive UDF 7.6 Model scoring UDF, Hive UDF 7.5 Model scoring UDF, Hive UDF Copy the downloaded JAR files to the local filesystem of every node. The path to the JAR files must be the same on each node. For example,
/usr/local/lib/radoop/radoop_hive-v4.jarand/usr/local/lib/radoop/rapidminer_libs-8.0.0.jar.Add the JAR files to the Hive classpath by copying or linking them into the $HIVE_HOME/lib/ folder. You need to do this only on the node that hosts the HiveServer2 service. Do not change the JAR file names.
Add the JAR files to the MapReduce application classpath by editing the
mapreduce.application.classpathproperty in the mapred-site.xml or do the same in Ambari or Cloudera Manager. For example, add/usr/local/lib/radoop/radoop_hive-v4.jar:/usr/local/lib/radoop/rapidminer_libs-8.0.0.jarto the existing value, separated by the:character. When using Hive on Tez, thetez.cluster.additional.classpath.prefixproperty (of tez-site.xml) should be changed instead ofmapreduce.application.classpath. Please note that these properties may be empty for some distributions. After this change, a YARN restart may be necessary.Restart HiveServer2.
Create the UDFs in Hive with the script matching your Radoop Version
When upgrading the cluster, the steps above may need to be performed again as for example Ambari deletes and recreates the $HIVE_HOME/lib/ folder. If the jar files are not present on every node, exceptions like org.apache.hive.com.esotericsoftware.kryo.KryoException: Unable to find class: eu.radoop.datahandler.hive.udf.GenericUDTFApplyModel may be thrown.
Create the functions manually
As an admin user (or a user that has CREATE FUNCTION privileges), connect to HiveServer2 (e.g. using Beeline), and create the permanent functions in all databases that RapidMiner Radoop users will connect to using the commands below. Please change the database name in the first line of the script, and execute the script for all relevant databases. You also have the opportunity of defining a database dedicated for Radoop UDFs, which should be used (and therefore accessible) by all Radoop users. The functions should be then created only for a single database.
For your Radoop connection check the UDFs are installed manually box on the Advanced Connection Properties window.
USE radoop_user_sandbox;
DROP FUNCTION IF EXISTS r3_add_file;
DROP FUNCTION IF EXISTS r3_apply_model;
DROP FUNCTION IF EXISTS r3_correlation_matrix;
DROP FUNCTION IF EXISTS r3_esc;
DROP FUNCTION IF EXISTS r3_gaussian_rand;
DROP FUNCTION IF EXISTS r3_greatest;
DROP FUNCTION IF EXISTS r3_is_eq;
DROP FUNCTION IF EXISTS r3_least;
DROP FUNCTION IF EXISTS r3_max_index;
DROP FUNCTION IF EXISTS r3_nth;
DROP FUNCTION IF EXISTS r3_pivot_collect_avg;
DROP FUNCTION IF EXISTS r3_pivot_collect_count;
DROP FUNCTION IF EXISTS r3_pivot_collect_max;
DROP FUNCTION IF EXISTS r3_pivot_collect_min;
DROP FUNCTION IF EXISTS r3_pivot_collect_sum;
DROP FUNCTION IF EXISTS r3_pivot_createtable;
DROP FUNCTION IF EXISTS r3_score_naive_bayes;
DROP FUNCTION IF EXISTS r3_sum_collect;
DROP FUNCTION IF EXISTS r3_which;
DROP FUNCTION IF EXISTS r3_sleep;
CREATE FUNCTION r3_add_file AS 'eu.radoop.datahandler.hive.udf.GenericUDFAddFile';
CREATE FUNCTION r3_apply_model AS 'eu.radoop.datahandler.hive.udf.GenericUDTFApplyModel';
CREATE FUNCTION r3_correlation_matrix AS 'eu.radoop.datahandler.hive.udf.GenericUDAFCorrelationMatrix';
CREATE FUNCTION r3_esc AS 'eu.radoop.datahandler.hive.udf.GenericUDFEscapeChars';
CREATE FUNCTION r3_gaussian_rand AS 'eu.radoop.datahandler.hive.udf.GenericUDFGaussianRandom';
CREATE FUNCTION r3_greatest AS 'eu.radoop.datahandler.hive.udf.GenericUDFGreatest';
CREATE FUNCTION r3_is_eq AS 'eu.radoop.datahandler.hive.udf.GenericUDFIsEqual';
CREATE FUNCTION r3_least AS 'eu.radoop.datahandler.hive.udf.GenericUDFLeast';
CREATE FUNCTION r3_max_index AS 'eu.radoop.datahandler.hive.udf.GenericUDFMaxIndex';
CREATE FUNCTION r3_nth AS 'eu.radoop.datahandler.hive.udf.GenericUDFNth';
CREATE FUNCTION r3_pivot_collect_avg AS 'eu.radoop.datahandler.hive.udf.GenericUDAFPivotAvg';
CREATE FUNCTION r3_pivot_collect_count AS 'eu.radoop.datahandler.hive.udf.GenericUDAFPivotCount';
CREATE FUNCTION r3_pivot_collect_max AS 'eu.radoop.datahandler.hive.udf.GenericUDAFPivotMax';
CREATE FUNCTION r3_pivot_collect_min AS 'eu.radoop.datahandler.hive.udf.GenericUDAFPivotMin';
CREATE FUNCTION r3_pivot_collect_sum AS 'eu.radoop.datahandler.hive.udf.GenericUDAFPivotSum';
CREATE FUNCTION r3_pivot_createtable AS 'eu.radoop.datahandler.hive.udf.GenericUDTFCreatePivotTable';
CREATE FUNCTION r3_score_naive_bayes AS 'eu.radoop.datahandler.hive.udf.GenericUDFScoreNaiveBayes';
CREATE FUNCTION r3_sum_collect AS 'eu.radoop.datahandler.hive.udf.GenericUDAFSumCollect';
CREATE FUNCTION r3_which AS 'eu.radoop.datahandler.hive.udf.GenericUDFWhich';
CREATE FUNCTION r3_sleep AS 'eu.radoop.datahandler.hive.udf.GenericUDFSleep';
Cleanup of RapidMiner Radoop temporary tables
As an advanced analytics solution, RapidMiner Radoop is able to push very complex processes to Hadoop. It creates temporary objects (tables, views, directories, files) in Hadoop during process validation, process execution, during data import or full connection test. These objects are deleted automatically as soon as they are not needed anymore. Namely, once a process or an import job or a full connection test completes or fails, all related objects are deleted.
For processes, this default behavior may be altered: if the cleaning parameter of the Radoop Nest operator is unchecked, then these objects will not be removed after a process completes. The only reason why you may want to disable the cleaning is debugging. During normal operation, it should always be enabled, since temporary objects may consume an increasing amount of space on the HDFS.
During normal operation, all temporary objects should be cleaned up if every process, connection test or import job either completes or fails. However, there are a few cases, when temporary objects are not deleted:
- RapidMiner Studio is closed (or the Server is killed) while a process or the cleaning phase is still running;
- a breakpoint is used, so the process is stopped and then it is not resumed after that;
- the connection is lost before the process or the cleaning phase completes.
In these cases, temporary objects will still be automatically removed by the periodic cleaning service. When running RapidMiner Studio with RapidMiner Radoop, the software periodically checks for potentially remaining temporary objects that are older than 5 days (by default), and removes the objects it finds. The interval for this service can be modified by specifying an interval in days in the Settings / ![]() Preferences / Radoop / Automatic cleaning interval setting.
Preferences / Radoop / Automatic cleaning interval setting.
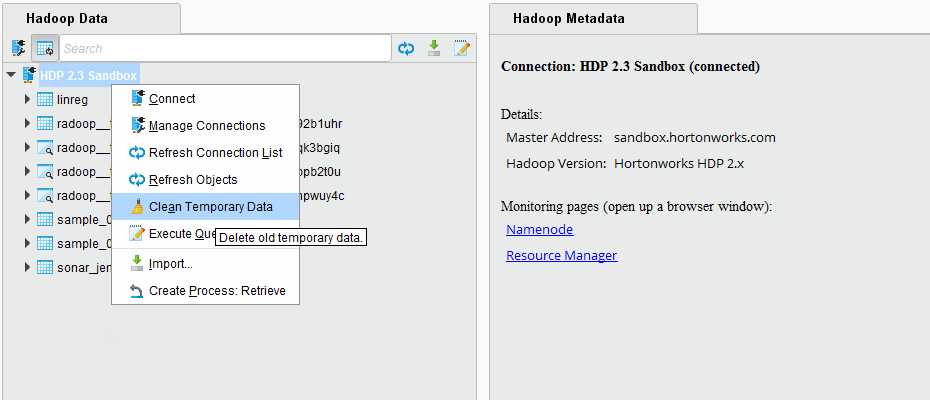
The temporary objects can also be explicitly removed on the Hadoop Data view. Right click on a connection, and choose the menu item Clean Temporary Data. The pop-up dialog will ask how many days it should look back, meaning that it will consider objects older than this interval. You may select 0, which will delete all temporary objects for your user. Please note that if you have processes currently running on this cluster, then removing all temporary objects may break their run. The pop-up dialog will immediately report the number of objects that you are about to delete.
Temporary objects can also be manually removed by a user with appropriate privileges, e.g. an administrator. This way, you may also delete other user's temporary objects which may break their process runs, so only use do this, if you are confident that it is safe to delete the objects you select.
Temporary tables and views can be easily distinguished from normal tables and views, because they use a common prefix: radoop_ by default. They also contain the name of the user that creates the object (consisting only of lowercase alphanumerical characters and the underscore character). This prefix can be changed. Use the Settings /
 Preferences / Radoop / Table prefix setting or the table prefix parameter of the Radoop Nest operator to change the default prefix of these temporary objects. On the Hadoop Data view you can easily filter for this prefix, select all your remaining temporary objects and delete them. The object names also contain a timestamp, so an ascending ordering shows the oldest objects on top.
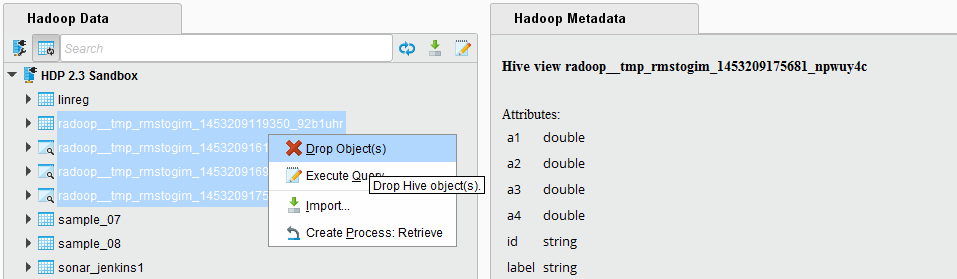
Temporary files and directories on the HDFS do not show up in the object list, so they are not visible in RapidMiner Studio. It is unlikely that remaining temporary files may consume significant space on the HDFS, nevertheless, a Hadoop administrator can easily remove them from the directory
hdfs:///tmp/radoop/<username>/. All temporary directory names start with the prefix tmp_. The following command removes all temporary files of a particular user (replace<username>in the command).hadoop fs -rm -r -skipTrash /tmp/radoop/<username>/tmp_*