You are viewing the RapidMiner Radoop documentation for version 8.0 - Check here for latest version
Distribution-specific Notes
For certain Hadoop distributions, you may need to complete additional client-side configuration using the Advanced Connection Properties window. Cluster modifications usually need an SSH connection or access to a Hadoop management tool (for example, Cloudera Manager or Ambari). You may need to contact your Hadoop administrator to perform the cluster configuration steps.
Connecting to a CDH 5.10 Quickstart VM
Start and configure the Quickstart VM
-
Download the Cloudera Quickstart VM (version 5.10) from the Cloudera website.
-
Import the OVA packaged VM to your virtualization environment (Virtualbox and VMware are covered in this guide).
-
It is strongly recommended to upgrade to Java 1.8 on the single-node cluster provided by the VM. Otherwise, the execution of Single Process Pushdown and Apply Model operators will fail.
You can take the following steps only if no clusters or Cloudera management services have been started yet. For the full upgrading process, read Cloudera’s guide.
Upgrading to Java 1.8:
- Start the VM.
- Download and unzip JDK 1.8 – preferrably jdk1.8.0_60 – to
/usr/java/jdk1.8.0_60. -
Add the following configuration line to
/etc/default/cloudera-scm-server:export JAVA_HOME=/usr/java/jdk1.8.0_60 - Launch Cloudera Express (or Enterprise trial version).
-
Open a web browser, and log in to Cloudera Manager (
quickstart.cloudera:7180) usingcloudera/clouderaas credentials. Navigate to Hosts / quickstart.cloudera / Configuration. In Java Home Directory field, enter/usr/java/jdk1.8.0_60 - On the home page of Cloudera Manager, (re)start the Cloudera QuickStart cluster and Cloudera Management Service as well.
-
If you are using Virtualbox, make sure that the VM is shut down, and set the type of the primary network adapter from NAT to Host-only. The VM will work only with this setting in a Virtualbox environment.
-
Start the VM and wait for the boot to complete. A browser with some basic information will appear.
-
Edit your local
hostsfile (on your host operating system, not inside the VM) and add the following line (replace<vm-ip-address>with the IP address of the VM):<vm-ip-address> quickstart.cloudera
Setup the connection in RapidMiner Studio
-
Click on
 New Connection button and choose
  Add Connection Manually
 -
Add
quickstart.clouderaas Master Address -
Select Cloudera Hadoop (CDH5) as Hadoop version
-
Add the following entry to the Advanced Hadoop Parameters:
Key Value dfs.client.use.datanode.hostnametrue(This parameter is not required when using the Import Hadoop Configuration Files option):
Key Value mapreduce.map.java.opts-Xmx256m -
If you want to use Spark operators, select the appropriate Spark Version (this should be Spark 1.6 if you want use the VM’s built-in Spark assembly jar) and set the Assembly Jar Location to the following value:
local:///usr/lib/spark/lib/spark-assembly.jar
Connecting to a HDP 2.5 or 2.6 (up to 2.6.1) Sandbox VM
WARNING! This documentation only works for HDP Sanbox version 2.6.1 and below. Please check newer versions of this documentation page for more recent versions.
Start and configure the Sandbox VM
-
Download the Hortonworks Sandbox VM (version 2.5 or 2.6) from the Hortonworks website.
-
Import the OVA packaged VM to your virtualization environment (Virtualbox and VMware are covered in this guide).
-
If you are using Virtualbox, make sure that the VM is shut down, and set the type of the primary network adapter from NAT to Host-only. The Sandbox will work only with this setting in a Virtualbox environment.
-
Start the VM and wait for the boot to complete. Write down the IP address of the VM:
- in a VMware environment it is printed to the console;
- in a Virtualbox environment you should switch to the login console (Alt+F5), login with the credentials (username:
root, password:hadoop– you may have already been asked to change this after first login) and typeip a.
-
Enable remote access to the DataNode and the JobHistory Server by running the following commands as root on the VM:
 iptables -t nat -A DOCKER ! -i docker0 -p tcp --dport 50010 -j DNAT --to-destination 172.17.0.2:50010
 iptables -t nat -A DOCKER ! -i docker0 -p tcp --dport 10020 -j DNAT --to-destination 172.17.0.2:10020
In HDP Sandbox 2.6, access to YARN services should also be enabled, and some firewall acceptance rules should be applied by these additional commands:
iptables -t nat -A DOCKER ! -i docker0 -p tcp --dport 8030 -j DNAT --to-destination 172.17.0.2:8030 iptables -t nat -A DOCKER ! -i docker0 -p tcp --dport 8025 -j DNAT --to-destination 172.17.0.2:8025 iptables -A DOCKER -d 172.17.0.2/32 ! -i docker0 -o docker0 -p tcp -m tcp --dport 50010 -j ACCEPT iptables -A DOCKER -d 172.17.0.2/32 ! -i docker0 -o docker0 -p tcp -m tcp --dport 10020 -j ACCEPT iptables -A DOCKER -d 172.17.0.2/32 ! -i docker0 -o docker0 -p tcp -m tcp --dport 8030 -j ACCEPT iptables -A DOCKER -d 172.17.0.2/32 ! -i docker0 -o docker0 -p tcp -m tcp --dport 8025 -j ACCEPT -
To make these settings persistent after reboot, execute the following:
 echo "iptables -t nat -A DOCKER ! -i docker0 -p tcp --dport 50010 -j DNAT --to-destination 172.17.0.2:50010" >> /root/start_scripts/start_sandbox.sh
 echo "iptables -t nat -A DOCKER ! -i docker0 -p tcp --dport 10020 -j DNAT --to-destination 172.17.0.2:10020" >> /root/start_scripts/start_sandbox.sh
(Only in HDP Sandbox 2.6 :)
echo "iptables -t nat -A DOCKER ! -i docker0 -p tcp --dport 8030 -j DNAT --to-destination 172.17.0.2:8030" >> /root/start_scripts/start_sandbox.sh echo "iptables -t nat -A DOCKER ! -i docker0 -p tcp --dport 8025 -j DNAT --to-destination 172.17.0.2:8025" >> /root/start_scripts/start_sandbox.sh echo "iptables -A DOCKER -d 172.17.0.2/32 ! -i docker0 -o docker0 -p tcp -m tcp --dport 50010 -j ACCEPT" >> /root/start_scripts/start_sandbox.sh echo "iptables -A DOCKER -d 172.17.0.2/32 ! -i docker0 -o docker0 -p tcp -m tcp --dport 10020 -j ACCEPT" >> /root/start_scripts/start_sandbox.sh echo "iptables -A DOCKER -d 172.17.0.2/32 ! -i docker0 -o docker0 -p tcp -m tcp --dport 8030 -j ACCEPT" >> /root/start_scripts/start_sandbox.sh echo "iptables -A DOCKER -d 172.17.0.2/32 ! -i docker0 -o docker0 -p tcp -m tcp --dport 8025 -j ACCEPT" >> /root/start_scripts/start_sandbox.sh -
Edit your local
hostsfile (on your host operating system, not inside the VM) and add the following line (replace<sandbox-ip-address>with the IP address from the previous step):<sandbox-ip-address> sandbox.hortonworks.com -
Reset Ambari access. Use an SSH client to login to sandbox.hortonworks.com as root using port 2222. (For example, on OS X or Linux, use the command
ssh root@sandbox.hortonworks.com -p 2222.)- Run
ambari-admin-password-resetas root user. - Provide a new admin password for Ambari.
- Run
ambari-agent restart.
- Run
-
Open the Ambari website:
http://sandbox.hortonworks.com:8080- Login with
adminand the password you chose in the previous step. - Navigate to the YARN / Configs / Memory configuration page.
- Set the node’s memory to at least
4 GBand click Save. Please note that Ambari may recommend to modify some related properties automatically. If so, unticktez.runtime.io.sort.mbto keep its original value. - Navigate to the Hive / Configs / Advanced configuration page.
- Add the
hive.security.authorization.sqlstd.confwhitelist.appendsetting as a new property to both Custom hive-site and Custom hiveserver2-site. The value should the following (it must contain no whitespaces):radoop\.operation\.id|mapred\.job\.name|hive\.warehouse\.subdir\.inherit\.perms|hive\.exec\.max\.dynamic\.partitions|hive\.exec\.max\.dynamic\.partitions\.pernode|spark\.app\.name
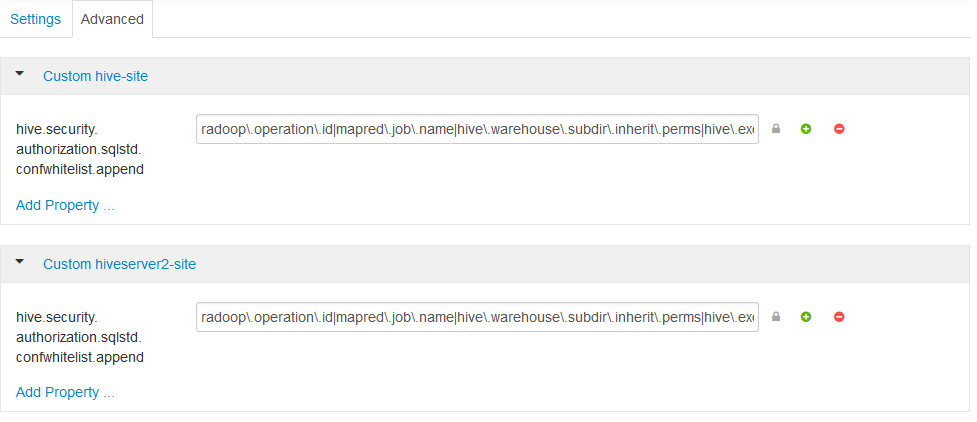
- Save the configuration and restart all affected services.
- Login with
-
For enabling Spark operators, you should copy the assembly JAR to the HDFS on the Sandbox machine. Use an SSH client to login to sandbox.hortonworks.com as root using port 2222. Copy the jar to the HDFS:
 sudo -u hdfs hadoop fs -mkdir -p /user/spark
 sudo -u hdfs hadoop fs -put /usr/hdp/current/spark-client/lib/spark-assembly-*.jar /user/spark/spark-assembly.jar
If you know the exact name and location of the assembly jar on the VM, this step can be skipped.
Setup the connection in RapidMiner Studio
-
Click on
New Connection button and choose Add Connection Manually -
Add
sandbox.hortonworks.comas Master Address -
Select
Hortonworks HDP 2.xas Hadoop version -
If you are connecting to HDP Sandbox 2.6, please check Change default ports and set the Resource Manager Port to
8032. -
Add the following entry to the Advanced Hadoop Parameters:
Key Value dfs.client.use.datanode.hostnametrue(This parameter is not required when using the Import Hadoop Configuration Files option):
Key Value mapreduce.map.java.opts-Xmx256m -
If you want to use Spark operators, select the appropriate Spark Version (this should be Spark 1.6 if you want use the VM’s built-in Spark assembly jar) and set Assembly Jar Location to the following value:
hdfs:///user/spark/spark-assembly.jarYou can provide the local path of the JAR on the Advanced Connection Properties window with the
local://prefix.
It is highly recommended to use ![]() New Connection /
New Connection / ![]() Import from Cluster Manager option to create the connection directly from the configuration retrieved from Cloudera Manager. If you do not have a Cloudera Manager account that has access to the configuration, an administrator should be able to Download Client Configuration. Using the client configuration files, choose
Import from Cluster Manager option to create the connection directly from the configuration retrieved from Cloudera Manager. If you do not have a Cloudera Manager account that has access to the configuration, an administrator should be able to Download Client Configuration. Using the client configuration files, choose ![]() New Connection /
New Connection / ![]() Import Hadoop Configuration Files to create the connection from those files.
Import Hadoop Configuration Files to create the connection from those files.
If security is enabled on the cluster, make sure you check Configuring Apache Sentry authorization section of the Hadoop Security chapter.
Configuring Spark
If you are using Spark 1.6 version you may need to select Spark 1.6 (CDH) for more recent Cloudera Hadoop releases and Spark 1.6 for older releases. Select any of them and then run the Spark job test (enable only this test in ![]() Full Test… /
Full Test… / ![]() Customize…) that automatically detects the proper version for you. Please choose the setting that this test recommends.
Customize…) that automatically detects the proper version for you. Please choose the setting that this test recommends.
Using any other Spark version should be straightforward.
The following describes setup for HDP 2.2.6, 2.3.0, 2.3.2, 2.3.4, 2.4.0 and 2.5.0. Setup for other HDP versions should be similar.
Configuring the cluster
If there are restrictions on Hive commands on your cluster (for example, SQL Standard Based Hive Authorization is enabled on it), then the change of certain properties through HiveServer2 must be explicitly enabled. This is required if you get the following error message when running a Full Test in RapidMiner Radoop: Cannot modify radoop.operation.id at runtime. In this case a property must be added on the Ambari interface to resolve this issue.
- Login to the Ambari interface.
- Navigate to the Hive / Configs / Advanced configuration page
- Add the
hive.security.authorization.sqlstd.confwhitelist.appendsetting as a new property to both Custom hive-site and Custom hiveserver2-site. The value should the following (it must contain no whitespaces):radoop\.operation\.id|mapred\.job\.name|hive\.warehouse\.subdir\.inherit\.perms|hive\.exec\.max\.dynamic\.partitions|hive\.exec\.max\.dynamic\.partitions\.pernode|spark\.app\.name
- Save the configuration and restart the proposed services.
For a more detailed explanation, see the Hadoop security section.
To enable Spark operators in RapidMiner Radoop, make the following changes in the Advanced Connection Properties window:
-
Select the appropriate Spark Version option in the Spark Settings. If Spark is installed with Ambari, the Spark Version depends on the cluster’s HDP version.
HDP version Spark assembly JAR location 2.6.x Spark 1.6 or Spark 2.1 / Spark 2.2 2.5.x Spark 1.6 or Spark 2.0 2.4.x Spark 1.6 2.3.4 Spark 1.5 2.3.2 Spark 1.4 or below 2.3.0 Spark 1.4 or below 2.2.6 Spark 1.4 or below -
Set the Assembly Jar Location / Spark Archive path to point to the Spark location on your cluster. The following table contains the default local locations depending on your HDP version. Refer to your Hadoop administrator if the specified path does not seem to work.
HDP version Spark 1.x assembly JAR location Spark 2.x archive path 2.6.x local:///usr/hdp/current/spark-client/lib/spark-hdp-assembly.jarlocal:///usr/hdp/current/spark2-client/jars/2.5.0 local:///usr/hdp/current/spark-client/lib/spark-hdp-assembly.jar2.4.2 local:///usr/hdp/current/spark-client/lib/spark-assembly.jar2.4.0 local:///usr/hdp/current/spark-client/lib/spark-assembly-1.6.0.2.4.0.0-169-hadoop2.7.1.2.4.0.0-169.jar2.3.4 local:///usr/hdp/current/spark-client/lib/spark-assembly-1.5.2.2.3.4.0-3485-hadoop2.7.1.2.3.4.0-3485.jar2.3.2 local:///usr/hdp/current/spark-client/lib/spark-assembly-1.4.1.2.3.2.0-2950-hadoop2.7.1.2.3.2.0-2950.jar2.3.0 local:///usr/hdp/current/spark-client/lib/spark-assembly-1.3.1.2.3.0.0-2557-hadoop2.7.1.2.3.0.0-2557.jar2.2.6 local:///usr/hdp/current/spark-client/lib/spark-assembly-1.2.1.2.2.6.0-2800-hadoop2.6.0.2.2.6.0-2800.jar
Notes on security
If you receive a permission error during connection Full Test, verify that:
- The
/user/<hadoop_username>directory exists on the HDFS and is owned by <hadoop_username>. (If the Hadoop username setting is empty, the client OS username is used.) - The <hadoop_username> has write privileges on
/user/historydirectory on the HDFS.
SQL Standard Based Hive Authorization may require that the user running HiveServer2 owns the files and directories loaded into Hive. This can disrupt the normal operation of RapidMiner Radoop. In case of a permission error, consult your Hadoop administrator.
Connecting to an Azure HDInsight 3.5 cluster using Radoop Proxy
RapidMiner Radoop supports Azure HDInsight 3.5, a cloud-based Hadoop service that is built upon Hortonworks Data Platform (HDP) distribution. If RapidMiner Radoop does not run inside the Azure network, there are a couple of options for the networking setup. A solution like Azure ExpressRoute or a VPN can simplify the setup. However, if those options are not available, the HDInsight clusters can be accessed using Radoop Proxy, which coordinates all the communication between RapidMiner Studio and the cluster resources. Since this setup is the most complex, this guides assumes this scenario, feel free to skip steps that are not required because of an easier networking setup.
For a proper networking setup, a RapidMiner Server instance (with Radoop Proxy enabled) should be installed on an additional machine that is located in the same virtual network as the cluster nodes. The following guide provides the necessary steps for establishing a proxied connection to an HDInsight cluster.
Starting an HDInsight cluster
If you already have an HDInsight cluster running in the Azure network, skip these steps entirely.
-
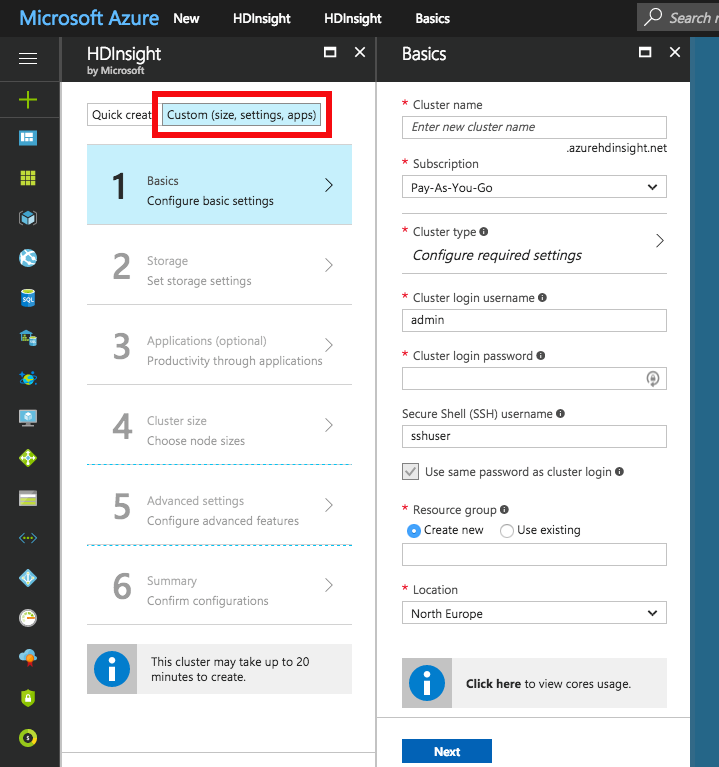
Create a new Virtual network for all the network resources that will be created during cluster setup. The default ** Address space** and Subnet address range may be suitable for this purpose. Use the same Resource group for all resources that are created during the whole cluster setup procedure.
-
Use the Custom (size, settings, apps) option instead of Quick create for creating the cluster. Choose Hadoop cluster type with Linux operating system and HDI 3.5 version. Fill all the required login credential fields. Select the previously defined Resource group.
-
Choose the Primary storage type of the cluster. You may specify additional storage accounts as well.
- Azure Storage : Provide a new or already existing Storage account and a Default container name. You may connect to as many Azure Storage accounts as needed.
- Data Lake Store : Provide a Data Lake Store account. Make sure that the root path exists and the associated Service principal has adequate privileges for accessing the chosen Data Lake Store and path. Please note that a Service principal can be re-used for other cluster setups as well. For this purpose, it is recommended to save the Certificate file and the Certificate password for future reference. Once a Service principal is chosen, the access rights for any Data Lake Stores can be configured via this single Service principal object.
-
Configure the Cluster size of your choice.
-
On Advanced settings tab, choose the previously created Virtual network and Subnet.
-
After getting through all the steps of the wizard, create the cluster. If it has been started, please find the private IPs and private domain names of the master nodes. You can easily get them from the Ambari interface. On the cluster dashboard page, click on Ambari Views, log in with the credentials provided in Step 2, and click on HDFS / Active Namenode and Standby NameNode. Insert the Name (usually starting with hn) and IP Address values of these nodes into your hosts file:
- For Windows systems: Windows\system32\drivers\etc\hosts
- For Linux and Mac systems: /etc/hosts
<Active NameNode IP Address>    <Active NameNode Hostname>
<Active NameNode IP Address>    headnodehost
<Standby NameNode IP Address>   <Standby NameNode Hostname>
Note: The expression headnodehost must not be changed.
Starting RapidMiner Server and Radoop Proxy
-
Deploy a MySQL instance (published by Bitnami) into the Resource Group used for the cluster. Choose a virtual machine that has at least 7 GB of memory. It is essential that the same Virtual network and Subnet are selected in the Network settings as the ones used for the cluster. All other settings may remain unchanged.
-
After the deployment finished, navigate to the dashboard of the MySQL server instance, and click on Boot diagnostics. Look for the lines like these in the logs:
 #########################################################################

 #                                                                       #

 #        Setting Bitnami application password to 'UdoP98bXs6FF'         #

 #                                                                       #

 #########################################################################
Take a note of the application password.
-
Go back to the MySQL dashboard and click Connect. Follow the instruction to SSH into the server (use PuTTY for Windows operating system). Use the password you provided when creating the cluster.
-
Install Java 8 on the server instance by issuing the following commands.
sudo add-apt-repository ppa:webupd8team/java sudo apt-get update sudo apt-get install oracle-java8-installer -
Start MySQL command line tool and create a database schema for RapidMiner Server:
mysql -u root -p <Bitnami application password> create schema rmserver; quit; -
Download RapidMiner Server to your local machine. Unzip the installation package. Ensure that a MySQL JDBC driver is present in the unzipped installation folder by following Step 1 and Step 2 here. Copy the installation package to the remote MySQL server instance using scp (use a substitute tool in case of Windows, e.g. WinSCP):
scp -r local_path_to_installer_folder user@host:path_to_target_folderReplace
local_path_to_installer_folder,user,hostandpath_to_target_folderas appropriate. -
Create an XML file on the MySQL server instance that will be used for a headless installation of RapidMiner Server. The following lines show a template for the content of the XML:
 <?xml version="1.0" encoding="UTF-8" standalone="no"?>
 <!DOCTYPE properties SYSTEM "http://java.sun.com/dtd/properties.dtd">
 <properties>
 <entry key="db_url">localhost</entry>
 <entry key="db_port">3306</entry>
 <entry key="server_service_id_overwrite">null</entry>
 <entry key="eula_accepted">true</entry>
 <entry key="server_port">8080</entry>
 <entry key="db_password">UdoP98bXs6FF</entry>
 <entry key="mail_password"/>
 <entry key="installation_directory">/home/rapidminer/server</entry>
 <entry key="license_key">XXXXXX</entry>
 <entry key="server_host">RMServer</entry>
 <entry key="db_driverclass">com.mysql.jdbc.Driver</entry>
 <entry key="server_register_as_service">false</entry>
 <entry key="mail_port">25</entry>
 <entry key="server_service_linux_variant">SUSE</entry>
 <entry key="mail_sender"/>
 <entry key="memory_max">2048</entry>
 <entry key="db_system">MySQL</entry>
 <entry key="radoop_proxy_port">1081</entry>
 <entry key="mail_url"/>
 <entry key="server_service_name">RapidMiner_Server_7_5_3</entry>
 <entry key="java_home">/usr/lib/jvm/java-8-oracle</entry>
 <entry key="db_user">root</entry>
 <entry key="server_service_id">RMS753SVC</entry>
 <entry key="db_driver_path_is_relative">true</entry>
 <entry key="server_host_bind_only">false</entry>
 <entry key="radoop_proxy_enable">true</entry>
 <entry key="mail_user"/>
 <entry key="db_schema">rmserver</entry>
 <entry key="db_driver_path">data/jdbc/mysql-connector-java-5.1.42-bin.jar</entry>
 </properties>
Please pay special attention to setting up the following configuration entries correctly:
Entry key Value db_passwordProvide Bitnami application password. installation directoryMake sure that the path exists on the MySQL Server instance. license_keyProvide your RapidMiner Server license key. server_hostProvide the name of the MySQL server instance. radoop_proxy_enableMust be true.db_driver_pathCheck that the MySQL driver jar exists on the specified path. -
Run the headless install process by providing the previously created XML file. Issue the following command from the bin directory of the RapidMiner Server installation directory:
bash ./rapidminer-server-installer <path_to_xml>.xml -
Go to
<installation directory>/binand start RapidMiner Server (and Radoop Proxy as well):./standalone.shNote: Every time you want to establish a connection to the cluster, RapidMiner Server and Radoop Proxy should be running on the remote host. To keep the service alive after terminating the SSH connection, use a terminal multiplexer (e.g. screen, tmux ) when starting the server.
-
To make Radoop Proxy accessible, some additional firewall rules have to be applied:
- Navigate to the MySQL dashboard, and click Network interfaces, and choose the associated interface.
- On the Network interface dashboard, navigate to Network security group, and choose the security group in use.
- On the Network security group dashboard, choose Inbound security rules, and add the following rules (the second rule is only necessary if you want to access RapidMiner Server web interface):
Priority Name Source Destination Service Action 1030 (default) radoopproxy (or any) Any Any Custom (TCP/1081) Allow 1040 (default) rmserver (or any) Any Any Custom (TCP/8080) Allow
Setting up the connection in RapidMiner Studio
First, create a Radoop Proxy Connection for the newly installed Radoop Proxy (described here in Step 1). The needed properties are:
| Field | Value |
|---|---|
| Radoop Proxy server host | Provide the IP address of the MySQL server instance. |
| Radoop Proxy server port | The value of radoop_proxy_port in the used RapidMiner Server install configuration XML (1081 by deafult). |
| RapidMiner Server username | admin (by default) |
| RapidMiner Server password | changeit (by default) |
| Use SSL | false (by default) |
For setting up a new Radoop connection to an Azure HDInsight 3.5 cluster, we strongly recommend to choose ![]() Import from Cluster Manager option, as it offers by far the easiest way to make the connection work correctly.
This section describes the Cluster Manager import process. The Cluster Manager URL should be the base URL of the Ambari interface web page (e.g.
Import from Cluster Manager option, as it offers by far the easiest way to make the connection work correctly.
This section describes the Cluster Manager import process. The Cluster Manager URL should be the base URL of the Ambari interface web page (e.g. https://radoopcluster.azurehdinsight.net). You can easily access it by clicking Ambari Views on the cluster dashboard.
After the connection is imported, most of the required settings are filled automatically. In most cases, only the following properties have to be provided manually:
| Field | Value |
|---|---|
| Hive Server Address | This is only needed, if you do not use the ZooKeeper service discovery (Hive High Availability is unchecked). Can be found on Ambari interface (Hive / HiveServer2). In most cases, it is the same as the NameNode address. |
| Radoop Proxy Connection | The previously created Radoop Proxy Connection should be chosen. |
| Spark Version | Choose the version that belongs to the used HDInsight version (in the case of HDInsight 3.5, Spark 1.6 should be selected). |
| Assembly Jar Location | For Spark 1.6 (HDInsight 3.5), the default value (local:///usr/hdp/current/spark-client/lib/spark-assembly.jar) can be used. |
It is essential that the RapidMiner Radoop client can resolve the hostnames of the master nodes. Follow the instructions of Step 6 of the Starting an HDInsight cluster to add these hostnames to your operating system’s hosts file.
Storage credentials setup
An HDInsight cluster can have more storage instances attached, which may even have different storage types (Azure Storage and Data Lake Store). For accessing them, the related credentials must be provided in Advanced Hadoop Parameters table. The following sections clarify the type of credentials needed, and how they can be acquired.
It is essential that the credentials of the primary storage are provided.
You may have multiple Azure Storages attached to your HDInsight cluster, provided that any additional storages were specified during cluster setup. All of these have access key(s) which can be found at Access keys tab on the storage dashboard. To enable access towards an Azure Storage, provide this key as an Advanced Hadoop Parameter:
| Key | Value |
|---|---|
fs.azure.account.key.<storage_name>.blob.core.windows.net |
the storage access key |
As above mentioned, a single Active Directory service principal object can be attached to the cluster. This controls the access rights towards Data Lake Store(s). Obviously, only one Data Lake Store can take the role of the primary storage. In order to enable Radoop to access a Data Lake Store through this principal, the following Advanced Hadoop Parameters have to be specified:
| Key | Value |
|---|---|
dfs.adls.oauth2.access.token.provider.type |
ClientCredential |
dfs.adls.oauth2.refresh.url |
OAuth 2.0 Token Endpoint address |
dfs.adls.oauth2.client.id |
Service principal application ID |
dfs.adls.oauth2.credential |
Service principal access key |
You can acquire all of these values under Azure Active Directory dashboard (available at the service list of the main Azure Portal). Click App registrations on the dashboard, then look for the needed values as follows:
- For OAuth 2.0 Token Endpoint address, go to Endpoints, and copy the value of OAuth 2.0 Token Endpoint.
- On App registrations page, choose the Service principal associated with your HDInsight cluster, and provide the value of Application ID as Service principal application ID.
- Click Keys. Generate a new key by entering a name and an expiry date, and replace the value of Service principal access key with the generated password.
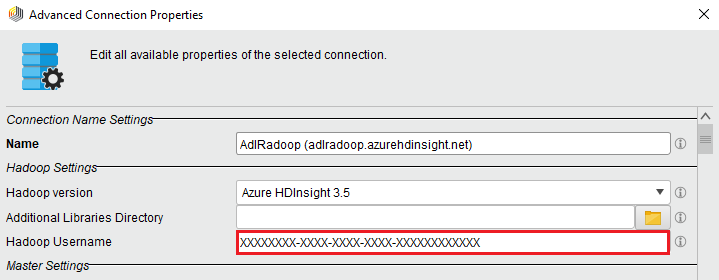
Finally, go to the HDInsight cluster main page, and click Data Lake Store access in the menu. Provide the value of Service Principal Object ID as Hadoop Username.
Connecting to a Premium cluster (having Kerberos enabled)
If you have set up or have a Premium HDInsight cluster (subscription required), some additional connection settings are required for Kerberos-based authentication.
- Configuring Kerberos authentication section describes general Kerberos-related settings.
- As for all Hortonworks distribution based clusters, you also have to apply a Hive setting (
hive.security.authorization.sqlstd.confwhitelist.append) described in this section. Please note that a Hive service restart will be needed. - We strongly advise to use
 Import from Cluster Manager option for creating a Radoop connection to the Kerberized cluster. The import process covers some necessary changes in Advanced Hadoop Parameters that are required for the connection to work as expected.
Connecting to EMR from another network
RapidMiner Radoop supports connecting to an EMR cluster using SOCKS proxy, VPN or Radoop Proxy. The following steps will guide you, how to start and configure an EMR cluster to use with RapidMiner Radoop and how to setup the networking and the Radoop connection to connect to the cluster. The steps required for a VPN setup can be found in a separated collapse box below.
Starting an EMR cluster
Skip these steps if you already have an EMR cluster running that has Java 8.
-
Use the advanced options for creating the cluster. Select EMR release 4.4 or newer. Make sure that Hadoop, Hive and Spark are selected for installation.
-
Add the following configuration in order to configure Java 8:
[ { "Classification": "hadoop-env", "Configurations": [ { "Classification": "export", "Configurations": [], "Properties": { "JAVA_HOME": "/usr/lib/jvm/java-1.8.0" } } ], "Properties": {} }, { "Classification": "spark-env", "Configurations": [ { "Classification": "export", "Configurations": [], "Properties": { "JAVA_HOME": "/usr/lib/jvm/java-1.8.0" } } ], "Properties": {} } ] -
After getting through all the steps of the wizard, create the cluster. If it has been started, the private IPs and private domain names of the EC2 instances should be available.
-
Use the advanced options for creating the cluster. Choose EMR release 4.4 or newer. Make sure that Hadoop, Hive and Spark are selected for installation.
-
Add the following configuration in order to configure Java 8:
[ { "Classification": "hadoop-env", "Configurations": [ { "Classification": "export", "Configurations": [], "Properties": { "JAVA_HOME": "/usr/lib/jvm/java-1.8.0" } } ], "Properties": {} }, { "Classification": "spark-env", "Configurations": [ { "Classification": "export", "Configurations": [], "Properties": { "JAVA_HOME": "/usr/lib/jvm/java-1.8.0" } } ], "Properties": {} } ] -
At the Hardware Configuration step select the vpc network instead of the EC2-Classic.
-
After getting through the following steps, create the cluster. If the cluster has been started, the private IPs and private domain names of the EC2 instances should be available.
-
Start a VPN server using an EC2 instance in the previously selected VPC and subnet.
-
Connect to the VPN from your desktop
- Check if the correct route is set up (e.g.
172.30.0.0/16)
- Check if the correct route is set up (e.g.
-
Enable the network traffic from the VPN to the EMR cluster
- On the EMR Cluster details page open the Master (and later the Slave) security group settings page
- At the inbound rules add a new rule and enable “All Traffic” from the VPC network (e.g.
172.30.0.0/16) - Do this setting on both the Master and Slave security groups of the EMR cluster
-
Setup local host file
- On the EMR Cluster details page in the Hardware section check the “EC2 Instances” and get the private IP and DNS.
- Add the hostnames (DNS) and IP addresses of the nodes to your local hosts file (e.g.
172.30.1.209 ip-172-30-1-209.ec2.local)
Configure the cluster
Using an SSH access, configure the cluster as follows. Log into the master node using the hadoop username and private key set during the launch. Execute the following commands to create the necessary staging directories:
hadoop fs -mkdir -p /tmp/hadoop-yarn/staging/history
hadoop fs -chmod -R 777 /tmp/hadoop-yarn
hadoop fs -mkdir /user
hadoop fs -chmod 777 /user
Setup networking
If you can install RapidMiner Server into an edge node on the EMR cluster, we strongly recommend to use Radoop Proxy. As a second option, you can use SOCKS proxy to connect to your EMR cluster. See the Networking Setup section for information on starting a SOCKS proxy and an SSH tunnel. Please open the SSH tunnel and the SOCKS proxy. The third option is to use a VPN connection. Please initiate the VPN connection to the cluster.
Setup the connection in RapidMiner Studio
When using the SOCKS proxy, the standard SOCKS proxy connection (described in Networking Setup) should be used with the following settings:
| Property | Value |
|---|---|
| Hadoop version | Amazon Elastic MapReduce (EMR) 4.4+ |
| Multiple Masters | Select this option. Access to modify addresses becomes available. |
| NameNode Address | <master_private_ip_address> (e.g. 10.1.2.3.) |
| Resource Manager Address | <master_private_ip_address> |
| Hive Server Address | localhost |
| Hive port | 1235 |
| Advanced Hadoop parameters | Key: hadoop.rpc.socket.factory.class.defaultValue: org.apache.hadoop.net.SocksSocketFactoryEnabled: yes |
| Advanced Hadoop parameters | Key: hadoop.socks.serverValue: localhost:1234Enabled: yes |
| Advanced Hadoop parameters (to avoid bug HDFS-3068 when using a proxy) | Key: dfs.client.use.legacy.blockreaderValue: trueEnabled: yes |
To use Spark operators in RapidMiner Radoop, enable them by selecting the appropriate Spark Version option in the Spark Settings. Then provide the path to the Spark libraries:
-
If you have added Spark 1.x on the cluster creation page, upload the Spark assembly jar to HDFS:
hadoop fs -mkdir -p /user/spark
hadoop fs -put /usr/lib/spark/lib/spark-assembly.jar /user/spark
Set
hdfs:///user/spark/spark-assembly.jaras Assembly Jar Location. -
For Spark 2.x versions, the best practice is to upload the compressed Spark jar files to HDFS. This can easily be done by issuing the following commands:
cd /usr/lib/spark/jars
zip -r /tmp/spark.zip .
hadoop fs -mkdir -p /user/spark
hadoop fs -put /tmp/spark.zip /user/spark
Set
hdfs:///user/spark/spark.zipas Spark Archive path.
-
Select Amazon Elastic MapReduce (EMR) 4.4+ as the Hadoop version.
-
Select the Multiple Masters option and set the addresses as follows:
- NameNode Address: <master_private_ip_address> (e.g.
10.1.2.3.) - Resource Manger Address: <master_private_ip_address>
- Hive Server Address:
localhost
- NameNode Address: <master_private_ip_address> (e.g.
-
Set the ports if necessary
- The default ports are set automatically. You can find the exact ports of the services here: Differences Introduced in 4.x.
- Set Hive port to 1235 (as described in Networking Setup)
-
To use Spark operators in RapidMiner Radoop, enable them by:
- Select the appropriate Spark Version option (should be Spark 1.6) in the Spark Settings.
- If you have added Spark on the cluster creation page, the default assembly location should not be modified (local:///usr/lib/spark/lib/spark-assembly.jar)
-
Add the following Advanced Hadoop Parameters key-value pair (as described in Networking Setup):
Key Value dfs.client.use.legacy.blockreadertruehadoop.rpc.socket.factory.class.defaultorg.apache.hadoop.net.SocksSocketFactoryhadoop.socks.serverlocalhost:1234
-
Select Amazon Elastic MapReduce (EMR) 4.4+ as the Hadoop version.
-
Set Master Address to <master_private_dns_address> (e.g.
ip-172-30-1-209.ec2.local) -
Set the ports if necessary
- The default ports are set automatically. You can find the exact ports of the services here: Differences Introduced in 4.x.
-
To use Spark operators in RapidMiner Radoop, enable them by:
- Select the appropriate Spark Version option (it should be Spark 1.6 ) in the Spark Settings.
-
Upload the Spark assembly jar to HDFS:
  hadoop fs -mkdir -p /user/spark
  hadoop fs -put /usr/lib/spark/lib/spark-assembly.jar /user/spark
Set
hdfs:///user/spark/spark-assembly.jaras Assembly Jar Location. -
Add the following Advanced Hadoop Parameters key-value pair:
Key Value dfs.client.use.legacy.blockreadertrue
Connecting to an IBM Open Platform (IOP) cluster with default settings usually works without any special setting on the Advanced Connection Properties window. Select IBM Open Platform 4.1+ as Hadoop version, and provide the appropriate address fields. If the SQL Standard Based Hive Authorization is enabled for your cluster or any unexpected error occurs, please refer to the Hortonworks Data Platform description.