You are viewing the RapidMiner Radoop documentation for version 9.6 - Check here for latest version
Installing RapidMiner Radoop on RapidMiner Server
Prerequisites
The following requirements must be met before installing the RapidMiner Radoop extension on RapidMiner Server:
- RapidMiner Radoop Extension installed and tested on RapidMiner Studio. If necessary, see Configuring RapidMiner Radoop Connections to ensure that you have a valid connection to a Hadoop cluster in RapidMiner Studio.
Installing RapidMiner Radoop on RapidMiner Server and the connected Job Agent(s)
Installing the RapidMiner Radoop extension on RapidMiner Server requires that you copy files from your RapidMiner Studio configuration into your RapidMiner Server installation. The central resource management functionality will automatically synchronize the Radoop extension, Radoop licenses and connection definitions to all connected Job Agents.
You need to prepare with the following artifacts to accomplish the installation:
RapidMiner Radoop Extension (a JAR file). You can download RapidMiner Radoop extension from the Marketplace or you can get it on your desktop computer from your local
.RapidMiner/configuration directory (created by RapidMiner Studio).Radoop license (a license string and/or a .lic file). RapidMiner Radoop license needs manual installation on RapidMiner Server (note that Radoop Basic license is not enough to use Radoop). You can get it on the https://my.rapidminer.com or you can locate the license file on your desktop computer in your local
.RapidMiner/configuration directory (created by RapidMiner Studio).Radoop Connection definitions (an XML file). Locate the radoop_connections.xml file in your local
.RapidMiner/configuration directory (created by RapidMiner Studio).
Installing RapidMiner Radoop on RapidMiner Server
Stop the server.
Copy the Radoop extension JAR file to the
resources/extensions/subfolder of your RapidMiner Server Home Directory.Copy the radoop_connections.xml file into the
.RapidMiner/subfolder of your RapidMiner Server Home DirectoryStart the server.
On the Server Web UI, navigate to Administration > Manage Licenses and check your Radoop license under Active licenses. If it is a Radoop Basic license, click on Install License in the Actions menu (located on the right side by default) and paste your Radoop license in the text field.
Installing RapidMiner Radoop on RapidMiner Server Job Agents
The central resource management functionality of RapidMiner Server will automatically synchronize the Radoop extension, installed licenses, and connections described in your radoop_connections.xml to all connected Job Agents. Please make sure that central resource management is configured to sync the locations where you uploaded these artifacts (the default locations will already be covered out-of-the-box).
If you need instructions on how to set up Radoop on all Job Agents manually, you will find it in the previous version of this document.
Updating Radoop connections on RapidMiner Server
Radoop connections are stored in radoop_connections.xml on the server side (in the .RapidMiner/ subfolder of the RapidMiner Server Home Directory), but there is no GUI on the server to edit the connections. The recommended procedure is to edit connections on the client side using RapidMiner Studio and then upload them to the server as an XML file.
Follow these steps to apply your new connection definitions on your Server deployment:
Copy (overwrite) radoop_connections.xml in the
.RapidMiner/subfolder of the RapidMiner Server Home DirectoryTo avoid a server restart - but still broadcast the changes - you need to manually trigger an update on all connected Job Agents via calling a Server REST API. To achieve this, you need to invoke the
/executions/sync/updateREST endpoint of the Server, with the"type":"EXECUTION_CONTEXT"parameter set and authentication in place. Successful trigger is indicated by a2xxstatus code in the HTTP response. Here's an example using command line:curl "https://<your_server_address:port>/executions/sync/update" \ -X POST \ -d '{"type":"EXECUTION_CONTEXT"}' \ -H "Content-Type: application/json" \ -H "Authorization: Bearer <JWT_token>" \ -w "\nResponse HTTP status code: %{http_code}\n"Alternatively, restart RapidMiner Server to apply the changes to Server and all connected Job Agents.
Changes to the radoop_connections.xml are applied immediately to all process executions started after the update. Already running processes remain unaffected.
Managing multiple Radoop connections on RapidMiner Server
The radoop_connections.xml file can list an arbitrary number of connections and should list all connections that may be used by any process submitted by any user to this Server. These connections may point to the same Hadoop cluster or may point to different clusters. Rapidminer Server administrator may define connections for the same user or for different users (see Managing multiple Hadoop users below).
To control the access rights to these connections on the RapidMiner Server - e.g. to restrict which user can use which connection when submitting processes to the RapidMiner Server - each connection should set the so called Access Whitelist field. See Access control on Radoop connections for details.
The connection names must be the same on the RapidMiner Server and in the RapidMiner Studio instance that submits the process to ensure correct process execution across the platform.
Once you have created a radoop_connections.xml file containing all desired connections, follow the procedure about Updating Radoop connections to apply changes on the Server.
Managing multiple Hadoop users on RapidMiner Server
In a multi-user Hadoop environment the RapidMiner Server administrator needs to manually edit the radoop_connections.xml file on Server to make sure that all connections are included and to ensure that users of RapidMiner platform are restricted to use solely their own identity on the Hadoop cluster (i.e. execute Spark jobs and Hive queries using their Hadoop access rights). After the changes has been made to radoop_connection.xml then follow the procedure about Updating Radoop connections to apply changes on the Server.
Two different configuration strategies are available:
- Dedicated Radoop connections. One for each Hadoop user.
- One connection with the credentials of a privileged Hadoop user, which is a user allowed to impersonate other users. (see Apache Hadoop user impersonation)
Option #1: Creating dedicated Radoop connections
This approach requires a dedicated connection definition for each Hadoop user. Administrators must take care of Radoop connection name conflicts and setting up individual Hadoop credentials for each Radoop connection. RapidMiner Studio users only need to have their own connection(s) in their local connection file on their client machine belonging to their Hadoop identity. On the RapidMiner Server side, there will be multiple connections defined in the connection file. An example for naming the connections: clustername_username, where clustername is an identifier for the Hadoop cluster and username is an identifier for the user (e.g. that may be the same as the value of the Hadoop username field). Edit XML... option on the Connection Settings dialog can be used to copy each user's connection entry into the merged radoop_connections.xml on the Server.
Although this strategy is the simplest to introduce since it doesn’t require a Hadoop cluster side setup, it may have its drawbacks. Eventually administrators has to keep several Radoop connection in sync, which connections may only differ in their Hadoop credentials.
Option #2: Using Hadoop user impersonation in the Radoop connection
Hadoop user impersonation is available for Radoop connections. This approach enables the administrators to maintain a single Radoop connection with the credentials of a privileged Hadoop user, who is able to impersonate other Hadoop users.
This approach results in less maintenance and simpler access right management, while the credentials of the individual users (their encrypted passwords or keytabs) are not stored on the RapidMiner server.
Prerequisite Hadoop cluster side configuration for impersonation
On the Hadoop side, there should be a dedicated user (username can be e.g. privilegeduser), who has the rights to impersonate others. This configuration can be done based on the Hadoop documentation. In a simple case, the following snippet should be added to the core-site.xml in the Hadoop Configuration:
<property>
    <name>hadoop.proxyuser.privilegeduser.hosts</name>
    <value>*</value>
</property>
<property>
    <name>hadoop.proxyuser.privilegeduser.groups</name>
    <value>*</value>
</property>
If HDFS Encryption (and KMS service) is enabled, the similar settings should be also ensured in the kms-site.xml. For detailed information please visit the KMS Proxyuser Configuration section on the KMS documentation page or follow the instructions of your Hadoop vendor.
Creating and testing an impersonated connection for RapidMiner Server
As a recommended approach, a connection should be constructed using RapidMiner Studio. You can find RapidMiner Server related settings on the RapidMiner Server tab of the Connection Settings dialog.
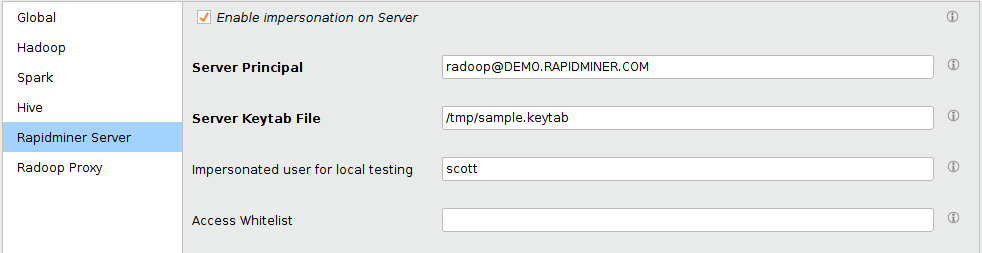
As on the screenshot above, the Enable impersonation on Server checkbox should be enabled and the credentials of the superuser should be entered to the Server Principal and Server Keytab File fields similar to the case with client users (presented in section Hadoop security configuration).
In case of LDAP authentication is configured for Hive, the Hive Principal should be empty and the credentials of the privilegeduser should be entered to the Hive Username and Password fields (these two fields are only enabled if Hive Principal is empty).
The connection can be tested from RapidMiner Studio, if the networking setup allows connecting to the Hadoop cluster from the client hosts. If the Impersonated user for local testing field is set (e.g. scott is entered as username), then all the operations are submitted using the privilegeduser credentials, but impersonating the scott user and using its access rights. This field does not have an effect when running on RapidMiner Server: in that case, the effective user will always be the user who submitted the RapidMiner process.
Securing Radoop connections on RapidMiner Server
RapidMiner Server supports connections to Hadoop clusters with the same security settings as RapidMiner Studio, but you may need to manually edit the connection XML file (e.g. because of different file path settings on the server side). In general, connections should be constructed using RapidMiner Studio (using it as a "connection editor"), and the following additional steps should be considered.
Decrypting connection passwords
RapidMiner Radoop uses the local cipher.key file to encrypt and the key attribute of the radoop-entries tag in the XML file to decrypt the passwords in the radoop_connections.xml file by default. If the radoop_connections.xml contains entries from multiple users, there are two possible solutions:
- Creating every user's connection entry on the same computer (with the same cipher.key file), or
- it is possible to add a key attribute to each radoop-connection-entry manually. Radoop will use the per-entry key attribute instead of the per-file key.
For example, user John and Scott have the following radoop_connections.xml files:
<radoop-entries key="XkzjmytZW2ffc7+MnU11BdhzomF8355R">
    <radoop-connection-entry>
        <name>connection-john</name>
        ...
    </radoop-connection-entry>
</radoop-entries>
<radoop-entries key="KLS4GvvZta0NhtXfwkXQeSqD11ngXeWP">
    <radoop-connection-entry>
        <name>connection-scott</name>
        ...
    </radoop-connection-entry>
</radoop-entries>
The merged radoop_connections.xml looks like the following:
<radoop-entries>
    <radoop-connection-entry key="XkzjmytZW2ffc7+MnU11BdhzomF8355R">
        <name>connection-john</name>
        ...
    </radoop-connection-entry>
    <radoop-connection-entry key="KLS4GvvZta0NhtXfwkXQeSqD11ngXeWP">
        <name>connection-scott</name>
        ...
    </radoop-connection-entry>
</radoop-entries>
Connection to Hadoop clusters with Kerberos authentication
For configuring a connection to a cluster with Kerberos authentication, see Hadoop security. Please take the following notes when using these connections through RapidMiner Server.
Connecting with Kerberos password
It is possible to use a password to connect to a Kerberized cluster. To make sure that the encrypted passwords in the connection XML can be decrypted on the Server, please refer to the Decrypting connection passwords section. Please note that on the Server side, using a keytab is recommended, as the ticket renewal is not supported in case of using a password.
Connecting with keytab file
Connections to a Kerberized cluster should specify the path for the users keytab file instead of the password. This means that the keytab file must be accessible on the local file system of the Server. The path usually differs from the path on the local file system of the user using RapidMiner Studio. The RapidMiner Server administrator have to ensure that the keytabFile field of the radoop_connections.xml file on the Server points to the appropriate path on the Server. The keytab file itself on the file system should only be accessible for the user running RapidMiner Server.
Note: A RapidMiner Server instance can only talk to a single kerberized Hadoop cluster, more precisely, to a single Kerberos Realm. This limitation comes from the architecture of the Java Kerberos implementation. However, multiple users can use this kerberized Hadoop cluster concurrently through this RapidMiner Server instance.
Connecting to Hive with LDAP authentication
If LDAP is used for authentication to HiveServer2, then passwords should be entered similarly to the Kerberos passwords, please refer to the Decrypting connection passwords section. In case of impersonation, the provided Hive LDAP user should also have Hadoop proxyuser privileges.
Access control on Radoop connections
The availability of a Hadoop connection on RapidMiner Server can be limited to a user or a group of users. This means that a RapidMiner Server user that is not on the optionally specified whitelist of a connection cannot use it when submitting Radoop processes. This way, the Server administrator can make sure that users cannot use connections that they are not permitted to use, and that they cannot evade this restriction by manipulating their connection identifiers in submitted processes.
To define a group (or user) whitelist for a connection, add the accesswhitelist xml tag for the corresponding radoop-connection-entry in the radoop_connections.xml. The value of this property is an arbitrary regular expression (.* or * can be used for allowing all users). Only RapidMiner Server users whose group matches this expression are allowed to use the connection in a submitted process. If this optional accesswhitelist is not specified for a connection, then any user can use it in a process.
<radoop-connection-entry>
    ....
    <accesswhitelist>ds_group|dba_group|john|scott</accesswhitelist>
</radoop-connection-entry>
Change Radoop Proxy enabled connections
Radoop Proxy is automatically disabled when a process is executed on RapidMiner Server, because in a typical setup, RapidMiner Server runs inside the secure zone, that's why there is no need to route the traffic through the Proxy.
In case you have a custom manual Radoop Proxy installed on an edge node, and RapidMiner Server (besides Studio) can only reach the Hadoop cluster via this edge node (so it runs outside the secure zone), you need to enable Force Radoop Proxy on Server setting on the RapidMiner Server tab. This setting has no effect when running in Studio.

Alternatively, you can manually edit the radoop_connectons.xml file on the Server. In this case add the forceproxyonserver tag with the value T.
<radoop-entries key="XkzjmytZW2ffc7+MnU11BdhzomF8355R">
    <radoop-connection-entry>
        ...
        <forceproxyonserver>T</forceproxyonserver>
        ...
    </radoop-connection-entry>
</radoop-entries>
To apply the updated connection, follow the procedure about Updating Radoop connections.
The location of the Radoop Proxy connection specified in Studio for this connection needs to be the Remote Repository corresponding to this RapidMiner Server instance. Otherwise the process won’t be able to find the proxy connection when running on the Server and will fail because of that.