You are viewing the RapidMiner Server documentation for version 9.6 - Check here for latest version
Creating Database Connections
This connection management is deprecated. Please use the new connection management.
Using the RapidMiner Server web interface, you can define database connections and assign user access to them. Once configured on RapidMiner Server, connections are available in all connected RapidMiner Studio instances. On all platforms, RapidMiner uses the JDBC standard to connect to databases.
With RapidMiner Server you configure server settings and credentials centrally, allowing users to share (based on their permissions) database connections. This section describes:
- Adding a new database connection for databases
- Adding JDBC drivers for database systems not included with the pre-installed standard drivers
- Modifying advanced driver settings to further configure database connections
Adding a new database connection
You define database connections, and provide users with access, in the RapidMiner Server web interface. To create a database connection:
From the RapidMiner Server web interface, select Administration > Database connections.
In the Actions box, click Create new connection entry:

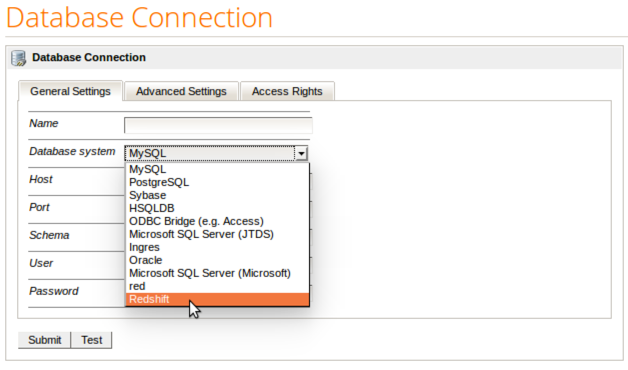
The Database Connection window opens, showing the General Settings tab:
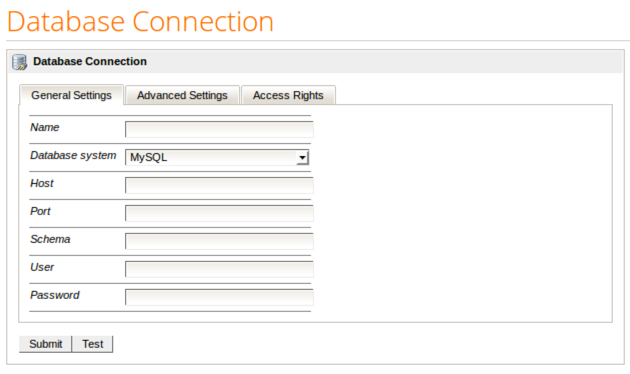
Supply the basic parameters that define the connection—typically all fields. (If your database does not require authentication, for example, leave the User and Password blank.)
Parameter Description Name Enter a name for the connection. Database system From the drop-down list, select the system the database uses. If your system isn't listed, you must first add the JDBC driver. Host Enter the hostname or IP address for the local machine hosting the database connection. See the special note on using "localhost" as a host name. Port Enter the port number used to access the database. Schema Enter the name of the schema that defines the portion of the database to be used by RapidMiner processes. User Enter the name of the user with login privileges to the database. Password Enter the password for the user with login privileges to the database. When you are finished making changes, click Test to check the connection. When the test passes, click Submit to save the new connection:
Optionally, use the Advanced Settings tab to further refine the connection.
Special consideration of the hostname
If you want the current machine running RapidMiner Server to host the database connection, make sure to enter "localhost" for the Host parameter. If you use the IP address 127.0.0.1, "host" is not replaced by the host name of the server.
RapidMiner Server stores database connections with the server IP address. If you create a connection on the server using 127.0.0.1, it is stored as "localhost." When RapidMiner Studio looks the database up on "localhost," it is looking on the host that runs RapidMiner Studio, and the database is not there. By specifying "localhost" instead of "127.0.0.1" for the hostname, RapidMiner Server replaces "localhost" with the unique hostname of the machine (making RapidMiner Studio able to find it).
Adding JDBC drivers
RapidMiner Server comes with database drivers for several popular database systems. If your driver is not part of the standard package, you can add it.
Note: For any connections shared between RapidMiner Studio and RapidMiner Server, the JDBC drivers must be installed on each platform. It is easiest to complete the RapidMiner Studio installation first, as one of its modified files is required to complete the RapidMiner Server installation.
Adding drivers to RapidMiner Studio
To add JDBC drivers for databases to RapidMiner Studio:
1. If necessary, quit RapidMiner Studio.
2. Download and then copy the JDBC driver .jar file for the database system you'd like to add into the lib/jdbc subfolder of your RapidMiner Studio installation directory.
Start RapidMiner Studio. Go to Connections > Manage Database Drivers:
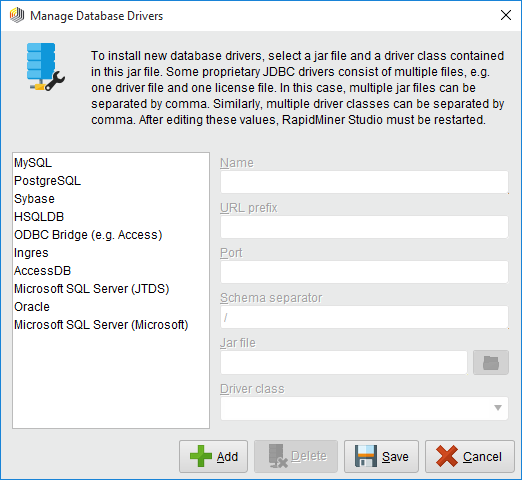
Click
 Add and complete the fields for the new database. If unsure of values, check your documentation or Google the JDBC driver type. For the .jar file, browse to the location in the
 lib/jdbcfolder.When you have finished completing the fields, click
 Save.
Save.To verify the addition, go to Connections > Show Database Drivers. The new driver should be present (alphabetically) in the list of available drivers.
Restart RapidMiner Studio.
If you have multiple RapidMiner Studio instances that use the newly added driver:
-
Copy the
jdbc_properties.xmlfile from the.RapidMinerfolder with the installed driver and paste it to the.RapidMinerfolder of each other system. -
Verify that the path of the .jar file is correct on the instance, and edit it if necessary.
-
Restart RapidMiner Studio. The driver is now available in Connections > Manage Database Drivers.
Adding drivers to RapidMiner Server
To add database JDBC drivers to RapidMiner Server:
Download and then copy the JDBC driver .jar file for the database system you'd like to add into the RapidMiner Server installation folder.
In the previous section you installed the driver on a RapidMiner Studio instance. Locate the file
jdbc_properties.xmlin the.RapidMinerfolder of that local user and copy it.Open the
resources/jdbc/folder within the RapidMiner Server home directory.Paste the file
jdbc_properties.xml(copied from your RapidMiner Studio instance) into the
<home directory>/resources/jdbc/folder.Open the file and edit any properties that have changed. For example, the path of the .jar file will have changed.
Edit the file to match the required settings for the desired JDBC driver:
 <drivers>
 <driver dbnameseparator="<DRIVER_SEPARATOR>" defaultport="<DRIVER_PORT>" driver_jar="C:\Program Files\RapidMiner\RapidMiner Studio\lib\jdbc\<DRIVER_JAR>.jar" drivers="<package.structure.for.DriverClass>" name="<DB_NAME>" urlprefix="<JDBC_URL_PREFIX>"/>
 </drivers>
For example (adding Amazon Redshift):
 <drivers>
 <driver dbnameseparator="/" defaultport="port" driver_jar="C:\Program Files\RapidMiner\RapidMiner Studio\lib\jdbc\RedshiftJDBC41-1.1.2.0002.jar" drivers="com.amazon.redshift.jdbc41.Driver" name="red" urlprefix="jdbc:redshift://"/>
 </drivers>
Note that there may be multiple
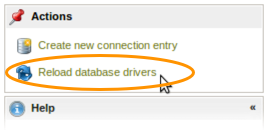
elements (one for each additional driver) within the outer <drivers>markers.From the web interface of RapidMiner Server, open Administration > Database Connections. In the Actions box, select Reload database drivers.
Open Administration > Database Connections again and select Create new connection entry in the actions tab. Now, the newly added driver is available in the Database System settings.
Modifying advanced driver settings
Database connection properties are defined by the JDBC driver of your database. These driver-dependent settings are listed (and set) in the Advanced Settings tab of the Database Connection window. See your database and JDBC driver documentation for a description of each property. To access the settings:
From the RapidMiner Server web interface, select Administration > Database connections.
Click on the connection for which you want to modify properties. The Database Connection window opens.
Click on the Advanced Settings tab. The settings for the connection appear, displaying each property and value:
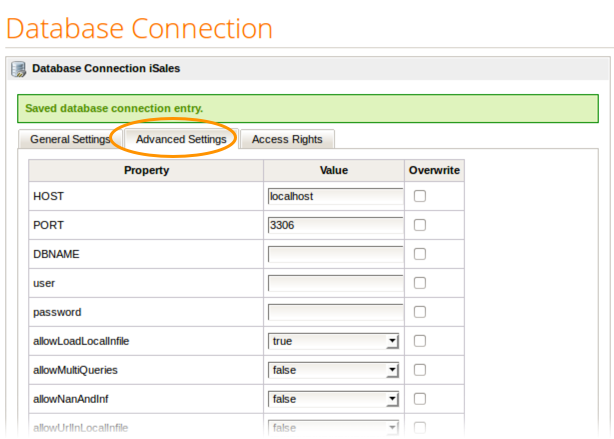
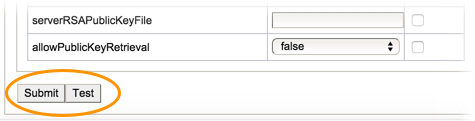
Modify any properties. Hover over the property name for a description of that property. Click Overwrite.
When you are finished making changes, click Test to check the connection:
When the test passes, you are returned to the General Settings tab with a message that pinging the database with the connection was successful.
From General Settings or Advanced Settings, click Submit to save the changes.
Database connection access rights
Users require access to database connections when they execute processes that use that database. You assign access rights to the database connections from the Administration > Database connections window of the RapidMiner Server web interface.