You are viewing the RapidMiner Studio documentation for version 9.7 - Check here for latest version
Best practices for development
In this document, we recommend best practices for teams who are developing and deploying RapidMiner processes and models.
In general, we recommend splitting your work into development and production Projects, with an intermediate testing stage for larger or more critical use cases. Processes and models will move from one stage to the next in a consistent way, with the platform keeping Snapshots of each stage in development, any of which can be recovered at any time.
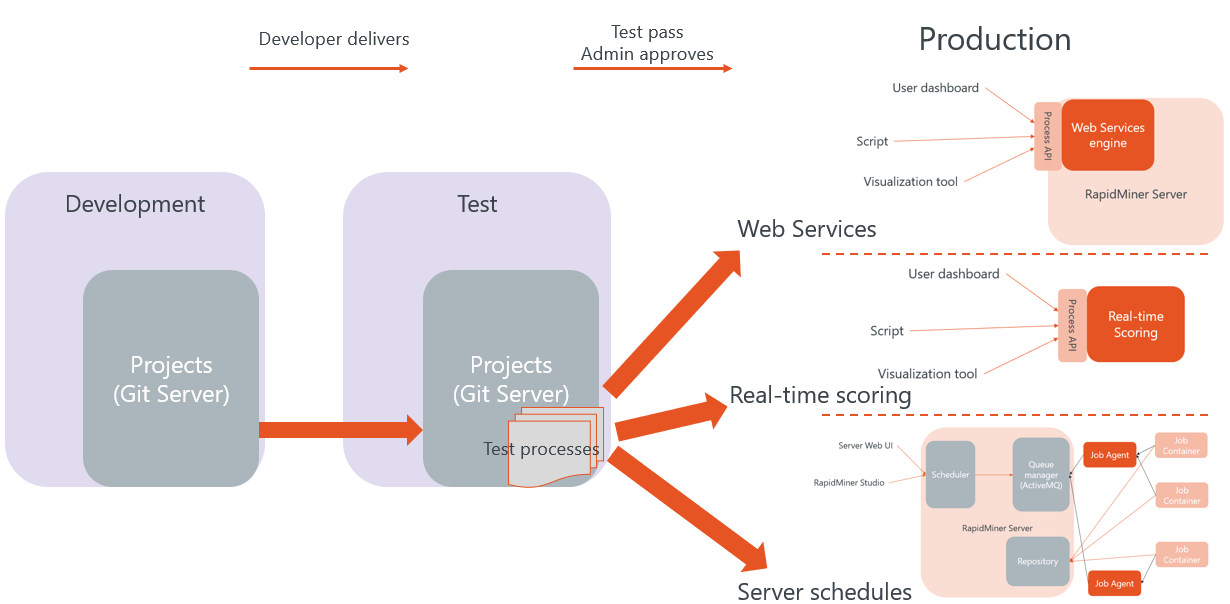
A schematic of a complete environment is provided by the image below, including:
- a development environment based on Projects,
- a testing environment that incorporates specific test processes, and
- a production environment that depends on the use case.
Development
To get started with a Project:
Create the Project within RapidMiner AI Hub, and make sure that all team members have
- access rights, and
- a copy of the Project URL.
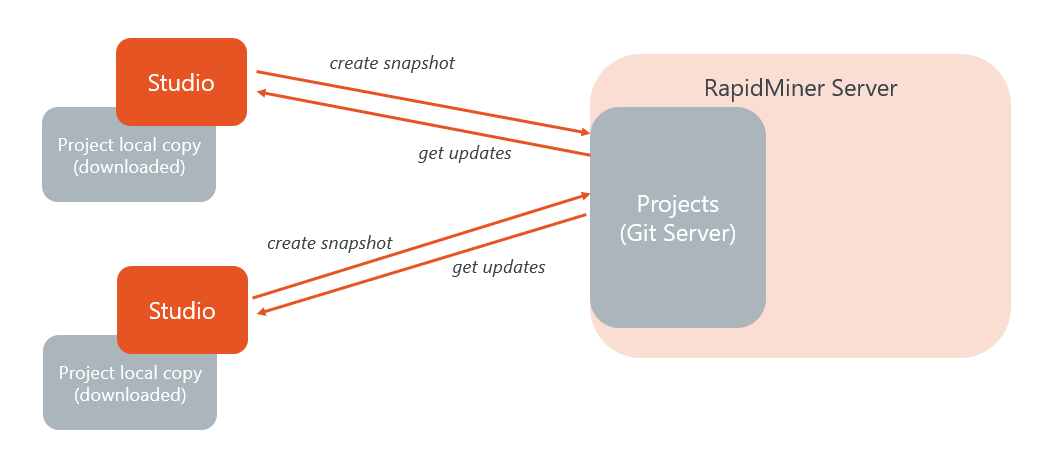
Each team member then connects to the Project from within RapidMiner Studio (or possibly a Git client).
Note the following points:
- Within a Project, RapidMiner Studio functions in the same way as within a Repository.
- A Project may include arbitrary file types, not just the processes and models created within RapidMiner.
- Each team member has a complete copy of the Project, and can work independently.
- All copies of the Project are identical, except for local changes that have not yet been shared as Snapshots.
- When you are satisfied that your local changes are working, it's a good moment to create a Snapshot.
- If you are dissatisfied with your local changes, you can discard local changes.
- If you need a Snapshot created by a team member, you can Get updates.
Conflicts
To avoid conflicts, it's wise to follow general advice for developers: keep the different parts of your Project as independent as possible. For example, if one team member is working on data preparation and another on modeling, create at least two independent processes, each with a clear definition of the expected inputs and outputs.
In the event of a conflict, RapidMiner Studio provides a user interface with some basic conflict resolution, and the following options for each of the conflicting files:
- use my version
- use my colleague's version
Note that nothing is ever lost! All the relevant information is saved in Snapshot History, as three different Snapshots: your Snapshot, your colleague's Snapshot, and the Snapshot containing the conflict resolution.
Testing and Production
Testing and production environments are fundamentally different from the development environment, but they are supported in RapidMiner by the same Project concept -- the difference is in how you configure them and how you work with them.
Note the following differences:
Permissions are different. In development, team members have access to everything. Testing and production is usually managed by Machine Learning Ops (depending on the company, that could be IT, DevOps, or some specific group within the Data Science team).
Connections point to different data sources. Even if processes are typically identical in all three environments, testing and, especially, production connections need to point to specific data sources.
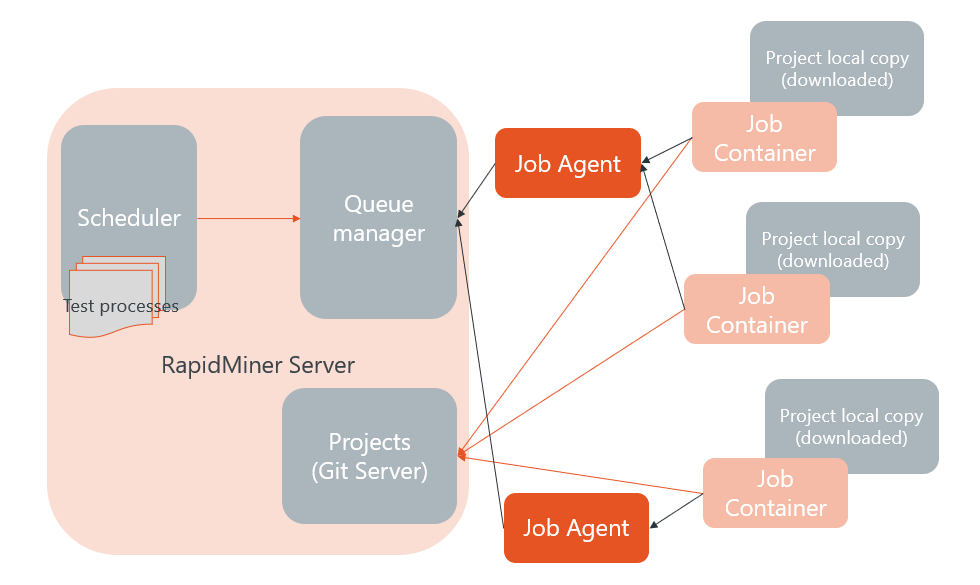
Processes are typically scheduled to run periodically.
History is shorter. A development Snapshot History contains all the changes and intermediate steps that were needed to create the final version. Testing and production environments are only changed when a new version is deployed, meaning that only stable, final versions are included in their history.
- Exception: if processes themselves modify the Project, for instance, by adding automatically trained models or process outputs.
Testing environments include additional processes that test whether the output of the scheduled processes is correct for a number of standard cases, typically including:
Output data consistency (if the output is an ExampleSet)
Model accuracy (or any other model performance metric)
Potentially other metrics like times, responses to known requests, etc.
Production
Once you have set up your environments, you are ready to start a cycle of continuous integration / continuous deployment (CI/CD). At present, this cycle cannot be fully automated.
Create the testing and production environments
Once the development team has produced their first results, the stable Snapshot can be downloaded from RapidMiner AI Hub's Snapshot History page. The result is a ZIP file with the complete content of the Snapshot, including connections.
Using this Snapshot, a new Project can be created in the testing or production environments. Some additional steps are usually needed:
- Review connections, so that they point to the right data sources in the new environments.
- Add testing processes to the testing Project.
- Configure schedules, as needed.
Update the testing and production environments
As the development team continues their work, additional deployments will be needed. The following steps are recommended:
- From within the RapidMiner AI Hub web interface, pause all schedules related to the Project.
- Start RapidMiner Studio and connect to the Projects corresponding to development and testing.
- Remove the content of the Project in testing, except for connections. Alternatively, if it's only a partial change, just remove the affected folders.
- Copy and paste the new content from development.
- Create the new Snapshot in testing.
- Run the tests that have been defined and make sure the results are as expected.
- From within the RapidMiner AI Hub web interface, resume all schedules (make sure the scheduled processes have not been renamed or removed).
For the production environment, the procedure depends on the use case.
Real-time Scoring
- Create a deployment package from the Project folder and update the active deployment.
Web services
- Copy the content of the Project to the repository of the production server
- Make sure all connections point to the right data source.
- Edit the web services to point them to the new processes.
RapidMiner AI Hub schedules
- Copy the content of the Project to the repository of the production server
- Make sure all connections point to the right data source.
- Edit the schedules to point them to the new processes.