Installation of Altair AI Hub in an air-gapped environment
Introduction
The following is a set of notes written in the context of a special request: installing Altair AI Hub in an air-gapped Kubernetes environment.
Note that this example is an edge case: the standard way of installing Altair AI Hub on Kubernetes does not include an air gap. Nevertheless, for the interested user, these notes may provide a valuable reference, provided that the user is sufficiently experienced with Kubernetes.
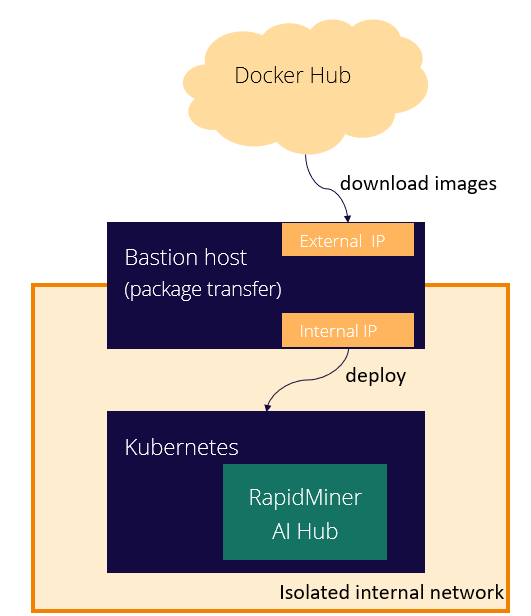
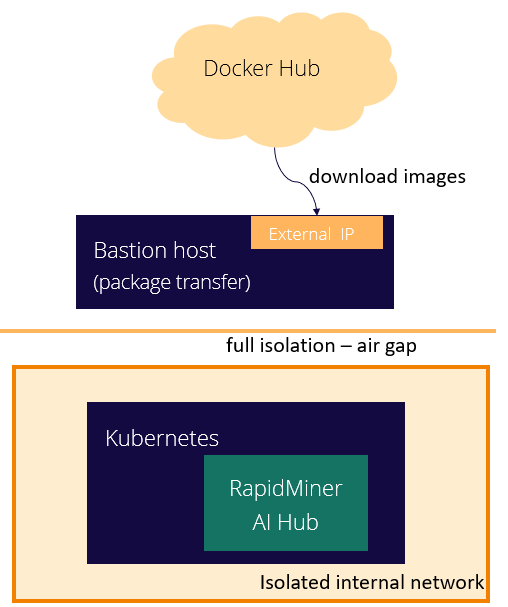
In some cases, companies need AI Hub to run in completely isolated environments, usually for security reasons or to be able to connect to protected sensitive data.
Such an air-gapped environment comes with its own challenges, so we've deployed one and documented results as a guide for admins needing something similar. This is a guide, and not a full documentation, because there are many options and decisions you can make on the way, like the storage settings, the networking architecture, or the security level. We started, therefore, with a particular case, which you can use to understand the main topics to take into account for an isolated environment.
Architecture
The goal was to deploy AI Hub in an air-gapped environment, running on Kubernetes, and using Ceph to manage the storage.
We started with a simple architecture consisting of a master node and 3 worker nodes. The master contains only the management layer, while the workers will run the service pods. We separated a master node because this is a requirement for Ceph, however, other options are possible.
Additionally, a bastion host is needed. This node has both a network interface with internet access and another to access the internal, isolated network. This node will be used to tranfer files and information from the internet to the environment.
Requirements
The installation will be done using Helm charts to deploy AI Hub on Kubernetes. Storage will be managed by Ceph.
Helm and SCP are available in the bastion host. Kubectl is available in the master node.
Step 1: Install the Rook Operator
Rook will be used as storage orchestrator for Kubernetes. It needs to be installed as a first step. We'll use the official helm chart for Rook to do it. This is the way we did it, but other options are also possible.
Overview
On the bastion host add the rook-release helm repo, fetch the chart and upload it to the master node:
helm repo add rook-release https://charts.rook.io/release
helm fetch rook-release/rook-ceph
scp rook-ceph-v1.9.8.tgz master
From this folder, upload the rook-operator-values.yaml file
to the same folder on the master host.
This file is used to customize the rook operator deployment.
Please review the
rook-operator-values.yamlfile,
registry URL, imagePullSecrets etc shall be customized in this file.
On the master node execute the following commands:
kubectl create ns rook-ceph
kubectl create secret \
    docker-registry \
    image-pull-secret \
    -n rook-ceph \
    --docker-server=registry.aihub.rapidminer.com \
    --docker-username=k8s \
    --docker-password=RapidPass2022! \
    --docker-email=operations@rapidminer.com
To do the installation, run the following command:
helm install \
    --namespace rook-ceph \
    rook-ceph \
    rook-ceph-v1.9.8.tgz \
    -f rook-operator-values.yaml
You can track the progress with the following command:
watch kubectl -n rook-ceph get all,pvc
Step 2: Set up the Ceph cluster
Disk configuration
Please note that this step needs to be done carefully. In case of mapping error, you have to do a lengthy cleanup process and start again.
Please pay attention to the nodeAffinity and size specification of the PVs
Our recommended configuration is to have two disks in every worker node, one for the Ceph mon deamon (10 Gb or more) and one for the osd deamon (size depending on use case).
We'll do the mapping of these disk devices to local PersistentVolumes.
First of all, let's discover the disks in the worker nodes with the lsblk command.
The following is a sample layout for cluster-on-local-pvc.yaml. Please make sure you review your copy of the file and adapt it to the right mapping (IPs of the worker nodes and disk sizes, especially).
worker1 10.15.131.218
        nvme0n1     259:0    0   80G  0 disk
        └─nvme0n1p1 259:2    0   80G  0 part /
local1-0    nvme1n1     259:1    0   10G  0 disk
local1-1    nvme2n1     259:3    0  256G  0 disk

worker2 10.15.187.25
        nvme0n1     259:0    0   80G  0 disk
        └─nvme0n1p1 259:1    0   80G  0 part /
local2-0    nvme1n1     259:2    0   10G  0 disk
local2-1    nvme2n1     259:3    0  256G  0 disk

worker3 10.15.164.202
        nvme0n1     259:0    0   80G  0 disk
        └─nvme0n1p1 259:2    0   80G  0 part /
local3-0    nvme1n1     259:1    0   10G  0 disk
local3-1    nvme2n1     259:3    0  256G  0 disk
Ceph installation
Copy all the files in this folder onto the master node.
In order to create the StorageClass local-storage, the PersistentVolumes, and the CephCluster, apply the cluster-on-local-pvc.yaml and toolbox.yaml files:
kubectl apply -f apply -f cluster-on-local-pvc.yaml -f toolbox.yaml
You can track the progress with the following command:
watch kubectl -n rook-ceph get all,pvc
Or follow the logs of the operator:
kubectl -n rook-ceph logs -f pod/rook-ceph-operator-655b5c7fcb-nw5tn
When the cluster is ready, you can check the cluster's health:
kubectl -n rook-ceph exec -it pod/rook-ceph-tools-98c5b5cc4-xv78s -- ceph -s
Create cephfs pools and storageClass
The next step is to apply the cephfilesystem.yaml yaml file. After that, 2 metadata server pods have to show up, and, on the webui, you shall see 2 new pools (rmcephfs_metdata and rmcephfs_data), and a new filesystem (rmcephfs).
kubectl apply -f cephfilesystem.yaml
Apply the cephstorageclass.yaml
kubectl apply -f cephstorageclass.yaml
Apply the test-pvc.yaml
kubectl apply -f test-pvc.yaml
Check it's state (check the belonging PV state too)
kubectl get pvc -n kube-system cephfs-pvc -o yaml
Check the Ceph webui, you will see the following path (folders) on the webui
Filesystem (menu) -> rmcephfs (in the list) -> Directories tab
[/] / [volumes] / [csi] / [csi-vol-XXX]
To clean up the test pvc
kubectl delete -f test-pvc.yaml
Access the admin UI
Please note, that you have to set up 2 port-forwards on your computer
This will also set up the port 8443 on the master host forwarded to your laptop's 8449 port. Those IPs are respectively the internal and external IPs of the bastion host.
~/.ssh/config:
Host airgap-onprem-ks-bastion
Hostname 54.211.174.191
user ubuntu
IdentityFile "~/.ssh/AirGapK8STest.pem"
Localforward  8449 10.15.128.126:8443
On the master host
Get the UI password:
kubectl get secret/rook-ceph-dashboard-password -o yaml | grep "password:" | awk '{print $2}' | base64 -d
To set up the 8443 port forwarding between the manager service in the cluster and the master host
kubectl port-forward -n rook-ceph service/rook-ceph-mgr-dashboard 8443:8443 --address='0.0.0.0'
Open https://localhost:8443/ in your browser
(Accept the security warning).
About backup
For the deployment we used Cephfs, which has a
snapshoting feature.
For a proper backup, the integrity is critical, so we recommend to rely on this
feature if you want to create filesystem backups, and do the database dumps
simultaneously (in parallel). The Ceph snapshot will create a .snap folder
locally containing all your files (this is very fast), so after it is ready you
can back up it's contents using slowwer backup mechanisms like duplicity, which
will transfer your data to a remote server. This is a slower process, but that
doesn't matter, becaus the contents of the snapshot will not change, so
integrity is guaranteed.
Clean up disks (in case anything goes wrong)
Please note that the disk devices may be different on your deployment
The /dev/nvme2n1 disk was used as OSD disk.
Please note that removing the local storage PVs will not erase data, and, after reinstallation, the Ceph cluster monitors will fail to form quorum, so you have to do the manual cleanup first.
Before removing the Cephcluster, erase the data on the disks
On every worker node run the following commands as root:
(replace "X-n" according to the existing directory)
rm -rf /var/lib/rook/*
rm -rf /var/lib/kubelet/plugins/kubernetes.io/local-volume/mounts/localX-0
rm -rf /var/lib/kubelet/plugins/kubernetes.io/local-volume/mounts/localX-1
dd if=/dev/zero of=/dev/nvme2n1 bs=1M count=100
Than you have to erase all other deployment which uses Ceph.
If there isn't any pv or pvc demanding on Ceph, you may start deleting it with:
kubectl delete CephCluster/rook-ceph \
    persistentvolume/local0-0 \
    persistentvolume/local0-1 \
    persistentvolume/local1-0 \
    persistentvolume/local1-1 \
    persistentvolume/local2-0 \
    persistentvolume/local2-1 \
    persistentvolume/local3-0 \
    persistentvolume/local3-1 \
    sc/local-storage;
kubectl delete \
    -f toolbox.yaml \
    -f cluster-on-local-pvc.yaml;
You can follow the progress:
watch kubectl get all,pv,pvc
When only the rook operator pod exists, than you can uninstall the operator:
helm uninstall rook-ceph
Step 3: Deploy AI Hub
Setting up the DNS name
The DNS record provided in the domain, public_url and sso_public_url fields of the airgap-values-9.10.11-gen2.yaml file should be resolved to the EXTERNAL IP of the ingress-nginx-controller service.
kubectl -n ingress-nginx get svc
NAME                                 TYPE           CLUSTER-IP      EXTERNAL-IP     PORT(S)                      AGE
ingress-nginx-controller             LoadBalancer   10.107.84.12    10.15.128.126   80:31395/TCP,443:31813/TCP   5d9h
ingress-nginx-controller-admission   ClusterIP      10.99.91.112    <none>          443/TCP                      5d9h
As you can see in the example output above, you shall set the DNS record
of the deployment to resolve to the 10.15.128.126 IP address
Download the Helm chart and upload to the master host
wget https://docs.rapidminer.com/assets/download/hub/rapidminer-aihub-9.10.8-gen2.tgz
scp v1.9.8.zip rapidminer-aihub-9.10.8-gen2.tgz master:
From this folder, upload the airgap-values-9.10.11-gen2.yaml file to the master node.
Create a docker image pull secret
kubectl create ns airgap-testing-9-10-11-ns
kubectl create secret \
    docker-registry \
    rm-registry-secret \
    -n airgap-testing-9-10-11-ns \
    --docker-server=registry.aihub.rapidminer.com \
    --docker-username=k8s \
    --docker-password=RapidPass2022! \
    --docker-email=operations@rapidminer.com
kubectl config set-context --namespace=airgap-testing-9-10-11-ns --current
Deployment
helm upgrade \
    -n airgap-testing-9-10-11-ns \
    --install rapidminer-aihub \
    --values airgap-values-9.10.11-gen2.yaml \
    ./rapidminer-aihub-9.10.11-gen2.tgz
Routing Ingress traffic to the AI Hub deployment (some options)
HTTP only deployment
Please note the using this method you won’t have encrypted network traffic. This configuration is not recommended for production environments.
To route some of the traffic to this AI Hub deployment, we have to create a routing rule by applying ingress-http.yaml. You'll need to customize at least the hostname in this file.
kubectl apply -f ingress-http.yaml
HTTPS deployment
In order to have encrypted network traffic, you need to configure the ingress and rm-proxy to use a certificate. The communication on the POD network remains unencrypted, however, except for the ingress-gateway and the kubectl port-forward, the POD network cannot be accessed from the external physical network.
kubectl apply -f ingress-https.yaml
HTTPS only deployment (using a custom Certificate Authority)
We recommend to follow the Certificate Management guide and set up the deployment to use encryption for the internal endpoints too, and also use the HTTPS deployment mentioned above to have encryption between the browser, the ingress gateway and the rm-proxy.
Service meshes
If possible, for public production systems we recommend to rely on a service mesh like Istio. It has significant overhead in resources, but provides great features for sysadmins.
Access the deployment with SSH tunneling and kubernetes port-forwarding
Please note, that the following configuration requires the right SSH port-forwarding described above.
The ports 1180 1443 are tunneled to your computer's port 80 and 443,
we have already routed the traffic from the ingress gateway to the rm-proxy-svc, what's left is to tunnel the master node's 1180 and 1443 ports
to the 80 and 443 port of the ingress gateway.
Now we have to do the tunneling (port-forwarding):
kubectl port-forward \
    -n ingress-nginx \
    service/ingress-nginx-controller \
    1180:80 \
    1443:443  \
    --address='0.0.0.0'
To make the DNS resolution work correctly, you have to add an entry to your /etc/hosts file to override the public DNS provided in the domain, public_url and sso_public_url fields of the airgap-values-9.10.11-gen2.yaml file, it shall be resolved to the 127.0.0.1 IP address (or any other IP of your computer).
Access the deployment using VPN or other method
Please note, that testing this scenario wasn’t part of this POC, so we haven’t tested it.
If you want to access the deployment from the private network of the cluster or
from a network from the private network of the cluster is (accessable using VPN),
you have to do that trough the EXTERNAL IP of the ingress-nginx-controller service.
Scaling down
Use these commands to scale the deployment down:
(kubectl delete pod/rm-deployment-init-pod pod/volume-init || true) && \
(kubectl scale --replicas=0 deployment.apps/proxy-dep || true) && \
(kubectl scale --replicas=0 deployment.apps/landing-page-dep || true) && \
(kubectl scale --replicas=0 deployment.apps/token-tool-dep || true) && \
(kubectl scale --replicas=0 deployment.apps/job-agents || true) && \
(kubectl scale --replicas=0 deployment.apps/rapidminer-server || true) && \
(kubectl scale --replicas=0 deployment.apps/rapidminer-server-postgres-dep || true) && \
(kubectl scale --replicas=0 deployment.apps/keycloak-dep || true) && \
(kubectl scale --replicas=0 deployment.apps/keycloak-postgres-dep || true) && \
(kubectl scale --replicas=0 deployment.apps/platform-admin-webui-dep || true) && \
(kubectl scale --replicas=0 deployment.apps/rts-agent-dep || true) && \
(kubectl scale --replicas=0 deployment.apps/jupyterhub-dep || true) && \
(kubectl scale --replicas=0 deployment.apps/jupyterhub-postgres-dep || true) && \
(kubectl scale --replicas=0 deployment.apps/grafana-dep || true)
Clean up
Use these commands for a full clean up.
kubectl config set-context --current --namespace=airgap-testing-9-10-11-ns

(kubectl delete `kubectl get all,cm | grep "configmap" | awk '{print $1}'` || true)
(kubectl delete pod/rm-deployment-init-pod pod/volume-init || true) && \
(kubectl delete `kubectl get all | grep "jupyter-notebook" | awk '{print $1}'` || true) && \
(kubectl delete `kubectl get all | grep "deployment.ap" | awk '{print $1}'` || true) && \
(kubectl delete `kubectl get all | grep "statefulset.a" | awk '{print $1}'` || true) && \
(kubectl delete `kubectl get all | grep "service" | awk '{print $1}'` || true) && \
(kubectl delete `kubectl get all,pvc | grep "persistentvolumeclaim" | grep -v "proxy-pvc" | awk '{print $1}'` || true) && \
#(kubectl delete `kubectl get all,pvc | grep "persistentvolumeclaim" | awk '{print $1}'` || true) && \
(kubectl delete pvc/rm-deployment-init-pvc pvc/keycloak-postgres-pvc || true) && \
(kubectl delete pod/volume-debug pvc/root-nfs-shared-pvc pv/root-nfs-shared-pv sc/nfs-root || true) && \
(kubectl delete pv/airgap-testing-9-10-11-ns-nfs-notebook-pv pv/airgap-testing-9-10-11-ns-nfs-shared-pv)
kubectl delete  sa/jupyterhub-kubespawner-service-account
kubectl delete netpol/jupyterhub-postgres-policy netpol/keycloak-postgres-policy
kubectl delete sc/nfs-airgap-testing-9-10-11-ns
kubectl delete rolebinding/jupyterhub-kubespawner-rolebinding
kubectl delete role/jupyterhub-kubespawner-role
kubectl delete ingress/default-ingress