You are viewing the RapidMiner Radoop documentation for version 8.1 - Check here for latest version
Configuring RapidMiner Radoop Connections on RapidMiner Studio
You configure connections between RapidMiner Radoop on RapidMiner Studio and one or more Hadoop clusters from the basic and advanced Connection Setup windows. You can access these windows from the Connections menu, the Hadoop Data view, or the Design view. After configuring and saving the connection entries, you can test them before deployment. The test validates the connection to the cluster and verifies that the connection settings comply with the RapidMiner Radoop requirements described in the section on prerequisites.
There are three methods to create a Radoop connection. If you have access to the cluster manager software (Apache Ambari or Cloudera Manager), we strongly recommend to use the ![]() Import from Cluster Manager option. This method is the simplest one. If you do not use or do not have access to a cluster manager, but can ask for the client configuration files, then use the
Import from Cluster Manager option. This method is the simplest one. If you do not use or do not have access to a cluster manager, but can ask for the client configuration files, then use the ![]() Import Hadoop Configuration Files option. Otherwise, you always have the option to
Import Hadoop Configuration Files option. Otherwise, you always have the option to ![]() Add Connection Manually. This last option also allows you to import a Radoop connection that someone shared with you by clicking on the Edit XML... button, once the Advanced Connection Properties dialog appears.
Add Connection Manually. This last option also allows you to import a Radoop connection that someone shared with you by clicking on the Edit XML... button, once the Advanced Connection Properties dialog appears.
Note: When configuring RapidMiner Radoop, you must provide the internal domain name or IP address of the master node (that is, the domain name or IP address that the master node knows about itself). See the networking setup overview for details on how to ensure that your data is safe from unauthorized access.
Basic RapidMiner Radoop connection configuration
Once RapidMiner Radoop is installed, you can create a connection.
Restart RapidMiner Studio so that it recognizes the RapidMiner Radoop extension. Once it restarts, you will see a new
 Manage Radoop Connections option in the Connections menu:
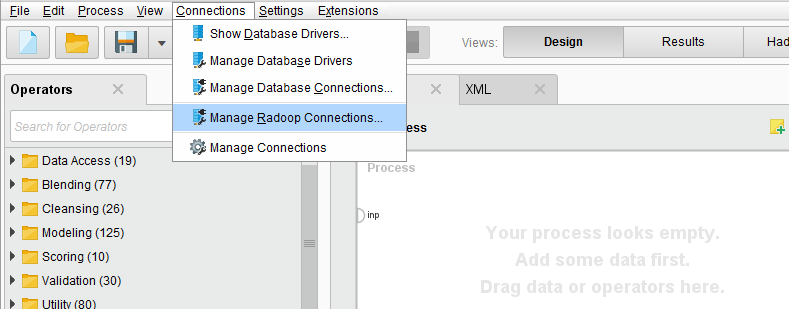
Select the
Manage Radoop Connections menu item and the Manage Radoop Connections window opens: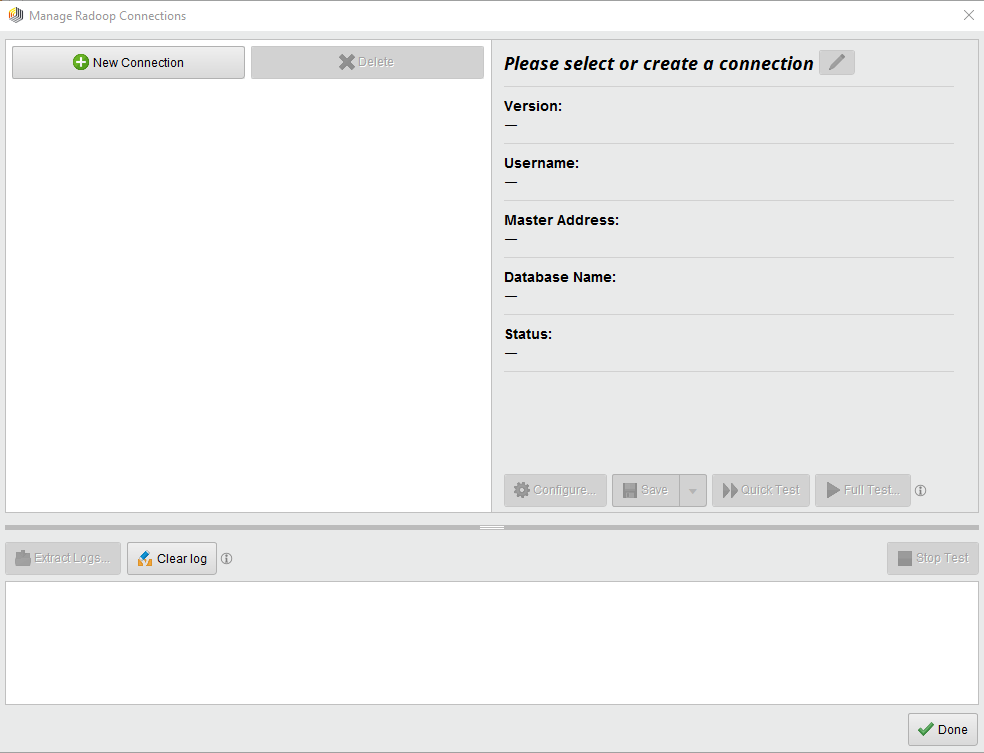
For more details on this dialog, see Manage Radoop Connections section below.
Click on
 New Connection button and choose
  Add Connection Manually:
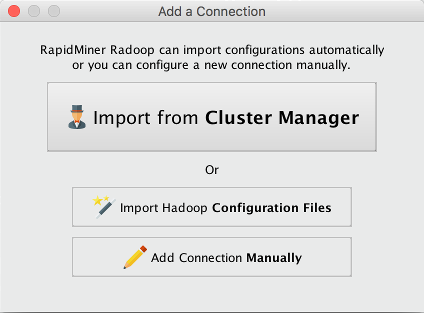
If you wish to create the connection by importing client configuration files or by using a cluster management service, read the Importing Hadoop configuration section.
You can edit the connection properties on the Advanced Connection Properties window.
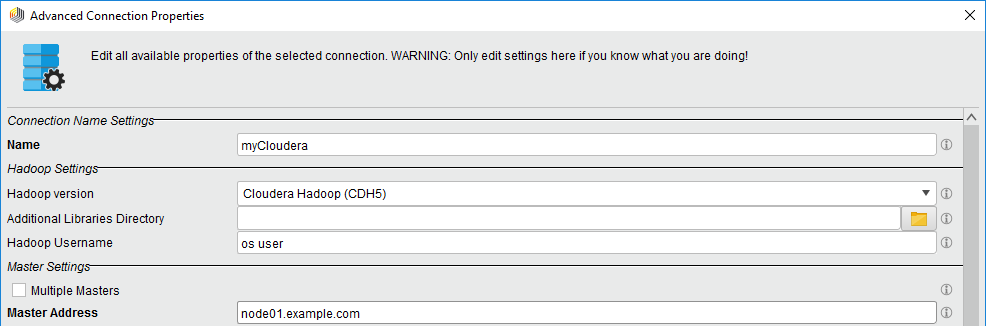
Complete the required connection fields:
Field Description Name A name for the connection. Hadoop Version The distribution that defines the Hadoop version type for this connection. Master Address The master address of the cluster. This is the hostname of the machine in the cluster that runs NameNode and all other master services. If master services are running on different nodes, you can specify them by checking Multiple Masters. Note that DNS and reverse DNS should work for all specified addresses, so the client machine must have access to the network name resolution system of the cluster or be able to resolve the addresses locally. For further details, see Advanced Connection Properties section below.
Click
 OK to create the connection entry.
Click
 Save to add the entry to the available connections.
Test the connection between RapidMiner Radoop and the Hadoop cluster. If necessary, and with the assistance of your Hadoop administrator, set the advanced settings based on the distribution specific notes.
Your connection settings are saved in a file called radoop_connections.xml in your .RapidMiner directory.
Importing a connection
Configuring a connection manually can be cumbersome for a more complicated cluster. In this case using one of the connection import features is recommended. There are two options: you can create a connection using the cluster's client configuration files, or by providing the URL and credentials for the cluster's management service (Cloudera Manager or Ambari).
You can create Radoop connections by setting up its parameters from client configuration files. To do so, choose ![]() Import Hadoop Configuration Files option when adding a new connection. Set the location of the file in the following dialog:
Import Hadoop Configuration Files option when adding a new connection. Set the location of the file in the following dialog:
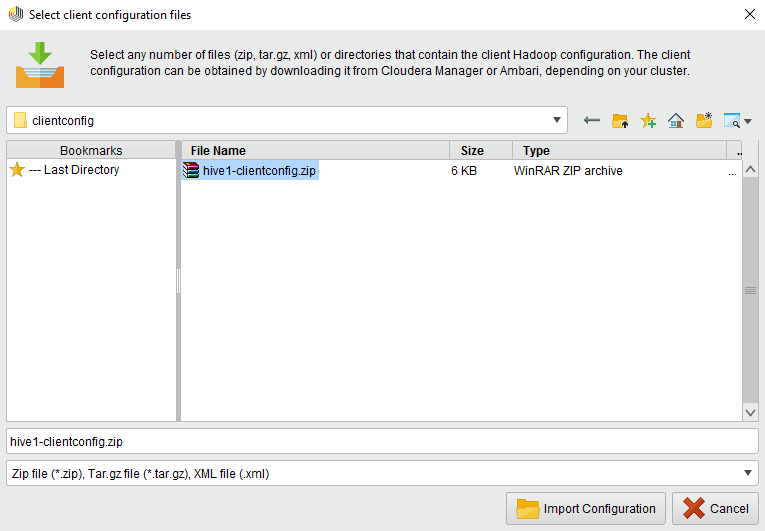
You can select one or more folder(s) or compressed file(s) (such as zip or tar.gz) containing the configuration XML documents, or you can simply import single xml files. You can easily get hold of these files by using the distributor’s Hadoop management tool.
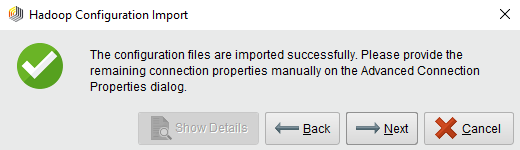
Click ![]() Import Configuration and wait until a popup window shows the result of the import process:
Import Configuration and wait until a popup window shows the result of the import process:
 Success: You can go on with the next step.
 Warning: Some fields will be missing, these can be provided in the next step.
  Show details button informs you about the problem(s).
 Failure: You need to go
  Back and choose the appropriate file(s).
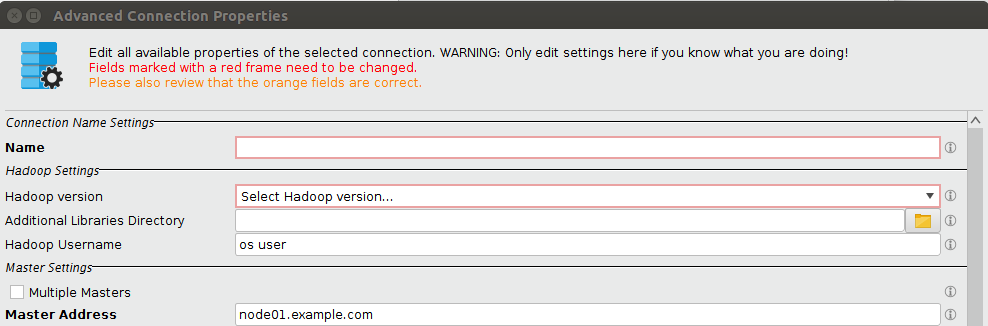
Clicking ![]() Next will lead you to the Advanced Connection Properties window, where you will find all the properties that could be retrieved via importing. Some required fields might still be missing, these appear highlighted and are to be filled manually:
Next will lead you to the Advanced Connection Properties window, where you will find all the properties that could be retrieved via importing. Some required fields might still be missing, these appear highlighted and are to be filled manually:
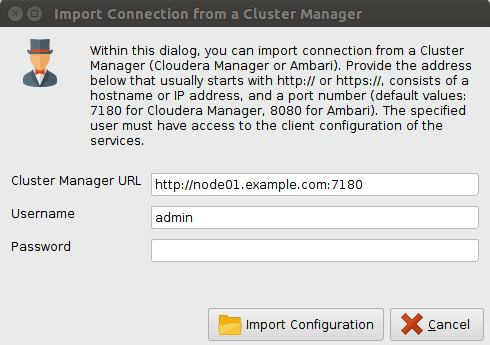
You can create a connection by providing the URL and the credentials for the cluster’s management service. In this case select the ![]() Import from Cluster Manager option when adding a new connection. The dialog looks the following:
Import from Cluster Manager option when adding a new connection. The dialog looks the following:
The fields that need to be filled on this dialog:
- Cluster Manager URL: The URL of the cluster’s management service. For HDP-like connections (HDP, HDInsight, IOP, IBM, etc.) this is usually Apache Ambari, which usually runs by default on port 8080 (except for HDInsight, where usually no port has to be provided). For CDH connections, this is Cloudera Manager, running by default on port 7180. Please take care of the protocol prefix (usually http, https). If the protocol is missing, “http://” will be used automatically.
- Username: The username for the cluster manager. Please note that the user needs to have privileges for the client configuration. Read-only permissions are sufficient for retrieving most connection properties. Using an admin user is not required, but makes it possible to retrieve further settings that may have to be provided manually otherwise.
- Password: The password for the provided cluster manager user.
After filling the fields, click ![]() Import Configuration to start the import process.
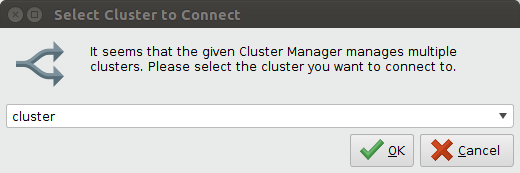
If the cluster manager manages more than one clusters, the following input dialog will pop up. Select the cluster’s name you want to connect to.
Import Configuration to start the import process.
If the cluster manager manages more than one clusters, the following input dialog will pop up. Select the cluster’s name you want to connect to.
The connection import can have two outcomes:
- Success: You can go on with the next step.
- Failure: You need to go Back and fix the URL or the credentials. The detailed error can be seen if you click the Show Details button.
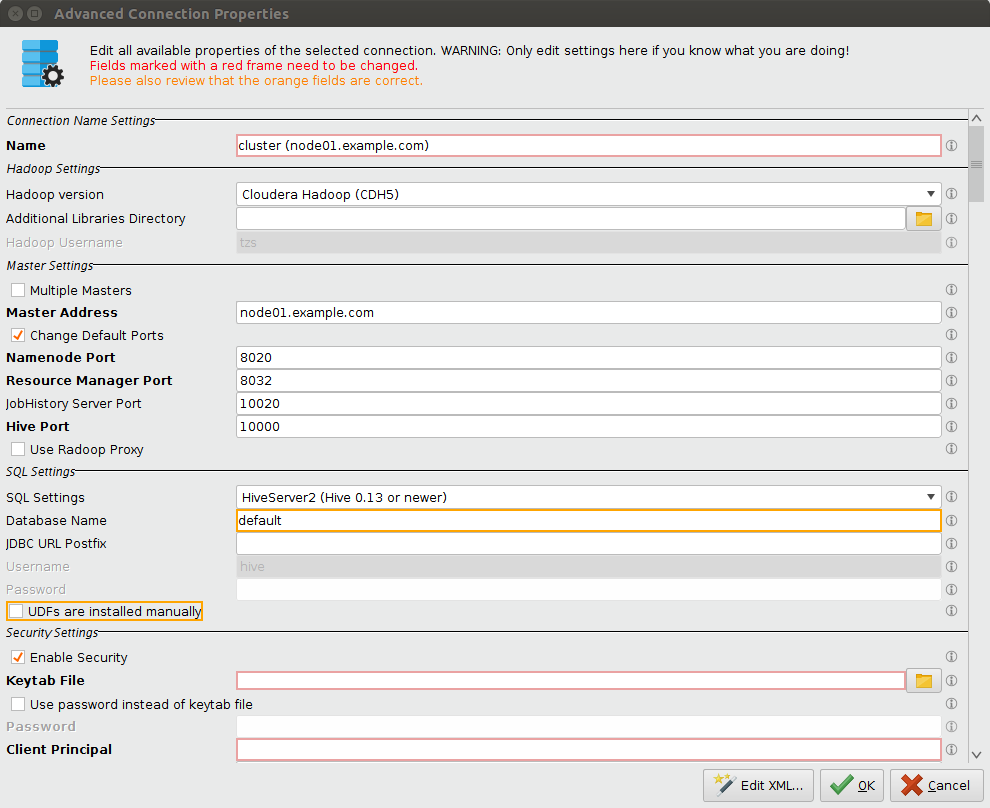
After successfully importing the connection, the Advanced Connection Properties window will pop up. Here you can change the name of the connection, and finish the connection configuration manually. A few required fields can not be retrieved from the cluster manager, these are marked with a red frame. A few other fields have a default value, but need to be changed often (e.g. Database Name for a secure connection). These have an orange frame on the dialog. Please note that the Hadoop Version is automatically set to HDP, if you used Apache Ambari as the cluster manager. In case of e.g. IBM and ODP distributions the Hadoop version needs to be changed manually.
Manage Radoop Connections window
The Manage Radoop Connections window shows your already configured connections and allows you to edit them, or create and test new connections:
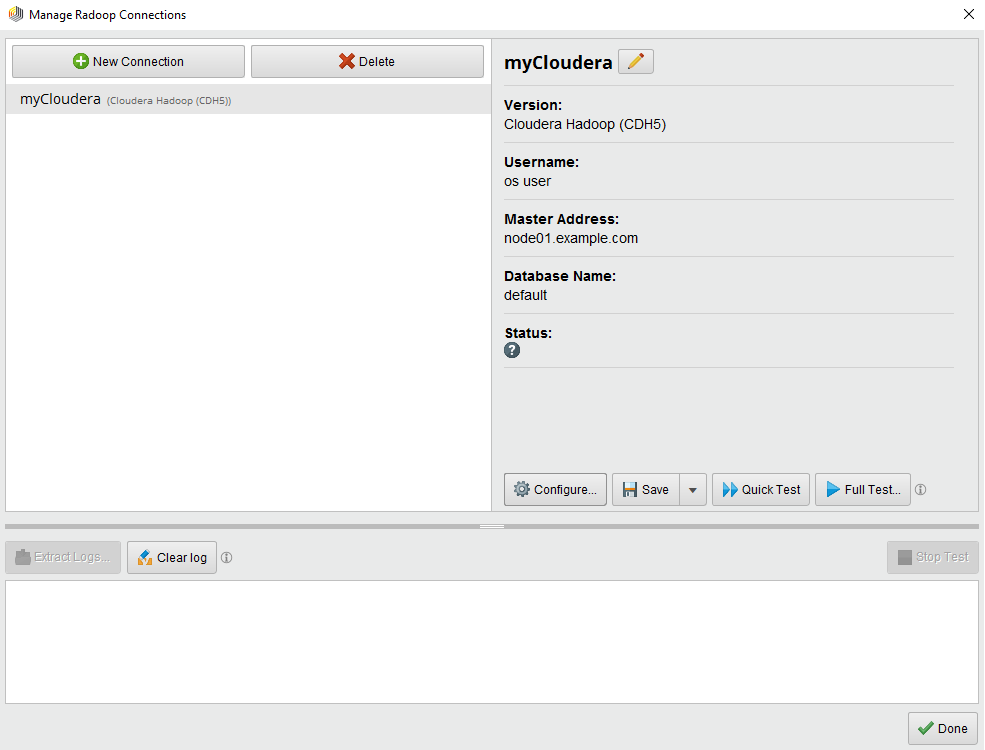
This window consists of 3 panels. The upper left panel lists all known connection entries. For each entry, one or more icons may be present showing some additional information, namely:
 Spark is configured for this connection
 The connection uses Impala as query engine
 Connection to a secure cluster
The basic properties of the currently selected connection are gathered on the right-hand side panel. There are also buttons executing several actions available on the selected connection:
 Configure...: Opens the Advanced Connection Properties window where you can configure the connection properties. Check the Advanced connection settings section for more details.
- Save: Saves the currently displayed connection.
 Save As...: Saves a copy of the currently displayed connection. Useful for saving a slightly modified connection while keeping the original entry.
 Quick Test: Runs a Quick Test on the currently displayed connection.
 Full Test...: Runs a Full Integration Test on this connection. More information on the connection tests can be found in the Testing RapidMiner Radoop connections section.
- Rename Action: Renames the current connection. Please note that all connection names should be unique.
The lower panel shows logs of the running tests. Several actions can be performed on this panel too:
 Extract logs...: This action creates a bundled zip file containing all relevant logs of your recent Radoop-related activities. See related section for more details.
 Clear logs: Clears the connection log field.
 Stop Test: The Stop Test action will halt the currently running test execution (see the Testing RapidMiner Radoop connections section).
Testing RapidMiner Radoop cluster connections
RapidMiner Radoop's built-in test functions help with troubleshooting before trouble begins.
Basic connection test
Click the ![]() Quick Test button in the Manage Radoop Connections window to test the connection to the cluster. Through a series of simple tests to different components (APIs) on the cluster, the test verifies that the cluster is running and that the RapidMiner Radoop client can access it. You can stop the test anytime by clicking the
Quick Test button in the Manage Radoop Connections window to test the connection to the cluster. Through a series of simple tests to different components (APIs) on the cluster, the test verifies that the cluster is running and that the RapidMiner Radoop client can access it. You can stop the test anytime by clicking the ![]() Stop Test button.
Stop Test button.
Full connection tests
Once your test succeeds, run a complete test (which may take several minutes) by clicking the ![]() Full Test... button. It's possible to customize a full connection test by clicking the
Full Test... button. It's possible to customize a full connection test by clicking the ![]() Customize... button. In this panel you can enable or disable tests, change the timeout and enable or disable the cleaning after the tests. These values are reset to the defaults after closing the Manage Radoop Connections window. Click
Customize... button. In this panel you can enable or disable tests, change the timeout and enable or disable the cleaning after the tests. These values are reset to the defaults after closing the Manage Radoop Connections window. Click ![]() Run to start the test.
Run to start the test.
The full test initiates several jobs and applications on the cluster and then checks the results. By successfully and extensively exercising RapidMiner Radoop interactions with your cluster, you can feel confident in your RapidMiner Radoop process design and execution.
In addition to testing connections when you first create a RapidMiner Radoop configuration, you can use the Full Test if you have an error in process execution or a change in the cluster. The output of the full test results can help identify the root cause of the problem for easier troubleshooting. You can stop the Full Test anytime by clicking the ![]() Stop Test button. Stopping the current test process may take some time.
Stop Test button. Stopping the current test process may take some time.
Note: The cluster connection initial test also starts automatically in the background when you open a process containing a RapidMiner Radoop Nest operator (indicated by the status bar in the bottom right corner of the RapidMiner Studio screen).
Advanced connection settings
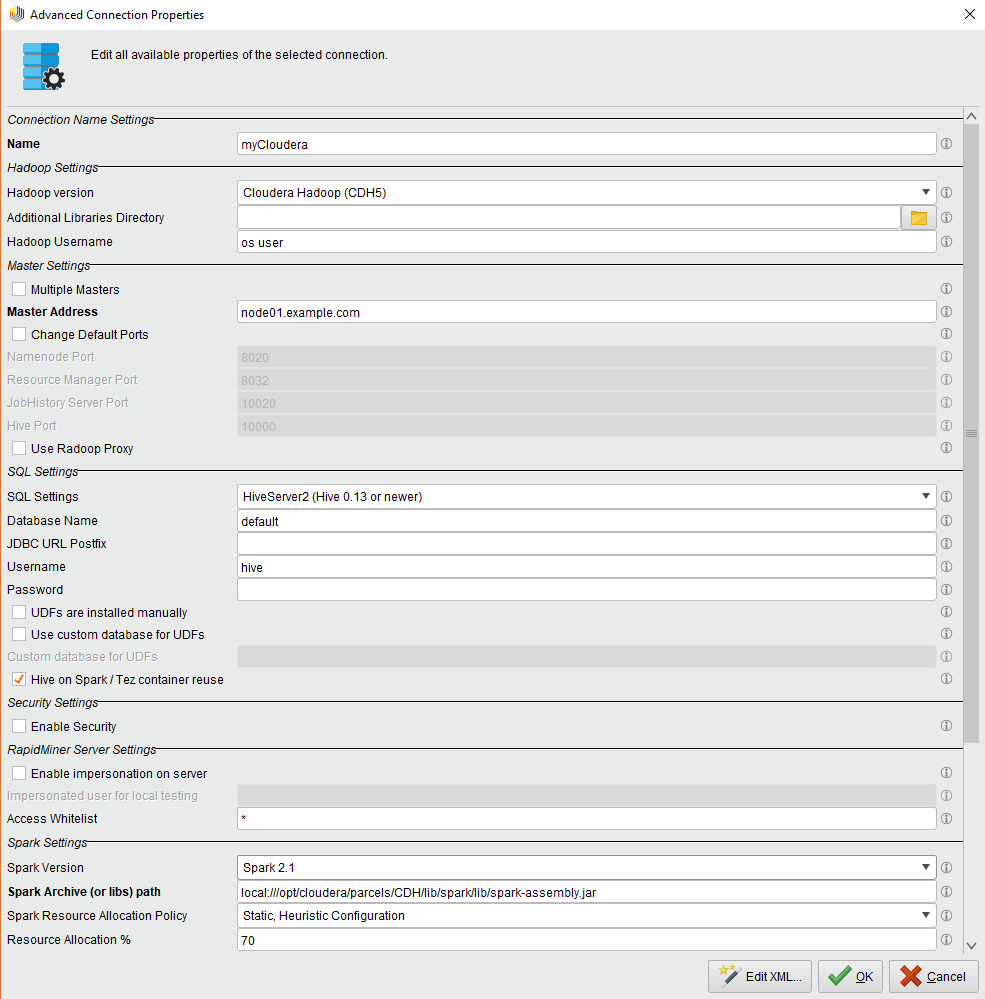
You can use the Advanced Connection Properties window to edit the connection parameters. For example, you can change port numbers or define arbitrary parameters for Hadoop and Hive using key-value pairs. Do not modify the connection settings without first consulting with your organization's IT administrator. To open the Advanced Connection Properties window, click the ![]() Configure... button from the Manage Radoop Connections window.
Configure... button from the Manage Radoop Connections window.
Note: The fields displayed depend on the selections (for example, the selected Hadoop version). Also, some fields prepopulate based on the Hadoop version selection from the basic settings. If a field is bold in the window, it is required.
The following table briefly describes the fields of the Advanced Connection Properties window. For advanced configuration details related to your environment, see the distribution specific notes.
| Field | Description |
|---|---|
| Name | A name for the connection. |
| Hadoop Version | The distribution that defines the Hadoop version type for this connection. |
| Additional Libraries Directory | Any additional libraries (JAR files) on the client needed to connect to the cluster (optional, for expert users only). |
| Hadoop Username | The name of the Hadoop user. In most cases, the user must have appropriate permissions on the cluster. For a new connection, the default is the OS user. |
| Master Address | The master address of the cluster. This is the address (usually hostname) of the machine in the cluster that runs the NameNode and all other master services. If master services are running on different nodes, check the Multiple Masters box. Note that DNS and reverse DNS should work for all specified addresses, so the client machine must have access to the network name resolution system of the cluster or be able to resolve the addresses locally. |
| Multiple Masters | Check this box if master services are running on different nodes. If checked, the following three fields become available. |
| NameNode Address | Only with Multiple Masters checked. Address (usually hostname) of the node running the NameNode service. (Requires a working network name resolution system.) |
| Resource Manager Address | Only with Multiple Masters checked. Address (usually hostname) of the node running Resource Manager service. |
| JobHistory Server Address | Address (usually hostname) of the node running the Job History Server service. |
| Hive Server Address/Impala Server Address | Only with Multiple Masters checked. Address (usually hostname) of the node running the Hive Server or the Impala Server. |
| Change Default Ports | Check this box if any of the services can be accessed on a non-default port. |
| Namenode Port | Only with Change Default Ports checked. Port of the NameNode service. |
| Resource Manager Port | Only with Change Default Ports checked. Port of the Resource Manager service. |
| JobHistory Server Port | Port of the Job History Server service. |
| Hive Port/Impala Port | Only with Change Default Ports checked. Port of the Hive Server or Impala Server. |
| Use Radoop Proxy | Check this box if you want to access the Hadoop Cluster through a Radoop Proxy. |
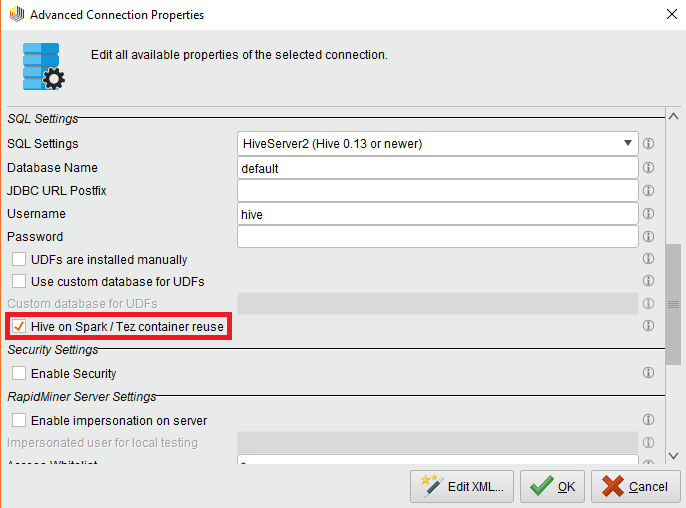
| SQL Settings | Select the appropriate Data Warehouse System — HiveServer2 (Hive 0.13 or newer) or Impala. Alternatively, you can select Custom HiveServer2 and provide your own Hive jars. |
| Custom Hive Lib Directory | Only with Custom Hiveserver2 selected. Select a directory that contains the libraries (JAR files) needed to connect to the cluster. |
| Database name | Name of the database to connect to. |
| JDBC URL Postfix | Optional postfix for the JDBC URL. The default is "auth=noSasl" for Impala connections. |
| Username | Username for connecting to the specified database. The default is "hive" for all HiveServer2 version connections. This user should have access to the HDFS directory that Radoop uses for storing files temporarily. If this directory is located in an encryption zone, the user should also have permissions to access the encryption zone key. |
| Password | Password for connecting to the specified database. RapidMiner Radoop uses the cipher.key file to encrypt the password in radoop_connections.xml. |
| UDFs are installed manually | Check this box if the Radoop UDFs are installed on the cluster manually. More information on the manual UDF installation can be found on the Operation and Maintenance page. |
| Use custom database for UDFs | Check this box if a custom database should be used for storing and accessing Radoop UDFs. This is useful when more users (having different project databases and granted privileges) wish to use Radoop. This common database should be accessible by all of them. The UDFs can still be automatically or manually created. |
| Custom database for UDFs | Define the database dedicated for storing Radoop UDFs (see above). The database must exist. |
| Enable Hive on Spark / Tez container reuse | Check this box if you would like to benefit from Hive on Spark / Hive on Tez container reuse. |
| Enable Security | Check this box to connect to a secure Hadoop cluster. |
| Additional security settings | For more information on these settings and connecting to a secured cluster, see the Hadoop Security section. |
| RapidMiner Server Settings | Within this group, some multi-user configuration properties are listed that affect the execution on RapidMiner Server. For more information and best practice solutions, see the relevant sections of Installing Radoop on Server page. |
| Spark Version | Selecting the appropriate Spark Version enables the Spark operators in Radoop. For more information on using Spark operators, see the Configuring Spark section. |
| Assembly JAR Location / Spark Archive (or libs) path | The HDFS location or local path (on all cluster nodes) of the Spark Assembly JAR file / Spark JAR files. |
| Spark Resource Allocation Policy | The resource allocation policy for Spark jobs. The default - Dynamic Resource Allocation starting from 8.1.1 and Static, Heuristic Configuration in 8.1.0 - is typically applicable. See more Spark policy information. |
| Resource Allocation % | Percentage of cluster resources allocated for a Spark job. This field is only enabled when Static, Heuristic Configuration is the Spark resource allocation policy. |
| Advanced Spark Parameters | Key-value properties that customize RapidMiner Radoop's Spark jobs. See the instructions for configuring Spark. |
| Advanced Hadoop Parameters | Key-value properties to customize the Hadoop connection and Radoop's Yarn/MapReduce jobs. Some connections require certain advanced parameters. For detailed information, see the distribution specific notes. |
| Advanced Hive Parameters | Key-value properties to customize the behavior of Hive. This field is hidden when using Impala. |
XML connection editor
The Radoop connection XML can be edited manually by clicking the Edit XML... button on the Advanced Connection Properties window. Please note that this feature should be used carefully as it's easy to make mistakes in a connection entry through the XML editor. The main purpose of the editor is to make connection sharing and copy-pasting some parts of it (e.g. Advanced Hadoop Parameters) much easier. When you close the window with the OK button, your changes appear in the fields of the Advanced Connection Properties window.
Note: Adding a separate key attribute to <radoop-connection-entry> tag in the XML editor will have no effect. It can only be added in radoop_connections.xml, manually.
Configuring non-default properties
If your Hadoop cluster uses non-default properties, additional key-value pairs may be required. Cluster management tools like Cloudera Manager and Ambari allow you to download the client configuration files. You may have to add cluster connection-related properties from these files to the Advanced Hadoop Parameters list. See below for single properties that occur to be (re)set frequently, and more complex examples describing the properties required to connect to a cluster with High Availability (HA) enabled. The following tables list the keys of the potentially required client-side settings. The values should be set to the appropriate property values from the client configuration files. Note that not all keys related to these features may be required, the required set of key-value pairs depend on your cluster settings.
| Key | Description |
|---|---|
dfs.client.use.datanode.hostname |
Indicates whether clients should use datanode hostnames when connecting to datanodes. Setting it to true may allow to use the public network interface of the datanodes instead of the private one. By default, the property value retrieved from the cluster is used. If not properly set, DataNode networking test (part of the full connection test) will show a warning. Example: see CDH 5.5 Quickstart VM |
mapreduce.job.queuename |
Queue to which a job is submitted. The system must be configured with this predefined queue, and access must be granted for submitting jobs to it. When using other than the default queue, it must be defined here explicitly. Example: low_priority |
Configuring the connection to an HA HDFS-enabled cluster only requires that you specify the proper Hadoop settings in the Advanced Hadoop Parameters window.
The HA feature eliminates any single point of failure for a cluster by providing a standby (in addition to active) NameNode. HA implements manual switchover and automatic failover to provide continuous availability. The following table lists the settings required for the RapidMiner Radoop client to connect to the cluster. These properties must be configured in each cluster node configuration file. For further details, see your Hadoop documentation.
| Key | Description |
|---|---|
fs.defaultFS (or fs.default.name) |
The default path for Hadoop FS typically contains the NameService ID of the HA-enabled cluster. Example: hdfs://nameservice1 |
dfs.nameservices |
The logical name for the service. Example: nameservice1 |
dfs.ha.namenodes.<nameservice ID> |
Comma-separated list of unique NameNode identifiers. Example: namenode152,namenode92 |
dfs.namenode.rpc-address.<nameservice ID>.<namenode ID> |
RPC address for each NameNode to listen on. Example: node01.example.com:8020 |
dfs.client.failover.proxy.provider.<nameservice ID> |
Class HDFS clients use to contact the active NameNode. Currently there is only one option shipped with Hadoop. Example: org.apache.hadoop.hdfs.server.namenode.ha.ConfiguredFailoverProxyProvider |
Setting the connection to an HA Resource Manager-enabled cluster only requires that you specify the proper Hadoop settings in the Advanced Hadoop Parameters window.
The Resource Manager (RM) HA feature removes a single point of failure (adds redundancy) using an Active/Standby RM pair. The following table lists the settings required for the RapidMiner Radoop client to connect to the cluster. These properties must be configured in each cluster node configuration file. For further details, see your Hadoop documentation.
| Key | Description |
|---|---|
yarn.resourcemanager.ha.enabled |
Enables Resource Manager High Availability. |
yarn.resourcemanager.ha.automatic-failover.enabled |
Enables automatic failover. By default, only enabled when HA is enabled. |
yarn.resourcemanager.ha.automatic-failover.embedded |
When automatic failover is enabled, uses embedded leader-elector to pick the active RM. By default, only enabled when HA is enabled. |
yarn.resourcemanager.zk-address |
Address of the ZK-quorum. Used both for the state-store and embedded leader-election. |
yarn.resourcemanager.cluster-id |
Identifies the cluster. Used by the elector to ensure an RM does not take over as active for another cluster. Example: yarnRM |
yarn.resourcemanager.ha.id |
Identifies the RM in the ensemble. Optional, but if set, ensure that all the RMs have a unique ID. |
yarn.resourcemanager.ha.rm-ids |
Comma-separated list of logical IDs for the RMs. Example: rm274,rm297 |
yarn.resourcemanager.address.<rm-id> |
Service address for each RM ID. |
yarn.resourcemanager.scheduler.address.<rm-id> |
Scheduler address for each RM ID. |
yarn.resourcemanager.resource-tracker.address.<rm-id> |
Resource tracker address for each RM ID. |
yarn.resourcemanager.admin.address.<rm-id> |
RM admin address for each RM ID. |
yarn.resourcemanager.store.class |
The class to use as the persistent store for RM recovery. |
Configuring Spark for a RapidMiner Radoop connection
By configuring Spark for a RapidMiner Radoop connection, you enable the Logistic Regression, Linear Regression, Decision Tree (MLlib binominal), Support Vector Machine and - if using Spark 1.5 or later - the Spark Script, Decision Tree, Random Forest and the Single Process Pushdown operators. The machine learning operators use the corresponding functions in Spark MLlib or Spark ML.
To enable Spark, select Spark 1.4 or below, Spark 1.5, Spark 1.6, Spark 2.0, Spark 2.1 or Spark 2.2 in the Spark version dropdown list in the Advanced Connection Properties window.
You must provide the following mandatory inputs on the Advanced Connection Properties window:
| Field | Description |
|---|---|
| Spark Version | The version of the Spark assembly JAR on your cluster. For Spark versions 1.2.x, 1.3.x and 1.4.x please select Spark 1.4 or below. If you have Spark 1.5.x, Spark 1.6.x, Spark 2.0.x, Spark 2.1.x or Spark 2.2.x on your cluster, select Spark 1.5, Spark 1.6, Spark 2.0, Spark 2.1 or Spark 2.2, respectively. If no Spark is needed then select None option. |
| Assembly JAR location / Spark Archive (or libs) path | The HDFS or local path of the distribution-specific Spark assembly JAR file / Spark JAR files. If you provide a local path then it must be the same on every node in your cluster. Specifying the local path is recommended if Spark is automatically installed (e.g. with Cloudera Manager or Ambari) on the cluster. For some Hadoop versions, the pre-built Spark assembly JAR can be downloaded from the Apache Spark download page. Some vendors (like Cloudera) provide a distribution-specific Spark assembly JAR. For the HDFS path of the JAR, contact your Hadoop administrator. For example, to install Spark 1.5 manually, refer to the Spark requirements section. If you followed the instructions there, your assembly jar is at the following location on the HDFS: hdfs:///tmp/spark/spark-assembly-1.5.2-hadoop2.6.0.jar |
| Spark resource allocation policy | Spark needs specification of the cluster resources it is allowed use. See the Spark resource allocation policy descriptions |
| Advanced Spark Parameters | Key-value pairs that can be applied to a Spark-on-YARN job. If the change has no effect on your Spark job, most likely it is ignored by YARN itself. To check the properties in the application log, set spark.logConf to true. |
Spark resource allocation policies
RapidMiner Radoop supports the following resource allocation policies:
Dynamic Resource Allocation
Default option starting from 8.1.1. While this policy requires configuration on the server, many server already have this installed.
With this policy you may need to configure an external shuffle service on the cluster. For more information about the required cluster configuration steps see the Spark Dynamic Allocation documentation.
The following properties may be defined under Advanced Spark Parameters of the Advanced Connection Properties window - they are only mandatory when Spark 1.4 or below is selected for Spark Version:
 - `spark.dynamicAllocation.minExecutors`
 - `spark.dynamicAllocation.maxExecutors`
Cluster specific info
Static, Heuristic Configuration
- This is the default policy in 8.1.0 and previous versions. If you use this option, you do not need to set any advanced resource allocation settings. The Resource Allocation % field sets the percentage of cluster resources (cluster memory, number of cores) to be used for a Spark job. Note that if you set this value too high, other jobs on the cluster might suffer. The default value is 70%.
Static, Default Configuration
- A policy that uses Spark's default settings for resource allocation. This value is very low and may not support a real cluster, but it may be a viable option for VMs/sandboxes.
Static, Manual Configuration
- This policy requires that you set the following properties under Advanced Spark Parameters of the Advanced Connection Properties window. The Spark documentation describes each property. (The corresponding Spark on YARN command line arguments are shown in parentheses.)
spark.executor.cores(--executor-cores)spark.executor.instances(--num-executors)spark.executor.memory(--executor-memory)- (optional)
spark.driver.memory(--driver-memory)
Note:
Because of SPARK-6962, RapidMiner Radoop changes the default value of spark.shuffle.blockTransferService to nio instead of netty. To override this setting, in the Advanced Spark Parameters field configure the key spark.shuffle.blockTransferService to the value netty. Starting from 1.6.0, this setting is ignored by Spark, the BlockTransferService is always netty.
Hive on Spark & Hive on Tez container reuse
Reusing the containers of the Hive execution engine can dramatically speed up Radoop processes, especially if there are lots of Hive-only tasks. It is achieved by keeping a number of Spark / Tez containers (applications) in running state for executing Hive queries. Keep in mind that these containers will use cluster resources even if there are no running processes. Radoop tries to estimate the optimal number of containers by default, but it also can be changed to a fix number in the settings (see below). Idle containers are automatically closed after a timeout.
To use this feature, your cluster must support Hive on Spark or Hive on Tez, and in your connection have to set hive.execution.engine to spark or tez in Advanced Hive Parameters and check Hive on Spark / Tez container reuse checkbox (this is the default value):
A number of global Radoop settings can be used to control the container reuse behaviour. You may want to test different settings to use your cluster optimally, see Radoop Settings for details.
As Hive on Spark / Hive on Tez containers are kept running and reserving cluster resources, you may easily run out of memory/cores on small clusters (e.g. quickstart VMs) if you run other MapReduce, Spark or Tez jobs. To prevent this situation, Radoop automatically stops these containers before starting a MapReduce or Spark job. (Idle containers would have been closed anyway, but this enables closing them before the idle timeout, right when the resources are needed.)
Impala connections
If your are configuring an Impala connection some Advanced Hadoop Parameters need to be added manually. If you forget to add any of those, a warning message will warn you about the missing ones. The Add Required Entries button adds the keys of these properties to the list, but their values must be set manually according to the cluster configuration.
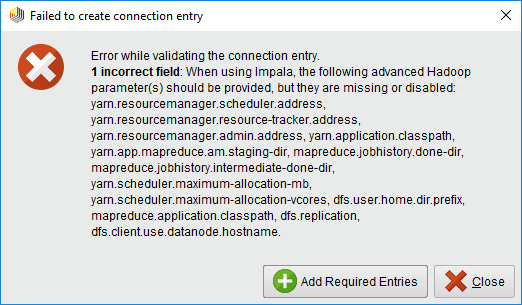
When upgrading RapidMiner Studio or Server, further settings may become mandatory, which could mean that the Impala connections may have to be updated with the new required advanced settings.