You are viewing the RapidMiner Deployment documentation for version 9.7 - Check here for latest version
Platform Admin
Introduction
Platform Admin provides an easy to use interface for common platform administration tasks in two distinct areas:
This page provides an overview of these functions and their limitations. The Platform Admin is available as part of the RapidMiner Platform deployment. See the deployment overview on where it fits in, and check one of the deployment templates to get started with it.
Logging in to Platform Admin
Platform Admin is accessible via the RapidMiner Platform landing page, or by navigating to https://your-platform-deployment/platform-admin/.
You need the right roles configured for your user to access Platform Admin and its features. Users with the platform-admin role will have access to all features of Platform Admin. If needed, you can restrict access by assigning any of the defined fine-grained roles based on the table below:
| Role Name | Description |
|---|---|
pem-viewer |
Can view defined Python and R environments and their contents |
pem-admin |
Can view, create, archive and delete Python and R environments |
rts-viewer |
Can view and test deployments |
rts-deployment-admin |
Can view, test, create and delete deployments |
rts-admin |
Can install licenses and manage scoring access control |
For more information on configuring roles, go to the relevant page of Manage deployments.
Managing Python and R Environments
The RapidMiner Platform deployment supports coder data scientists in their daily productivity. As part of that, we ship our Python Scripting Extension and R Scripting Extension preconfigured for process and web service execution.
We also ship a base Miniconda environment that contains the most commonly used Python and R packages in data science projects, however it is a common use-case that projects need their specific set of Python or R packages. As the RapidMiner Platform's scalable execution backend is a distributed engine, it is required to ensure the same environments are defined on all parts of the execution backend.
The goal of the Platform Admin is to ease the administration of these Python and R environments. Its key benefits are:
- reduced administrative overhead
- reduced risk of administrative errors
- ensured correct operation of deployed RapidMiner processes and web services containing Python or R code
Limitations
Please be mindful of the following limitations when managing environments:
- Platform Admin only manages Python and R environments shipped with the RapidMiner Platform deployment.
- Platform Admin currently only manages Python and R environments for Job Agent based process execution and web services. JupyterHub and Real-Time Scoring Agent is not supported.
- When importing an environment definition file that was exported from another machine, only Linux (and WSL in Windows) is supported as a source. Environments exported from macOS or Windows based systems will not work. This is a limitation of the underlying Miniconda package manager.
Creating a new Python or R environment
The Platform Admin interacts with a Miniconda installation present on the deployed Job Agents. It accepts environment definition YAML files which are used by Miniconda. Follow these steps to create a new environment:
- First, create a definition file on your computer. You can use any of the following methods:
- Preferred way: download the preinstalled base environment definition to your computer and edit it (be sure to change the name). See instructions below.
- Export the environment from your own machine using the
conda env exportcommand. Make sure to check the limitations first. - Open your favorite text editor and create the definition file manually.
- Preferred way: download the preinstalled base environment definition to your computer and edit it (be sure to change the name). See instructions below.
- In the Platform Admin UI, browse and find the YAML file you just created, and click Submit.
- Be patient for a few minutes until the settings are applied on all Job Agents.
- You can check the status of the deployment if you refresh the page.
Updating an existing Python or R environment
Updates are very similar to creating new environments. The only difference is that you need to specify an environment with an existing name. Follow the instructions above to create and upload your modified environment definition file.
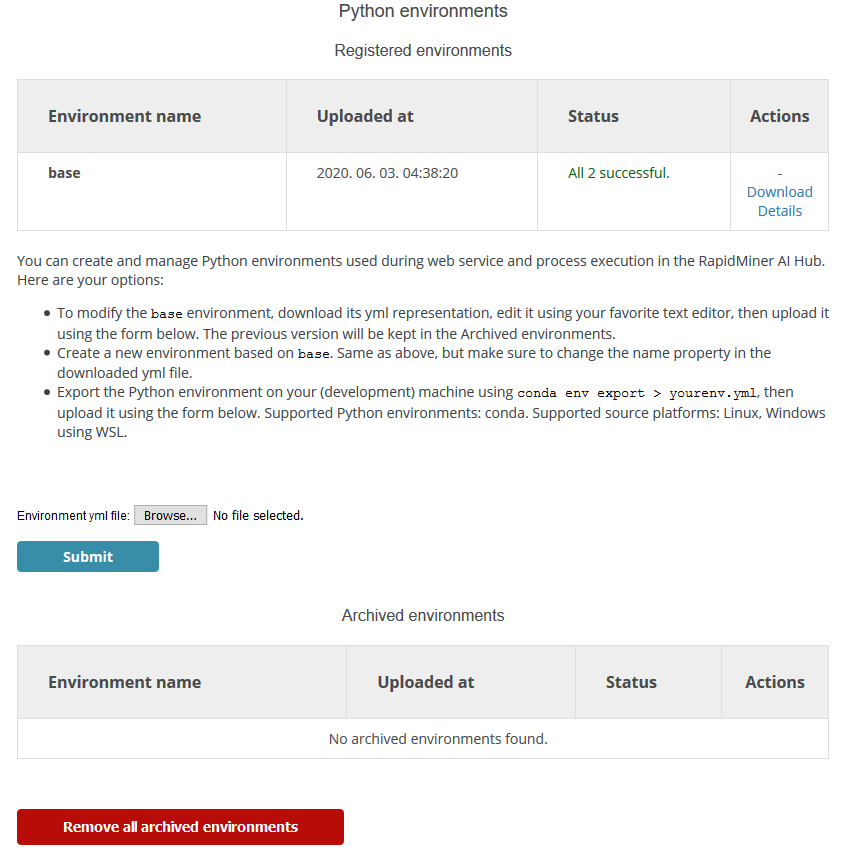
Checking status and logs
You can track the status of an environment deployment by clicking on Details next to your environment. It will open a new page where you can see the stdout and stderr outputs for the conda commands executed on all connected Job Agents.
Downloading a Python environment definition file
You can download an existing environment definition file by clicking Download next to your environment.
Archiving an existing Python or R environment
If you no longer need an environment, you can archive it by clicking on the X next to your environment. This will remove the environment from all connected Job Agents, and move it to the list of archived environments in the Platform Admin. This might come in handy if you later need to reuse it or create a new one with slight modifications.
The base environment cannot be archived.
Managing archived environments
If you no longer need an archived environment for your records, you can completely erase it by clicking on the X next to the archived environment.
You can also erase all archived environments, by clicking on Remove all archived environments.
Managing Real-Time Scoring Deployments
Platform Admin also provides an easy way to manage Real-Time Scoring Deployments.
It can manage only a single Real-Time Scoring Agent deployed on the same machine (virtual or physical). See the deployment overview on where it fits in.
Configuring scoring access control
To ensure we meet low latency requirements for Real-Time Scoring, we kept the scoring access control simple.
To manage access to the scoring service, navigate to Scoring Access Control under Real-Time Scoring.
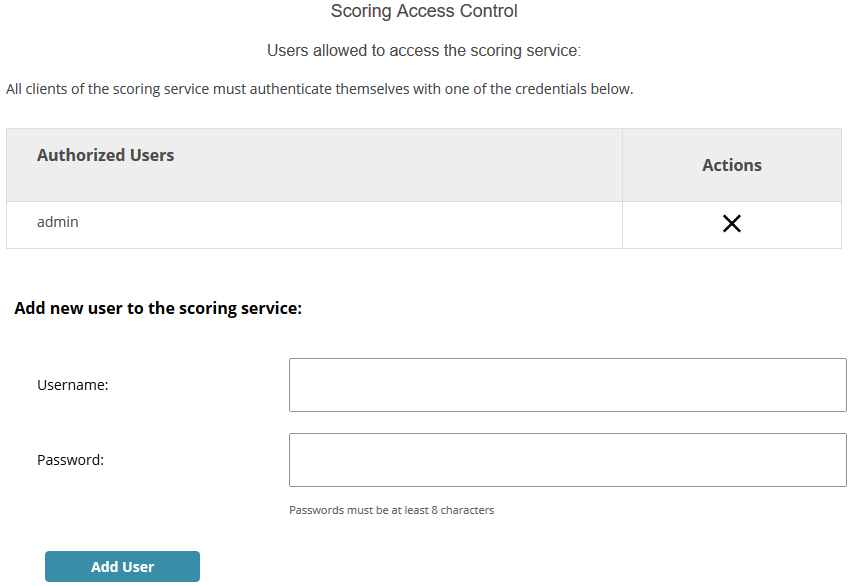
To add a new user
- Type the username of the new user into the Username field
- Type the new password in the Password field
- Click on the Add User button
Passwords can be changed by introducing the old name and new password into the Username and Password fields and clicking on Add User. If you change the password of the logged-in user, it will be immediately logged out and asked to log in again.
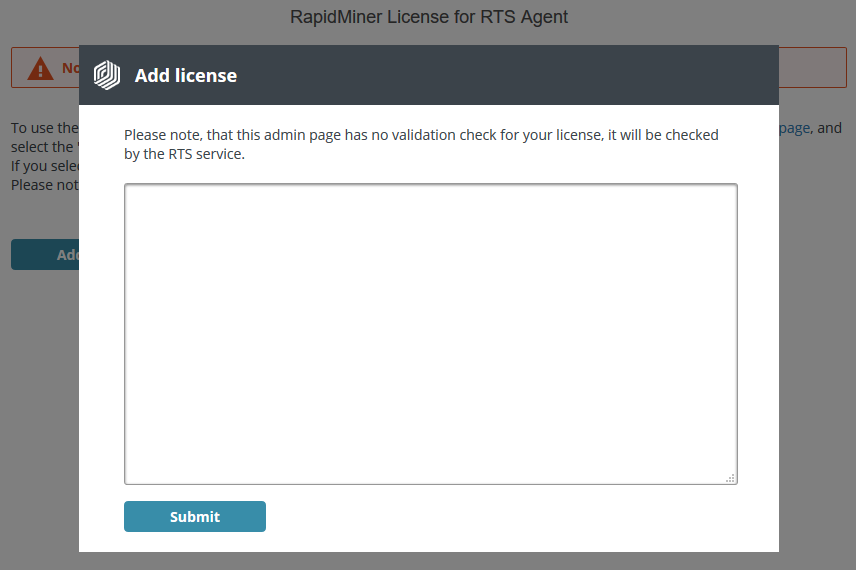
Adding a new license
If you have just deployed your Real-Time Scoring Agent, you'll need to upload the license you obtained from RapidMiner. The license is a long string of characters.
To upload it, use the License menu item under Real-Time Scoring. Click on Add new license and paste your license in the available space. Click submit. After that, it will take a minute or two before the system is ready to go. You can check the status in the Status menu item.
Managing deployments
The Deployment menu item under Real-Time Scoring allows reviewing, adding and removing deployment packages from the Real-Time Scoring Agent.
It provides a list of the currently active deployment packages.
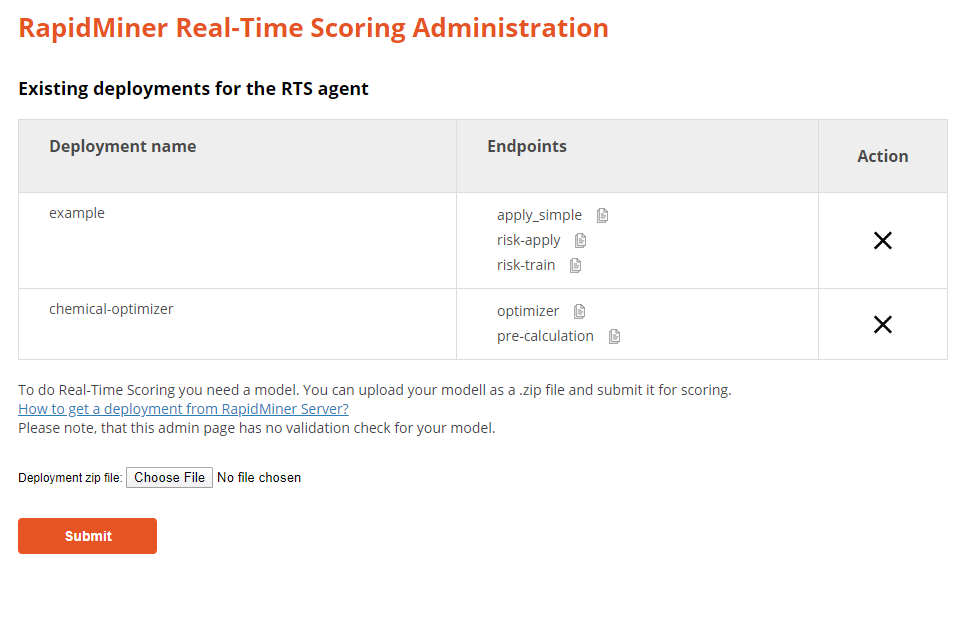
For each deployment, you can see the name, and the list of REST endpoints it contains. To the right of each endpoint, there is a copy button that provides the full URL to call that particular endpoint.
To add a new deployment:
First, if you're not yet familiar with it, learn how to create a deployment package in RapidMiner Server.
To add a new deployment, follow these steps:
- Click the Choose File button
- Browse your file system and select the deployment's zip file
- Click Submit
To remove a deployment:
To remove a deployment, click on the corresponding X to the right of the deployment's name.