You are viewing the RapidMiner Scoring-agent documentation for version 9.8 - Check here for latest version
Create a deployment file
A deployment file defines web services that are exposed by the Scoring Agent to score data. Following section describes step by step how to create and obtain a Scoring Agent deployment file from RapidMiner Server.
Create a deployment on RapidMiner Server
To create a deployment file for the Scoring Agent create a new folder in the RapidMiner Server repository. The folder can be placed anywhere and will be used to define the contents of the deployment. Keep in mind that everything stored in this folder will be included in the deployment file. This includes processes as well as data and models. Top-level processes of the deployment folder will be exposed as web services.
The image below shows an example deployment folder called score-fraud:
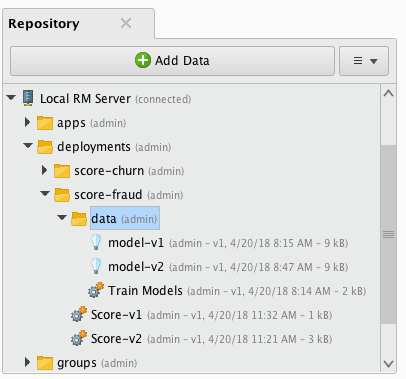
It contains two top-level processes called Score-v1 and Score-v2 and a data/ folder.
The data/ folder contains the production models model-v1 and model-v2 that are used by the top-level processes for scoring and a training process Train Models which builds the models.
In general the Scoring Agent exposes top-level processes of a scoring folder based on following schema:
http://$SA_HOST/services/$folderName/$processName
Therefore the base path of the deployment will be the same as the folder name and the endpoint paths of the two top-level processes will be the same as the process names.
Let's assume the Scoring Agent is running on localhost with default settings.
The full URL of the web services exposed by the score-fraud deployment will look like this:
http://localhost:8090/services/score-fraud/score-v1http://localhost:8090/services/score-fraud/score-v2
The process Train Models will not be available as a web service as it is not a top-level process.
Please note that special characters in the name of the deployment folder and top-level processes will be URL encoded.
A process called score customer stored in the folder customer churn/ will be available as a web service at http://$SA_HOST/services/customer%20churn/score%20customer.
Create a scoring process
Each web service offered by the Scoring Agent relies on a RapidMiner Studio process.
Here's an example of a simple scoring process:
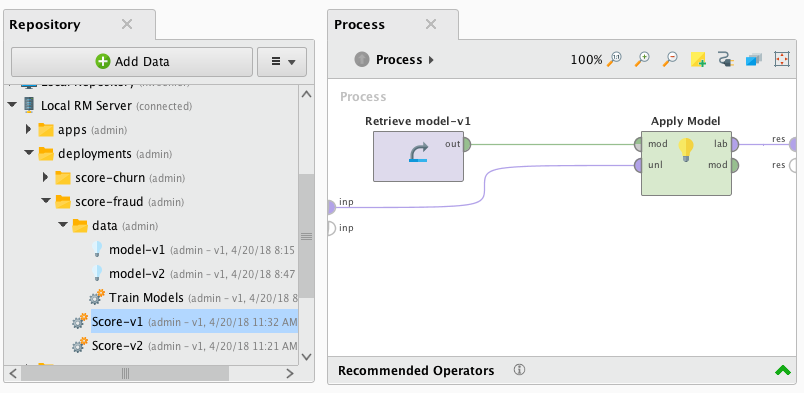
The process will load a previously trained model from the repository and apply it on the input data. Afterwards the scoring results will be delivered to an output port.
The Retrieve operator works only with relative paths and only with data that is contained in the deployment folder or its subfolders.
For easier local testing of a scoring process you can assign input data to the input port via the process context. Or just drag&drop data on the input port.
Download deployment file from RapidMiner Server
The deployment file can now be downloaded from RapidMiner Server either via command line or via browser. Both possibilities are described below.
Downloading the deployment from RapidMiner Server will create a .zip file with a snapshot of the current deployment folder content together with a configuration file that defines the endpoints of deployment.
Download via command line
To trigger the deployment creation via command line you can, for example, use curl or any other tool which fits the needs.
The creation URL is defined as http://$RM_SERVER/api/rest/resources/$LOCATION?format=webservice. Where
$RM_SERVERis the host name of the RapidMiner Server (e.g.localhost:8080)$LOCATIONis the repository location of the deployment folder (e.g.deployments/score-fraud)
So, in our case the URL looks like this:
http://localhost:8080/api/rest/resources/deployments/score-fraud?format=webservice
and an example curl command looks like this:
curl -u user:password 'http://localhost:8080/api/rest/resources/deployments/score-fraud?format=webservice' -o deployment.zip
It's also possible to include one or more connections from the central repository into the deployment.zip file by
referencing the name of it. Assume a connection is called MyDB and it resides in the default location /Connections/MyDB
of the repository, then adding a query parameter with &connection=MyDB will include the connection into the created
deployment file.
So, in our case the URL might look like this if we like to include connections MyDB and MySecondDB at the same time:
http://localhost:8080/api/rest/resources/deployments/score-fraud?format=webservice&connection=MyDB&connection=MySecondDB
Connections having injected parameters are not supported within the Scoring Agent. Please ensure that you didn’t define any injected parameters for the connections you like to include into your deployment ZIP file.
Download via browser
To trigger the deployment creation via browser you just need to visit the resource URL of your created deployment folder.
The URL is defined as http://$RM_SERVER/internal/rest/resources/$LOCATION?format=webservice. Where
$RM_SERVERis the host name of the RapidMiner Server (e.g.localhost:8080)$LOCATIONis the repository location of the deployment folder (e.g.deployments/score-fraud)
So, in our case the browser URL looks like this:
http://localhost:8080/internal/rest/resources/deployments/score-fraud?format=webservice
Continuous Deployment
By default, the RTSA is designed to be reactive, i.e. the execution of deployments are manually triggered via a REST call. With the continuous mode it is now possible that deployments are being executed and restarted after each execution automatically.
You can enable the continuous mode during the download of a deployment by adding the query parameter &continuous=true.
You can also define a delay in milliseconds between each execution by adding the query parameter &sleep=5000.
If you omit the sleep parameter a default of 1 milliseconds will be used.
So, as an example, if you want to enable the continuous mode with a delay of 5000 milliseconds between each execution the browser URL would look like this:
http://localhost:8080/internal/rest/resources/deployments/score-fraud?format=webservice&continuous=true&sleep=5000
By default, the execution order of the endpoints in a continuous deployment is automatically set during ZIP creation.
To change the execution order, you will need to edit the config.json within the newly created deployment ZIP file and adjust the order attribute.
The endpoints will be executed in ascending order.
What's next?
After you have downloaded the deployment file you can install it on a Scoring Agent.