Radoop Proxy
Radoop Proxy lets you tunnel all Radoop connections through a single machine residing on the edge of your secure Hadoop cluster. Its purpose is to significantly reduce the number of ports that need to be opened on the firewall protecting the Hadoop cluster, making the networking configuration much easier. The proxy also enables application submission for Spark 3.
See the Installing Radoop Proxy section for information about obtaining and installing it in your cluster.
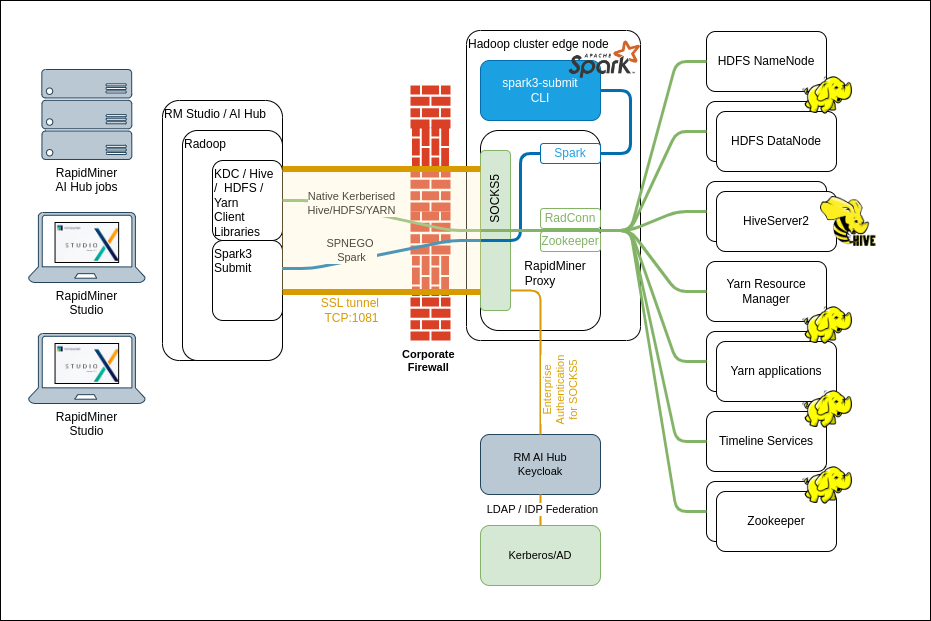
Radoop Proxy architecture
Radoop Proxy can accept connections from Altair AI Studio and forward these connections towards Hadoop, forming a single access point to the cluster. It is typically installed on one of the secured cluster machines (this can be an existing Hadoop node, or a dedicated machine / edge node), so it resides on the same local network as the cluster nodes. To allow outside access to the secured cluster, only a single port needs to be opened on the firewall, making the default networking setup obsolete.
To ensure security, Altair AI Studio users must be authenticated when using the Radoop Proxy. Authentication is done by Altair AI Hub that is connected to the Radoop Proxy, or with a standalone username/password combination (depending on Radoop Proxy configuration). If Kerberos is enabled in the cluster, Spark 3+ submit requests are authenticated using SPNEGO.
The connection between Altair AI Studio users and Radoop Proxy can be easily secured with SSL if the certificate for the machine hosting the proxy is available.
Setting up a Radoop Proxy Connection
Make sure that Networking requirements (hostname resolution, firewall rules) are in place and Radoop Proxy is installed on a node located inside the network of the Hadoop cluster.
Create a new Radoop Proxy Connection from Altair AI Studio belonging to any local or remote repositories of your choice. The fields on the Setup tab are explained below:

Field Description Radoop Proxy Server host IP address or hostname of the Radoop Proxy server Radoop Proxy Server port Radoop Proxy Server port. Default is 1081 Use Enterprise SSO Use the Enterprise SSO token from the parent Repository. Only displayed with Radoop Proxy Connections that are in Repository Panel. Should only be used with a Radoop Proxy Server configured with SAML/Keycloak authentication. Altair AI Hub user and Altair AI Hub password are disabled when this feature is used. Altair AI Hub user Username for authenticating. This is disabled when Use Enterprise SSO is checked. Altair AI Hub password Password to use for the connection. This is disabled when Use Enterprise SSO is checked. Use secure (SSL) connection Use SSL for the proxy connection. See Radoop Proxy security for details. If your certificate is NOT well-known then you need to fill in Keystore file and Keystore password. Keystore file (SSL) Keystore file that contains the SSL cert to use, if cert is well known, you can leave this empty. This is disabled when Use secure (SSL) connection is unchecked. Keystore password (SSL) password to use to unlock the keystore, if keystore has no password, you can leave this empty. This is disabled when Use secure (SSL) connection is unchecked. In the Connections menu, select
 Manage Radoop Connections, edit your connection by clicking Configure, and on the Radoop Proxy tab check Use Radoop Proxy:
Select the location of your proxy definition from the first dropdown selector in the Radoop Proxy Connection section. Choose
Local Repositoryfor connection setup in Altair AI Studio or the name of the Altair AI Hub repository in case of remote connections.Select the connection from the second dropdown selector in the Radoop Proxy Connection section. In case of AI Hub locations, you may need to click on the
 Refresh button to sync the connections from Altair AI Hub to Altair AI Studio. You also have the option to click on
  Edit button to edit an existing or to create a new Radoop Proxy connection right from this screen.