Using the Impala JDBC Driver
Altair AI Studio does not come bundled with the Impala JDBC driver. To connect to Impala databases, you need to manually download and configure the Impala JDBC driver.
This article will walk you through how to:
Download and extract the Impala JDBC Driver
Download the latest Impala JDBC driver from the official Cloudera website.
The driver is distributed as a ZIP archive containing multiple JAR files. You should use the LeanImpalaJDBC42.jar file.
Create a new JDBC Connection
The following example demonstrates how to connect to a CDP (Cloudera Data Platform) hosted Impala server via Knox, using SSL and username/password authentication:
jdbc:impala://<knox_gateway_host>:8443/default;ssl=1;transportMode=http;httpPath=/gateway/cdp-proxy-api/impala;AuthMech=3;SSLTrustStore=%{_internal_files/cm-auto-host_keystore.jks};SSLTrustStorePwd=<trust_store_password>;UID=<username>;PWD=<password>
Choose Custom as the database system and use Knox credentials.
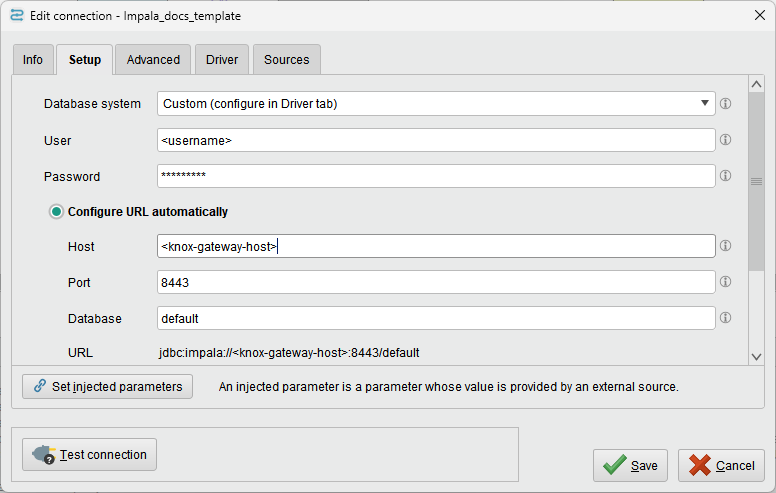
Add these advanced properties to the connection:
Property Value Description ssl1Enables SSL encryption transportModehttpUses HTTP transport mode httpPath/gateway/cdp-proxy-api/impalaPath for Knox gateway AuthMech3Username/password authentication SSLTrustStore%{_internal_files/keystore_filename}Path to the keystore file (use this format for referencing files added in driver additional libraries) SSLTrustStorePwd<password>Password for the keystore 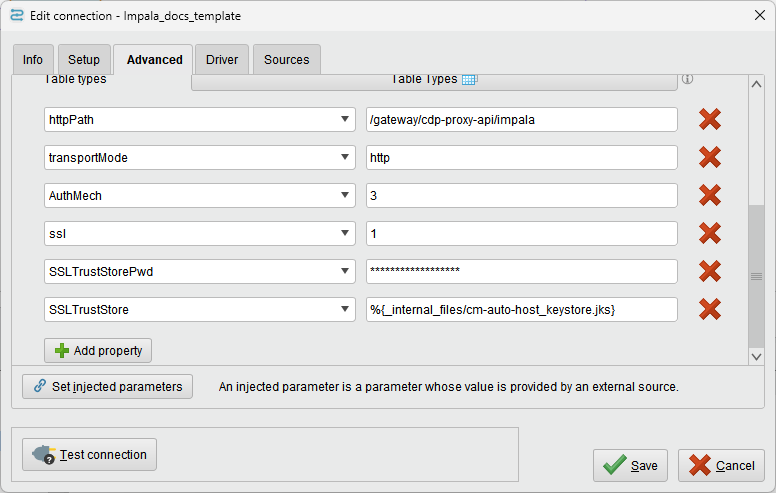
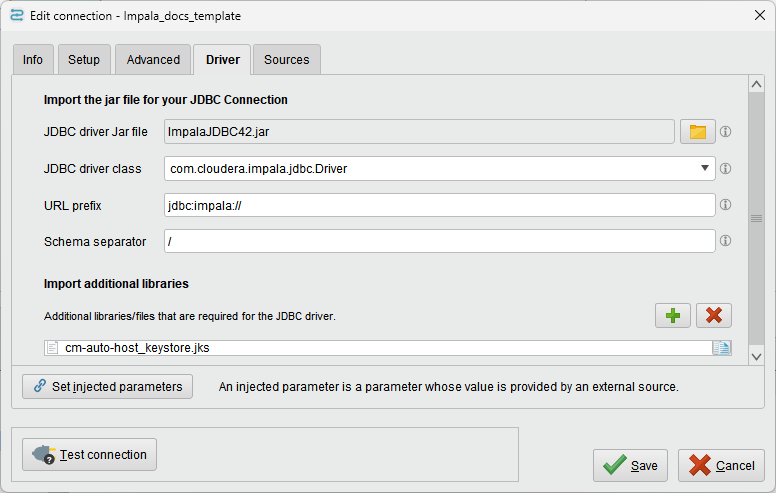
Go to the Driver tab and add the previously downloaded Impala JDBC driver JAR file. Note that the JAR files will be bundled inside the connection itself, so you can move or delete the downloaded files after creating the connection. Add the cluster keystore file to the connection as "Import additional library".
Notes
- Current Impala support includes read operations from all storage types, while new tables will be created as Kudu tables.