You are viewing the RapidMiner Server documentation for version 8.2 - Check here for latest version
Mirror groups
Mirror groups are prepared to automatically manage the memberships of LDAP authenticated users. Any regular group can be turned into a mirror group. After turning the group into a mirror group it loses all users that were assigned to it but it is also prepared to gain new members automatically when an LDAP authenticated user logs in.
LDAP groups
LDAP groups in RapidMiner Server are the representation of groups that an LDAP user belongs to on the LDAP server. LDAP groups that a user is a member of are automatically created during the login process of the LDAP authenticated user. They can also be created manually by the admin user. A mirror group can have multiple LDAP groups assigned to it that control which LDAP authenticated users become part of the mirror group during their login process. If an LDAP authenticated user is member of an LDAP group that was assigned to a mirror group then they also become part of the mirror group.
Defining mirror groups
Changing a group to mirror group can be initiated in the Administration > User management window of the web interface.
Open Administration > User management and the Groups tab.
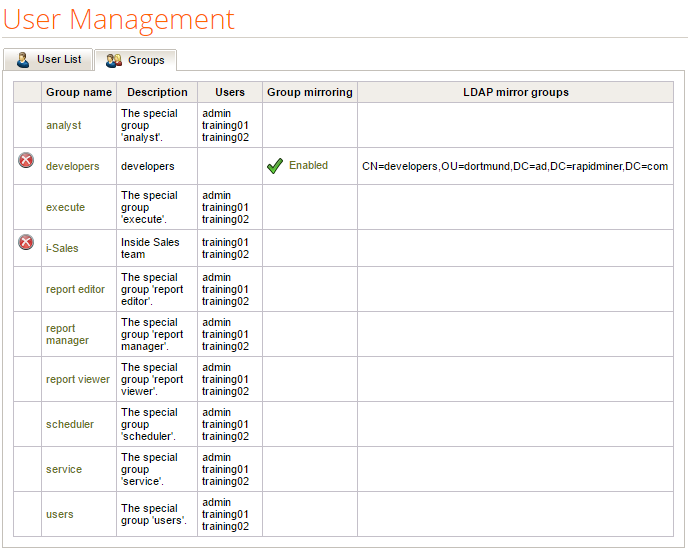
Select any of the groups. Please note the Group Mirroring column that indicates the mirrored status and LDAP mirror groups column that indicates the associated LDAP groups.
Check Group mirroring (If activated members of this group are automatically managed by the server) option to turn a regular group in mirror group or uncheck it to change it back to regular.

When a group is turned to mirrored then current RapidMiner users gets removed from it and a new LDAP mirror groups list appears. You can find automatically or manually created LDAP groups in the list.
The left side contains the available and the right side contains the already associated LDAP groups. You can use the buttons in the middle to change the association. If you don't find the required LDAP group in the list you can create it manually.
Creating LDAP groups manually
The admin user can create or delete LDAP groups by opening the group management screen and selecting the Manage LDAP groups action on the right side.
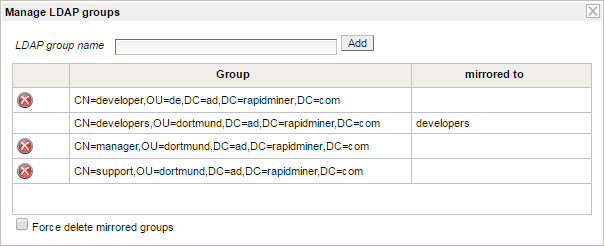
- To add a new LDAP group: If the LDAP group you wish to use is not present in the LDAP management list, enter the name of the LDAP group and click on Add. Afterwards the new group should be displayed in the table.
- To remove an LDAP group: Click on the
 Delete icon next to the group you want to remove. If you want to delete an LDAP group which is already used, check the Force delete mirrored groups checkbox to be able to remove these groups as well.
Keep in mind the LDAP group should always reflect the name of the group on the LDAP server.