You are viewing the RapidMiner Server documentation for version 8.2 - Check here for latest version
RapidMiner Server Settings and Services
You can change commonly accessed RapidMiner Server system settings using the web interface. Additionally, you can change the RapidMiner Server configuration files to make changes to your Java and JBoss settings.
Customize the configurations to fit your organization's needs:
Modify additional commonly accessed settings of your RapidMiner Server
Modify the secret token of your RapidMiner Server used by external processes such as the RapidMiner Job Agents
Change standalone.xml for hostname, port, HTTP header size and email changes
Change standalone.conf for Java version
Change max-memory.conf for JVM memory settings
Set up RapidMiner Server to to run as a service on startup, if not done on installation
Modifying system settings
RapidMiner Server displays the system settings you have set or modified in the Administration > System Settings window of the web interface. From this window you can modify the displayed settings or change default system settings. To see the complete list of settings and their current values, refer to the Administration > System Information page, on the System Settings tab.
Follow these steps to change system settings.
Note: System settings can only be edited by an administrator. If the setting edit (add, change, or remove) seems to have no effect, restart RapidMiner Server.
Open Administration > System Settings. The System Settings tab displays, listing all settings that have been set or modified for this instance of RapidMiner Server (either manually or during the installation process).
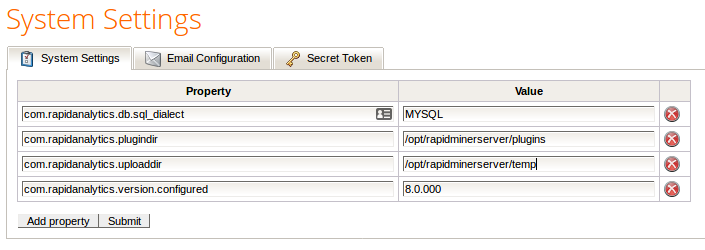
To add properties: If the property you wish to set is not present in the System Settings list, click on Add property. RapidMiner Server adds a row to the properties table. Enter the property name in the Property field of the new row and the value in the Value field. Refer to the table of system settings for assistance. Click Submit to save and apply the new setting(s).
To change properties: To change the value of a listed property, simply edit the Value field. Click Submit to save and apply the new setting(s).
To remove properties: To delete a property, click on the
 Delete icon. Click Submit to save the configuration without the removed setting(s). Restart RapidMiner Server to apply that configuration.
Changes are reflected on the Administration > System Information page, System Settings tab.
Table of system settings
| Property | Description | Accepted values | Default |
|---|---|---|---|
| Database | |||
| com.rapidanalytics.db.max_rowlength | Sets the maximum number of bytes per row when storing an ExampleSet. If an ExampleSet contains more Attribute data than can be stored in max_rowlength, RapidMiner Server splits it into multiple tables. Reduce this number if you receive a database error that RapidMiner Server created tables with too many columns. | Integer | 20000 |
| com.rapidanalytics.db.stream_chunk_size | Sets the buffer size when reading data from the database. | Integer | 500 rows |
| com.rapidanalytics.db.table_prefix | Sets the prefix for tables storing example sets in the RapidMiner Server database. | Any string allowed as an identifier in your database | es_ |
| com.rapidanalytics.db.exampleset.jndi | Sets the JNDI name of the data source connections where RapidMiner Server stores example sets; defined in standalone.xml. | JNDI identifier | java:/jdbc/RapidAnalyticsDS |
| com.rapidanalytics.db.sql_dialect | Sets the SQL dialect used by the operations database. | MYSQL, ORACLE, MICROSOFT, POSTGRES. But no need to ever edit. | Set on installation by the DB System argument, in the Database Configuration window (so no need to edit). |
| Anonymous access—Requires an "anonymous" user account | |||
| com.rapidanalytics.web.anonymous_resources | Sets whether resources can be accessed without authentication under /api/rest/public/resources. Use this when implementing the anonymous user functionality. | True to allow access or false to deny access | False |
| com.rapidanalytics.web.anonymous_services | Sets whether web service processes can be accessed without authentication under /api/rest/public/processes. Use this when implementing the anonymous user functionality. | True to allow access or false to deny access | False |
| com.rapidanalytics.web.anonymous_reports | Sets whether web apps can be accessed without authentication. Web apps do not have a fixed URL; the access URL is shown while editing the app. Use this when implementing the anonymous user functionality. | True to allow access or false to deny access | False |
| Process log | |||
| com.rapidanalytics.process.log.enable | Sets whether to log process output. Logs are visible in the web interface under Processes > Scheduler and linked from RapidMiner Studio. | True to log process output or false to discard. | True |
| com.rapidanalytics.process.log.update_delay | Sets the interval, in milliseconds, between updates to the database with the latest log records. That is, instead of writing immediately to the log, messages can be delayed for this interval and written at one time. | Integer | 1000 milliseconds |
| com.rapidanalytics.process.log.continuous | Specifies whether to write to the logs as a process executes or whether to write all log data at process completion. | True to write continuously or false to write at completion | True |
| com.rapidanalytics.process.log.limit_access_to_owner | Sets accessibility of the process log. If true, log is only available to the user that started the process. If false, log is available to any user with Read access to the folder. | True or false | False |
| Process execution | |||
| com.rapidanalytics.webservices.concurrency | Sets the concurrency level (i.e. how many CPU cores are used) for each web service that runs. Defaults to 1 which means each web service runs in a single thread and thus responds faster. If you offer web services that take longer to run(several minutes to hours), you can increase this setting to make use of multiple CPU cores (limited by your license) for each web service process. This has the same effect as the Number of threads setting in RapidMiner Studio. Note that if you have many web service calls (hundreds at the same time) for processes that can use multiple cores (e.g. via Loop operators), this can cause new web service calls to fail! This is due to a global limit in the number of threads depending on various system parameters. | Integer | 1 |
| Directories | |||
| com.rapidanalytics.plugindir | Defines the directory where RapidMiner Server stores user-added extensions that are loaded at start up. | You can create the plugin directory anywhere that is accessible to your machine, but be sure that you have write permission to the location. Bundled extensions (no installation necessary) are stored in a separate directory that is independent of the path specified here. | Specified at installation |
| com.rapidanalytics.uploaddir | Defines the directory where RapidMiner Server stores temporary binary files uploaded by the user and needed for processes. | You can create the uploads directory anywhere that is accessible to your machine, but be sure that you have write permission to the location. If the RapidMiner Server host has a small hard disk, make sure you create the directory in a place that can handle the potentially large temporary files. | Specified at installation |
| Logging | |||
| com.rapidanalytics.accesslog.db.mode | Determines when access to resources are logged to the database. | ALWAYS, NEVER, or ONLY_ERROR. | ALWAYS |
| com.rapidanalytics.accesslog.file.mode | Determines when access to resources are logged to a file. | ALWAYS, NEVER, or ONLY_ERROR. | NEVER |
| com.rapidanalytics.accesslog.file.destination | Specifies the destination to write the access log file to. Only applicable if com.rapidanalytics.accesslog.file.mode is ALWAYS or ONLY_ERROR. | Filename | None |
| com.rapidanalytics.mail.jndi_name | Sets the JNDI name of the email session. See changing outgoing email. | JNDI identifier | None |
| Triggers | |||
| com.rapidanalytics.triggers.delay | Sets the delay between active triggers that check conditions (for example, file modifications). | Integer | 10000 ms |
| Web | |||
| com.rapidanalytics.web.hostname | Sets the RapidMiner Server hostname to display to users (to use, for example, for web service URLs). Auto-detected based on configuration. | Any | None |
| com.rapidanalytics.web.myport | Sets the RapidMiner Server port to display to users (to use, for example, for web service URLs and other generated direct links). Auto-detected based on configuration. | Any valid port number | 80 |
| com.rapidanalytics.web.session.timeout | Sets the timeout for web sessions. | Integer | 1800s |
| com.rapidanalytics.web.rooturl | Sets the RapidMiner Server root URL to display to users. Auto-detected based on configuration. | Valid URL | None |
| com.rapidanalytics.web.reverse_dns_lookup | Specifies whether RapidMiner Server does a reverse DNS (IP address to hostname) when writing to the access log. | True to write the reverse DNS lookup results or false to write the IP address to the log | False |
| Scripting extensions | |||
| rapidminer.r_scripting.path | Specifies the path to the RScript executable in your R installation. | Anywhere that is accessible to your machine, but be sure that you have write permission to the location | None |
| rapidminer.python_scripting.path | Specifies the path to the Python executable in your Python installation. | Anywhere that is accessible to your machine, but be sure that you have write permission to the location | None |
| Miscellaneous | |||
| com.rapidanalytics.enable_timestamp_locking | Sets whether RapidMiner Studio warns if two users are simultaneously modifying the same process (whether a warning message is delivered on saving). | True to warn or false to allow overwrite | True |
| LDAP username and group filters | |||
| com.rapidanalytics.access.userfilter | Sets the filter to restrict access of LDAP authenticated users based on their username. If the username matches the filter then access is granted. Blank or undefined value does not restrict access. | Regular expression | |
| com.rapidanalytics.access.groupfilter | Sets the filter to restrict access of LDAP authenticated users based on their LDAP group membership. If any of the LDAP groups name that the user belongs to matches the filter then access is granted. Blank or undefined value does not restrict access. | Regular expression | |
| Security | |||
| com.rapidanalytics.security.x_frame_options | Set the X-FRAME-OPTIONS header for web site responses to prevent embedding of pages into other websites (e.g. as an iframe). This prevents clickjacking attacks. Please note that setting this header to DENY might also affect the RapidMiner Server UI. | DENY, SAMEORIGIN, or ALLOW-FROM https://example.com/ | Header not set |
| com.rapidanalytics.security.access_control_allow_origin | Used to specify the content of the Access-Control-Allow-Origin header for CORS requests. | *, or https://example.com/ | Header not set (CORS disabled) |
| com.rapidanalytics.security.access_control_allow_credentials | Used to specify the content of the Access-Control-Allow-Credentials header for CORS requests. | true or false | true |
| com.rapidanalytics.security.access_control_allow_headers | Used to specify the content of the Access-Control-Allow-Headers header for CORS requests. | Any comma-separated combination of headers: origin, content-type, accept, authorization | origin, content-type, accept, authorization |
| com.rapidanalytics.security.access_control_allow_methods | Used to specify the content of the Access-Control-Allow-Methods header for CORS requests. | Any comma-separated combination of valid HTTP methods, e.g. GET, POST, PUT, DELETE | GET, POST, PUT, DELETE |
| com.rapidanalytics.security.upload.whitelist | A whitelist for file extensions that may be uploaded via the Web UI and from Studio. If a whitelist is defined, the blacklist will be ignored. | Any comma-separated combination of file extensions, including "none" as a filter for files without any extensions. In case of an empty whitelist all uploads will be blocked. For example, the whitelist 'pdf,csv,none' permits the upload of files with pdf and csv extensions and the upload of files with no file extension. | |
| com.rapidanalytics.security.upload.blacklist | A blacklist for file extensions that should NOT be uploaded via the Web UI and from Studio. If a whitelist is defined, this blacklist will be ignored. | Any comma-separated combination of file extensions, including "none" as a filter for files without any extensions. For example, the blacklist 'exe,sh,none' blocks files with the file extensions exe and sh and also blocks files with no file extension. | |
| com.rapidanalytics.security.upload.content_type.allowed_types | Defines allowed content-types of uploads via the Web UI and from Studio. The content-type check will happen after a file has been uploaded. It uses magic bytes to extract the real content-type of a file regardless of the file extension. | Any comma-separated combination of allowd content-types. In case of an empty list all uploads will be blocked. For example, the content-types 'application/pdf,application/zip' permit the upload of PDF and Zip files. | |
| com.rapidanalytics.security.upload.max_size | Defines the maximum allowed file size in bytes of uploads via the Web UI and from Studio. | Integer | |
| com.rapidanalytics.encryption.key | Used to specify the key used for property encryption. Currently only relevant for the LDAP Property Encryption | Any | |
Modify the secret token
The secret token is a shared secret to enable an external process such as the RapidMiner Job Agent to communicate with the RapidMiner Server respectively the RapidMiner Job Service REST API.
To invalidate the current secret token and set a new one simply click on the Generate new Token button.
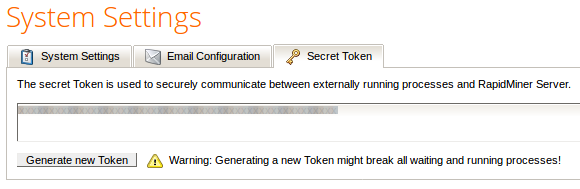
Note: Generating a new token might break all waiting and running processes!
The following steps must be done to apply the new token:
-
The RapidMiner Server must be re-started
-
The token must be exchanged in the RapidMiner Job Agent configuration
-
The RapidMiner Job Agent must be re-started
Changing standalone.xml settings
The file standalone.xml contains JBoss Application Server 7 configuration settings, such as hostname, ports, mail, database, enabling HTTPS, etc. The file is found in standalone/configuration of the RapidMiner Server installation directory. The next sections describe how to make the following changes in the file standalone.xml.
To change the hostname settings, follow these steps:
-
Edit the file
standalone/configuration/standalone.xmlin the RapidMiner Server installation directory. -
Locate the tags configuring the interface:
<interface name="public"> <inet-address value="${jboss.bind.address:127.0.0.1}"> </interface> -
Edit the bind address (the IP address after the colon, 127.0.0.1 in the above example) as required. You can enter a hostname instead of an IP address if desired.
-
Save the file and restart RapidMiner Server.
To change the port settings, follow these steps:
-
Edit the file
standalone/configuration/standalone.xmlin the RapidMiner Server installation directory. -
Locate the tags configuring the socket bindings (these define the HTTP and HTTPS ports):
<socket-binding name="http" port="8080"/> <socket-binding name="https" port="8443"/> -
Edit the port numbers as required.
-
Save the file and restart RapidMiner Server.
Note: On Linux, you must be running as root to change port numbers below 1024 (this includes the standard HTTP(S) ports 80 and 443).
If you use single sign on in RapidMiner Server, you must change the HTTP header size. This is because the Kerberos token string is usually quite long, exceeding the default header size.
To change the header size:
-
Edit the file
standalone/configuration/standalone.xmlin the RapidMiner Server installation directory. -
Locate the extensions tag definitions (they are most likely at the beginning of the file):
<extensions> . . . </extensions> -
Immediately after the extensions tag (do not modify the extensions tag), add the following system-properties tag, where
valuedefines the maximum URL length:<system-properties> <property name="org.apache.coyote.http11.Http11Protocol.MAX_HEADER_SIZE" value="65535"/> </system-properties> -
Save the file and restart RapidMiner Server.
If you did not configure the SMTP server during installation or need to change the outgoing email address, you can do it by editing the standalone.xml configuration file.
-
Edit the file
standalone/configuration/standalone.xmlin the RapidMiner Server installation directory. -
Locate the mail subsystem element, for example:
<subsystem xmlns="urn:jboss:domain:mail:1.0"> <mail-session jndi-name="java:/Mail" debug="false" from="user@localhost.com"> <custom-server name="smtp" outbound-socket-binding-ref="mail-smtp"> <login name="username" password="password"/> </custom-server> <!-- pop3-server outbound-socket-binding-ref="mail-pop3"/ --> </mail-session> </subsystem> -
Modify the
from,username, andpasswordfields as required. Be certain that thefromfield is not blank (otherwise sending emails will not work). Thefromandusernamefields should not be the same, unless required to be by your email provider. Thefromvalue cannot be an arbitrary address, it must be a registered alias thatusernamecan send as. -
Locate the outbound socket element for example:
<outbound-socket-binding name="mail-smtp"> <remote-destination host="localhost" port="25"/> </outbound-socket-binding> -
Modify the host and port fields as required.
-
Save the file and restart RapidMiner Server.
To verify the settings:
-
Log in to RapidMiner Server as administrator.
-
Go to Administration > System Settings. Click on the Email Configuration tab.
-
Enter an email address and click the Send test mail button. If the email address you entered does not soon receive an email (and you checked any junk and trash folders), consult the log files.
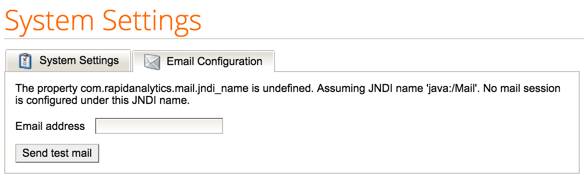
Note: In the Email Configuration tab you may see the message “The property com.rapidanalytics.mail.jndi_name is undefined. Assuming JNDI name ‘java:/Mail’. No mail session is configured under this JDNI name.”
JNDI is the Java Naming and Directory Interface, used, for example, if RapidMiner Server runs on a JBoss shared with other applications. Typically this message can be ignored. If you changed the JNDI name in the
standalone.xmlconfiguration file, you can configure the system settings of your RapidMiner server and set thecom.rapidanalytics.mail.jndi_nameproperty to the new JNDI name.
This information is only applicable if you are upgrading from versions 2.4 or earlier to version 2.5 or later using an EAR file. This step is not necessary if you perform a full upgrade.
RapidMiner Server version 2.5 improves repository performance when storing large example sets. To include this improvement when performing an EAR upgrade:
-
Edit the file
standalone/configuration/standalone.xmlin the RapidMiner Server installation directory. -
Locate the datasource subsystem element, for example:
<datasource jta="true" jndi-name="java:/jdbc/RapidAnalyticsDS" pool-name="RapidAnalyticsDS" enabled="true" use-java-context="false" use-ccm="true"> <connection-url>jdbc:mysql://localhost:3306/rapidminer_server</connection-url> <driver>mysql-connector-java-5.1.31.jar</driver> . . . </datasource> -
Add the following line to the
<datasource></datasource>element:<connection-property name="rewriteBatchedStatements">true</connection-property> -
Save the file and restart RapidMiner Server.
Changing standalone.conf(.bat) settings
The files standalone.conf (Linux) or standalone.conf.bat (Windows) contain arguments passed to Java when RapidMiner Server starts, for example Xmx, garbage collection, etc. The file is found in bin folder of the RapidMiner Server installation directory. The next sections describe how to change:
- Java version
Updating the Java version
Once RapidMiner Server is installed, any changes to the Java version require a change to the JAVA_HOME path. Remember that RapidMiner Server requires Java 8. To change JAVA_HOME:
-
In the RapidMiner Server installation directory, open
bin/standalone.conf.bat. -
Change the JAVA_HOME location by changing the following line, where JRE7 is the updated Java folder:
set "JAVA_HOME=C:\Program Files\Java\<jre7> -
Save the file and restart RapidMiner Server.
-
In the RapidMiner Server installation directory, open
bin/standalone.conf. -
Change the JAVA_HOME location by changing the following line, where JRE7 is the updated Java folder:
JAVA_HOME="/opt/java/<jre7>" -
Save the file and restart RapidMiner Server.
Changing memory usage
You can view the maximum memory setting for RapidMiner Server in the Administration > System Information window of the web interface. Total memory (amount currently assigned to RapidMiner Server by the operating system), maximum memory (maximum memory amount defined during installation), and free memory (allowed memory not currently in use) are displayed under the System Load tab.
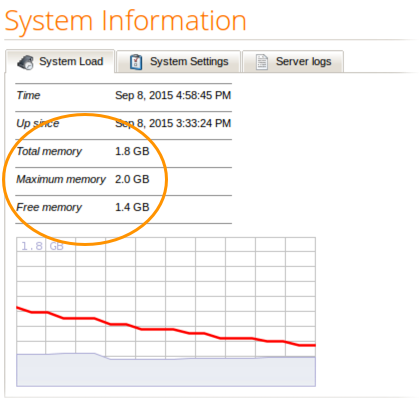
The memory usage of the RapidMiner Job Agents and Job Containers are not included by this view. How to monitor or change the memory usage is described at the Job Agent’s and Job Container’s administration page.
-
Starting from the base RapidMiner Server installation directory, navigate and open the file
standalone/configuration/max-memory.conf. -
The file should contain a number followed by the letter
M. This sequence signifies the maximum amount of memory in MB that Rapidminer Server may use. For example the value8192Mmeans that RapidMiner Server may allocate up to 8,192 MB of RAM. -
To modify this setting simply replace the number with the desired amount of memory in MB, that RapidMiner Server may use.
-
Save the file and restart RapidMiner Server.
Please note that the maximum amount of memory is bound by the RapidMiner Server license you are using.
Please make sure that the value you specify is greater than 1303M which is the minimum Rapidminer Server memory requirement.
Running RapidMiner Server as a service
You can set RapidMiner Server to run as a service, allowing it to start when the system starts. If you did not register as a service during installation, you can do it now.
You had an opportunity, at installation, to register RapidMiner Server to run as a Windows service (by checking a box in the installer process). If you did not check Register as a service or you did not have admin privileges when you started the installer, RapidMiner Server is not registered to run as a service. To change the configuration so that RapidMiner Server runs as a service in the future:
-
As administrator, open a Windows command prompt.
-
From the terminal window, change to the
binfolder in your RapidMiner Server installation folder. -
Enter
service.bat installat the prompt. This installs RapidMiner Server as a Windows service. (To uninstall the service later, enterservice.bat uninstallfrom the same location.) -
By default, the service is registered with the key
RMS<version>SVC(for exampleRMS710SVCorRMSSVCin case of older versions than 7.1.0). (This can be modified in theservice.batfile.) To start the service from a Windows command prompt, enter the following command with the service name. For example:net start RMS710SVCSimilarly, to stop the service, enter:
net stop RMS710SVC
Alternatively, you can use the Windows control panel to set, start, and monitor the service.
You can autostart RapidMiner Server under UNIX, but the method is dependent on your UNIX distribution. The following instructions apply to Ubuntu.
Linux system startup scripts are contained in /etc/init.d/. To start RapidMiner Server when an Ubuntu system boots, follow these steps:
-
Download the file rapidminerserver.sh to your computer and open it in an editor:
\#!/bin/bash \### BEGIN INIT INFO \# Provides: rapidminerserver \# Required-Start: $local_fs $remote_fs $network $syslog \# Required-Stop: $local_fs $remote_fs $network $syslog \# Default-Start: 3 4 5 \# Default-Stop: 0 1 2 6 \# Short-Description: Start/Stop RapidMiner Server \### END INIT INFO \# chkconfig: 345 85 15 RAPIDMINER-SERVER_HOME=/opt/rapidminer-server-2 RAPIDMINER-SERVER_USER=root case "$1" in start) echo "Starting RapidMiner Server..." start-stop-daemon --start --quiet --background --chuid ${RAPIDMINER-SERVER_USER} --exec ${RAPIDMINER-SERVER_HOME}/bin/standalone.sh ;; stop) echo "Stopping RapidMiner Server..." start-stop-daemon --start --quiet --background --chuid ${RAPIDMINER-SERVER_USER} --exec ${RAPIDMINER-SERVER_HOME}/bin/jboss-cli.sh -- --connect --command=:shutdown ;; *) echo "Usage: /etc/init.d/rapidminerserver {start|stop}"; exit 1; ;; esac exit 0 -
Change the
RAPIDMINER-SERVER_USERvariable to the Linux user who will run the service. The user you enter must already exist. To create the user, use theuseraddcommand. -
Change the
RAPIDMINER-SERVER_HOMEvariable to point to your RapidMiner Server installation. -
Save the script file as
/etc/init.d/rapidminerserver. -
Make the script file executable by calling:
chmod 755 /etc/init.d/rapidminerserver -
To configure Ubuntu to execute the script at boot time and shutdown, call:
chkconfig --add rapidminerserver