You are viewing the RapidMiner Radoop documentation for version 9.7 - Check here for latest version
Amazon Elastic MapReduce (EMR) 5.x
There are multiple options to connect to an EMR cluster
- If RapidMiner Radoop does not run inside the EMR cluster's connected VPC:
- via SOCKS proxy
- via VPN
- via Radoop Proxy (Recommended)
- Direct access (eg: using Amazon WorkSpaces)
The following steps follow Radoop Proxy recommendation, but you can also find step-by-step guides of the additional steps for other two remote methods below. For direct access setup please follow the Radoop Proxy guide but skip the parts describing the setup of the Radoop Proxy itself.
Connecting to a firewalled EMR cluster using Radoop Proxy
The following steps will guide you through starting and configuring an EMR cluster, and accessing it from RapidMiner Radoop via a RapidMiner Radoop Proxy that is running on the EMR cluster's Master Node.
If you doesn't already have a running EMR cluster, then use the advanced options on AWS Console for creating your EMR cluster. Select a 5.x version for EMR release. Make sure that Hadoop, Hive and Spark are selected for installation in the Software Configuration step. Complete the rest of the configuration steps on AWS Console, then start the cluster.
SSH onto the Master node (once its status became either
RUNNINGorWAITINGon the EMR page of the AWS console) SSH instructions can be found on the Summary tab of your EMR cluster. Make note of the <Master public DNS name>, this will be needed later for the Radoop Proxy configuration in RapidMiner Studio. (eg:ec2-35-85-2-17.compute-1.amazonaws.example.com)Obtain the internal IP address of the Master node (e.g.
10.1.2.3) via thehostname -icommand and make note of it as this will be needed for the Radoop Connection. (Private IP and DNS information can also be obtained from the AWS Console on the EMR Cluster details page in the Hardware section checking the "EC2 Instances")Perform the following commands to setup Spark on the cluster for Radoop. For Spark 2.x versions, the best practice is to upload the compressed Spark jar files to HDFS from the preinstalled location from the master node. (This is crucial as EMR usually installs relevant libraries onto the file system of the master node only, whereas worker nodes also depend on them) On recent versions of EMR 5.x all of this can easily be done by issuing the following commands on the EMR master node:
 #Setup Spark 2.* libraries from the default install location
 cd /usr/lib/spark
 zip /tmp/spark-jars.zip --junk-paths --recurse-paths ./jars
 hdfs dfs -mkdir -p /user/spark
 hdfs dfs -put /tmp/spark-jars.zip /user/spark

 #Copy PySpark libaries onto hdfs
 hdfs dfs -put ./python/lib/py4j-src.zip /user/spark
 hdfs dfs -put ./python/lib/pyspark.zip /user/spark

 #Copy SparkR libaries onto hdfs
 hdfs dfs -put ./R/lib/sparkr.zip /user/spark

 #List all the files that have been put onto hdfs in the /user/spark directory
 hdfs dfs -ls /user/spark
If everything went well the output should be very similar to this:
 [hadoop@ip-172-31-18-147 spark]$ hdfs dfs -ls /user/spark
 Found 4 items
 -rw-r--r--    1 hadoop spark      74096 2019-07-25 17:47 /user/spark/py4j-src.zip
 -rw-r--r--    1 hadoop spark     482687 2019-07-25 17:48 /user/spark/pyspark.zip
 -rw-r--r--    1 hadoop spark  180421304 2019-07-25 17:47 /user/spark/spark-jars.zip
 -rw-r--r--    1 hadoop spark     698696 2019-07-25 17:48 /user/spark/sparkr.zip
Follow the instructions in the Standalone Radoop Proxy section. Start the Radoop Proxy after the configuration has been completed.
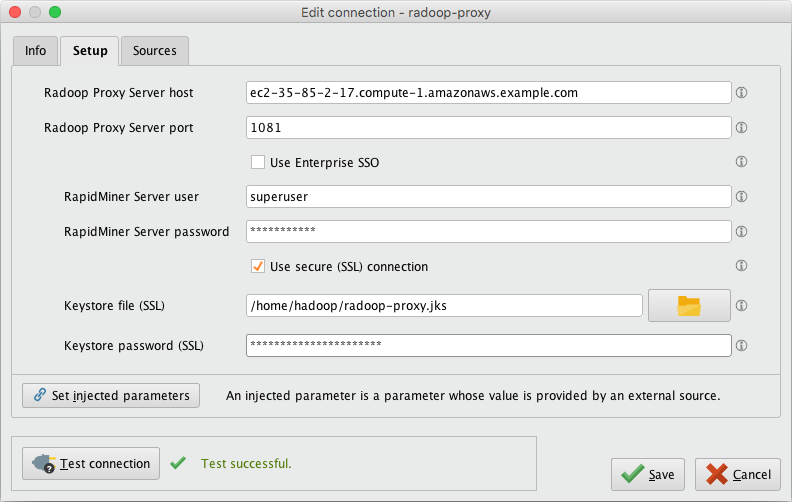
Start RapidMiner Studio and create a New Radoop Proxy connection. Use the <Master public DNS name> (from step 2) as the Radoop Proxy Server host. Make sure to test the Proxy connection via the Test Connection button.
In RapidMiner Studio create a new Radoop Connection with the following values (you can supply additional configuration parameters as needed). Advanced Radoop users can alternatively import the Example Radoop Connection xml template for EMR below which includes all required settings listed in this table.
Property Value Hadoop Version Amazon Elastic MapReduce (EMR) 5.x Hadoop username hadoop NameNode Address <Master node internal IP address from step 3> (e.g. 10.1.2.3)NameNode Port 8020 Resource Manager Address <Master node internal IP address from step 3> (e.g. 10.1.2.3)Resource Manager Port 8032 JobHistory Server Address <Master node internal IP address from step 3> (e.g. 10.1.2.3)Hadoop Advanced Parameters Add key/value dfs.client.use.datanode.hostnamevalue offalseSpark Version Corresponding Spark version (eg: Spark 2.3.1+)Use custom PySpark archive Checked Custom PySpark archive paths Add two entries hdfs:///user/spark/py4j-src.zipandhdfs:///user/spark/pyspark.zipUse custom SparkR archive Checked Custom SparkR archive path hdfs:///user/spark/sparkr.zipHive Server Address <Master node internal IP address from step 3> (e.g. 10.1.2.3)Hive Username hive Use Radoop Proxy Checked Radoop Proxy Connection <Select the Proxy created in step 6> Note Please consider fine tuning Spark memory settings as discussed here.
<?xml version="1.0" encoding="UTF-8"?><radoop-connection-entry>
<name>Amazon EMR Connection Example</name>
<compatibilityLevel>9.4.0</compatibilityLevel>
<masterAddress/>
<jobtrackerAddress><Master node internal IP address eg 10.1.2.3></jobtrackerAddress>
<namenodeAddress><Master node internal IP address eg 10.1.2.3></namenodeAddress>
<jobHistoryServerAddress><Master node internal IP address eg 10.1.2.3></jobHistoryServerAddress>
<hiveserverAddress><Master node internal IP address eg 10.1.2.3></hiveserverAddress>
<multipleMasterAddress>T</multipleMasterAddress>
<hiveDB>default</hiveDB>
<hivePort>10000</hivePort>
<mapredPort>8032</mapredPort>
<hdfsPort>8020</hdfsPort>
<jobHistoryServerPort>10020</jobHistoryServerPort>
<hiveHighAvailability>F</hiveHighAvailability>
<zookeeperQuorum/>
<zookeeperNamespace/>
<hadoopVersion>hadoop-emr-5.x</hadoopVersion>
<useDefaultPorts>F</useDefaultPorts>
<useRadoopProxy>T</useRadoopProxy>
<securityEnabled>F</securityEnabled>
<retrievePrincipalsFromHive>T</retrievePrincipalsFromHive>
<realm/>
<kdc/>
<krbConfFile/>
<saslQopLevel>auth</saslQopLevel>
<hivePrincipal/>
<jobHistoryServerPrincipal/>
<keytabFile/>
<usekerberospassword>F</usekerberospassword>
<kerberospassword/>
<impersonation>F</impersonation>
<sparkVersion>SPARK_23_1</sparkVersion>
<useCustomPySparkLocation>T</useCustomPySparkLocation>
<useCustomSparkRLocation>T</useCustomSparkRLocation>
<customPySparkLocation>hdfs:///user/spark/pyspark.zip,hdfs:///user/spark/py4j-src.zip</customPySparkLocation>
<customSparkRLocation>hdfs:///user/spark/sparkr.zip</customSparkRLocation>
<sparkAssemblyJar>hdfs:///user/spark/spark-jars.zip</sparkAssemblyJar>
<sparkResourceAllocationPolicy>dynamic</sparkResourceAllocationPolicy>
<sparkHeuristicAllocationPercentage>30</sparkHeuristicAllocationPercentage>
<advancedHadoopSettings>
<keyvalueenabledelement>
<key>dfs.client.use.datanode.hostname</key>
<valuee>false</valuee>
<enabled>T</enabled>
</keyvalueenabledelement>
</advancedHadoopSettings>
<advancedHiveSettings/>
<advancedSparkSettings>
<keyvalueenabledelement>
<key>spark.driver.extraJavaOptions</key>
<valuee>-XX:+PrintGC -XX:+PrintGCDateStamps</valuee>
<enabled>T</enabled>
</keyvalueenabledelement>
<keyvalueenabledelement>
<key>spark.driver.memory</key>
<valuee>2000</valuee>
<enabled>T</enabled>
</keyvalueenabledelement>
<keyvalueenabledelement>
<key>spark.executor.extraJavaOptions</key>
<valuee>-XX:+PrintGC -XX:+PrintGCDateStamps</valuee>
<enabled>T</enabled>
</keyvalueenabledelement>
<keyvalueenabledelement>
<key>spark.executor.memory</key>
<valuee>2000Mb</valuee>
<enabled>T</enabled>
</keyvalueenabledelement>
<keyvalueenabledelement>
<key>spark.logConf</key>
<valuee>true</valuee>
<enabled>T</enabled>
</keyvalueenabledelement>
</advancedSparkSettings>
<libdir/>
<hadoopusername>hadoop</hadoopusername>
<hiveusername>hive</hiveusername>
<hiveversion>hive2</hiveversion>
<hivepassword/>
<manuallyinstalledudfs>F</manuallyinstalledudfs>
<usecustomudfdatabase>F</usecustomudfdatabase>
<customudfdatabase/>
<hiveurlpostfix/>
<hivejdbc>hive_0.13.0</hivejdbc>
<execframework>yarn</execframework>
<accesswhitelist>*</accesswhitelist>
<forceproxyonserver>F</forceproxyonserver>
<useContainerPool>T</useContainerPool>
</radoop-connection-entry>
Save the Radoop Connection and perform Quick/Full Tests accordingly.
A different Hadoop username can be used, but please check that the username is created and has proper permissions and ownership rights on the /user/<username> directory on HDFS via hdfs dfs -ls /user.
Connecting to an EMR cluster using SOCKS Proxy
SOCKS proxy is another option to connect to your EMR cluster. See the Networking Setup section for information on starting a SOCKS proxy and an SSH tunnel. Please open the SSH tunnel and the SOCKS proxy.
Setup the connection in RapidMiner Studio
-
Select Amazon Elastic MapReduce (EMR) 5.x as the Hadoop version.
-
Set the following addresses:
- NameNode Address: <master_private_ip_address> (e.g.
10.1.2.3) - Resource Manger Address: <master_private_ip_address> (e.g.
10.1.2.3) - JobHistory Server Address: <master_private_ip_address> (e.g.
10.1.2.3) - Hive Server Address:
localhost
- NameNode Address: <master_private_ip_address> (e.g.
-
Set the ports if necessary
- Set Hive port to 1235 (as described in Networking Setup)
-
Add the following Advanced Hadoop Parameters key-value pair (as described in Networking Setup):
Key Value dfs.client.use.legacy.blockreadertruehadoop.rpc.socket.factory.class.defaultorg.apache.hadoop.net.SocksSocketFactoryhadoop.socks.serverlocalhost:1234 -
Save the Radoop Connection and perform Quick/Full Test accordingly.
Connecting to an EMR cluster over VPN
EMR VPN is another option to connect to your EMR cluster. This will require setting up a dedicated EC2 instance with the VPN software.
Setting up the VPN
If the user already has a VPN established for the EMR cluster then this section can be skipped. But the user does need to still take note of the VPN’s IP address and DNS name and make sure the VPN is attached to the EMR cluster’s VPC and subnet.
-
When the cluster is in a
RUNNINGorWAITINGstate, note the private IPs and private domain names of the EC2 instances should be available. -
Start a VPN server using an EC2 instance in the same VPC as the EMR cluster.
-
Connect to the VPN from your desktop
- Check if the correct route is set up (e.g.
172.30.0.0/16)
- Check if the correct route is set up (e.g.
-
Enable the network traffic from the VPN to the EMR cluster
- On the EMR Cluster details page open the Master (and later the Slave) security group settings page
- At the inbound rules add a new rule and enable “All Traffic” from the VPC network (e.g.
172.30.0.0/16) - Do this setting on both the Master and Slave security groups of the EMR cluster
-
Optional: Setup local hosts file (if you would like to use host/DNS names instead of IP addresses)
- On the EMR Cluster details page in the Hardware section check the “EC2 Instances” and get the private IP and DNS.
- Add the hostnames (DNS) and IP addresses of the nodes to your local hosts file (e.g.
172.30.1.209 ip-172-30-1-209.ec2.local)
Setting up the Radoop Connection in RapidMiner Studio to use the VPN
When the VPN server has been established either by the Setting up the VPN instructions above or by some external entity the Radoop Connection can be created. Use the steps described in the Connecting to a firewalled EMR cluster using Radoop Proxy section skipping the setup requirement for Radoop Proxy itself.