You are viewing the RapidMiner Radoop documentation for version 9.7 - Check here for latest version
Azure HDInsight 3.6
RapidMiner Radoop supports version 3.6 of Azure HDInsight, a cloud-based Hadoop service that is built upon Hortonworks Data Platform (HDP) distribution. If RapidMiner Radoop does not run inside the Azure network, there are a couple of options for the networking setup. A solution like Azure ExpressRoute or a VPN can simplify the setup. However, if those options are not available, the HDInsight clusters can be accessed using Radoop Proxy, which coordinates all the communication between RapidMiner Studio and the cluster resources. Since this setup is the most complex, this guides assumes this scenario, feel free to skip steps that are not required because of an easier networking setup.
Connecting to an Azure HDInsight 3.6 cluster using Radoop Proxy
For a proper networking setup, a RapidMiner Server instance (with Radoop Proxy enabled) should be installed on an additional machine that is located in the same virtual network as the cluster nodes. The following guide provides the necessary steps for establishing a proxied connection to an HDInsight cluster.
Starting an HDInsight cluster
If you already have an HDInsight cluster running in the Azure network, skip these steps entirely.
Create a new Virtual network for all the network resources that will be created during cluster setup. The default Address space and Subnet address range may be suitable for this purpose. Use the same Resource group for all resources that are created during the whole cluster setup procedure.
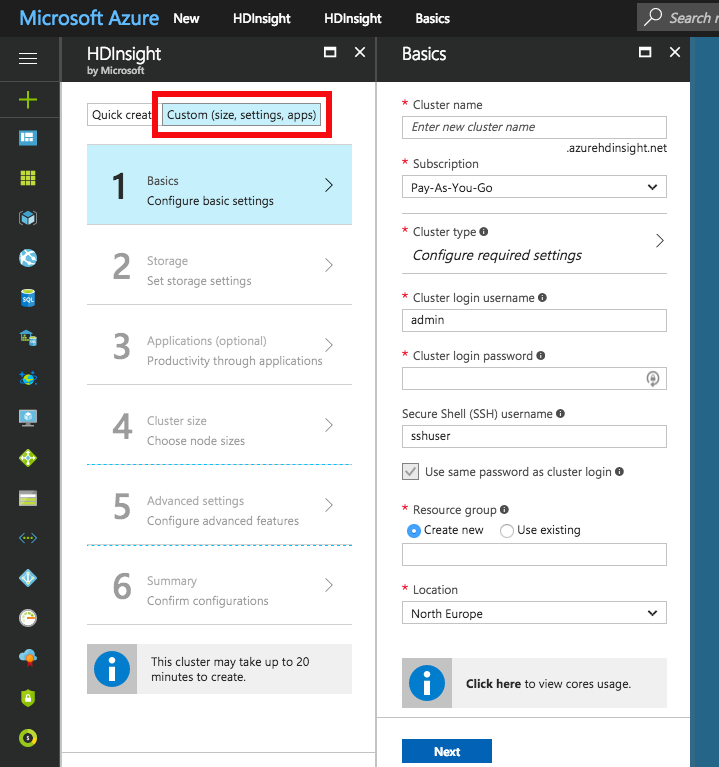
Use the Custom (size, settings, apps) option instead of Quick create for creating the cluster. Choose Spark cluster type with Linux operating system, and the latest Spark version supported by Radoop, which is Spark 2.2.0 (HDI 3.6) as of this writing. Fill all the required login credential fields. Select the previously defined Resource group.
Choose the Primary storage type of the cluster. You may specify additional storage accounts as well.
- Azure Storage : Provide a new or already existing Storage account and a Default container name. You may connect to as many Azure Storage accounts as needed.
- Data Lake Store : Provide a Data Lake Store account. Make sure that the root path exists and the associated Service principal has adequate privileges for accessing the chosen Data Lake Store and path. Please note that a Service principal can be re-used for other cluster setups as well. For this purpose, it is recommended to save the Certificate file and the Certificate password for future reference. Once a Service principal is chosen, the access rights for any Data Lake Stores can be configured via this single Service principal object.
Configure the Cluster size of your choice.
On Advanced settings tab, choose the previously created Virtual network and Subnet.
After getting through all the steps of the wizard, create the cluster. After it has started, please find the private IPs and private domain names of the master nodes. You will need to copy these to your local machine. This step is required because some domain name resolutions need to take place on the client (RapidMiner Studio) side. The easiest way to do this is by copying it from one of the cluster nodes. Navigate to the dashboard of your HDInsight cluster, and select the SSH + Cluster login option. Choose any item from the Hostname selector. On Linux and Mac systems you can use the ssh command appearing below the selector. On Windows systems you will have to extract the hostname and the username from the command, and use PuTTY to connect to the host. The password is the one you provided in step 2. Once you are connected, view the contents of the /etc/hosts file of the remote host, for example by issuing the following command:
cat /etc/hosts. Copy all the entries with long, generated hostnames. Paste them into the hosts file of your local machine, which is available at the following location:- For Windows systems: Windows\system32\drivers\etc\hosts - For Linux and Mac systems: /etc/hosts
Starting RapidMiner Server and Radoop Proxy
Create a new RapidMiner Server virtual machine in Azure. For this you will need to select the "Create a resource" option and search the Marketplace for RapidMiner Server. Select the BYOL version which best matches your Studio version. Press Create and start configuring the virtual machine. Provide the Basic settings according to your taste, but make sure that you use the previously configured Resource group and the same Location as for your cluster. Click Ok, then select a virtual machine size with at least 10GB of RAM. Configure optional features. It is essential that the same Virtual network and Subnet are selected in the Network settings as the ones used for the cluster. All other settings may remain unchanged. Check the summary, then click Create.
Once the VM is started, you still need to wait a few minutes for RapidMiner Server to start. The easiest way to validate this is to open (Public IP address of the VM):8080 in your browser. Once that page loads, you can log in with admin username and the name of your VM in Azure as password. You will immediately be asked for a valid license key. A free license is perfectly fine for this purpose. If your license is accepted you can close this window, you will not need it anymore.
Setting up the connection in RapidMiner Studio
First, create a Radoop Proxy Connection for the newly installed Radoop Proxy (described here in Step 1). The needed properties are:
| Field | Value |
|---|---|
| Radoop Proxy server host | Provide the IP address of the MySQL server instance. |
| Radoop Proxy server port | The value of radoop_proxy_port in the used RapidMiner Server install configuration XML (1081 by default). |
| RapidMiner Server username | admin (by default) |
| RapidMiner Server password | name of Azure proxy VM (by default) |
| Use SSL | false (by default) |
For setting up a new Radoop connection to an Azure HDInsight 3.6 cluster, we strongly recommend to choose ![]() Import from Cluster Manager option, as it offers by far the easiest way to make the connection work correctly.
This section describes the Cluster Manager import process. The Cluster Manager URL should be the base URL of the Ambari interface web page (e.g.
Import from Cluster Manager option, as it offers by far the easiest way to make the connection work correctly.
This section describes the Cluster Manager import process. The Cluster Manager URL should be the base URL of the Ambari interface web page (e.g. https://radoopcluster.azurehdinsight.net). You can easily access it by clicking Ambari Views on the cluster dashboard.
After the connection is imported, most of the required settings are filled automatically. In most cases, only the following properties have to be provided manually:
| Field | Value |
|---|---|
| Advanced Hadoop Parameters | Disable the following properties: io.compression.codec.lzo.class and io.compression.codecs |
| Hive Server Address | This is only needed, if you do not use the ZooKeeper service discovery (Hive High Availability is unchecked). Can be found on Ambari interface (Hive / HiveServer2). In most cases, it is the same as the NameNode address. |
| Radoop Proxy Connection | The previously created Radoop Proxy Connection should be chosen. |
| Spark Version | Select the version matching the Spark installation on the cluster, which is Spark 2.2 if you followed above steps for HDInsight install. |
| Spark Archive (or libs) path | For Spark 2.2 (with HDInsight 3.6), the default value is (local:///usr/hdp/current/spark2-client/jars). Unless using a different Spark version you are fine with leaving Use default Spark path checkbox selected. |
| Advanced Spark Parameter | Create spark.yarn.appMasterEnv.PYSPARK_PYTHON property with a value of /usr/bin/anaconda/bin/python. |
You will also need to configure your storage credentials, which is described by the Storage credentials setup section. If you want to connect to a premium cluster you will need to follow the steps in the Connecting to a Premium cluster section. Once you completed these steps, you can click OK on the Connection Settings dialog, and save your connection.
It is essential that the RapidMiner Radoop client can resolve the hostnames of the master nodes. Follow the instructions of Step 6 of the Starting an HDInsight cluster to add these hostnames to your operating system’s hosts file.
Storage credentials setup
An HDInsight cluster can have more storage instances attached, which may even have different storage types (Azure Storage and Data Lake Store). For accessing them, the related credentials must be provided in Advanced Hadoop Parameters table. The following sections clarify the type of credentials needed, and how they can be acquired.
It is essential that the credentials of the primary storage are provided.
You may have multiple Azure Storages attached to your HDInsight cluster, provided that any additional storages were specified during cluster setup. All of these have access key(s) which can be found at Access keys tab on the storage dashboard. To enable access towards an Azure Storage, provide this key as an Advanced Hadoop Parameter:
| Key | Value |
|---|---|
fs.azure.account.key.<storage_name>.blob.core.windows.net |
the storage access key |
As above mentioned, a single Active Directory service principal object can be attached to the cluster. This controls the access rights towards Data Lake Store(s). Obviously, only one Data Lake Store can take the role of the primary storage. In order to enable Radoop to access a Data Lake Store through this principal, the following Advanced Hadoop Parameters have to be specified:
| Key | Value |
|---|---|
dfs.adls.oauth2.access.token.provider.type |
ClientCredential |
dfs.adls.oauth2.refresh.url |
OAuth 2.0 Token Endpoint address |
dfs.adls.oauth2.client.id |
Service principal application ID |
dfs.adls.oauth2.credential |
Service principal access key |
You can acquire all of these values under Azure Active Directory dashboard (available at the service list of the main Azure Portal). Click App registrations on the dashboard, then look for the needed values as follows:
- For OAuth 2.0 Token Endpoint address, go to Endpoints, and copy the value of OAuth 2.0 Token Endpoint.
- On App registrations page, choose the Service principal associated with your HDInsight cluster, and provide the value of Application ID as Service principal application ID.
- Click Keys. Generate a new key by entering a name and an expiry date, and replace the value of Service principal access key with the generated password.
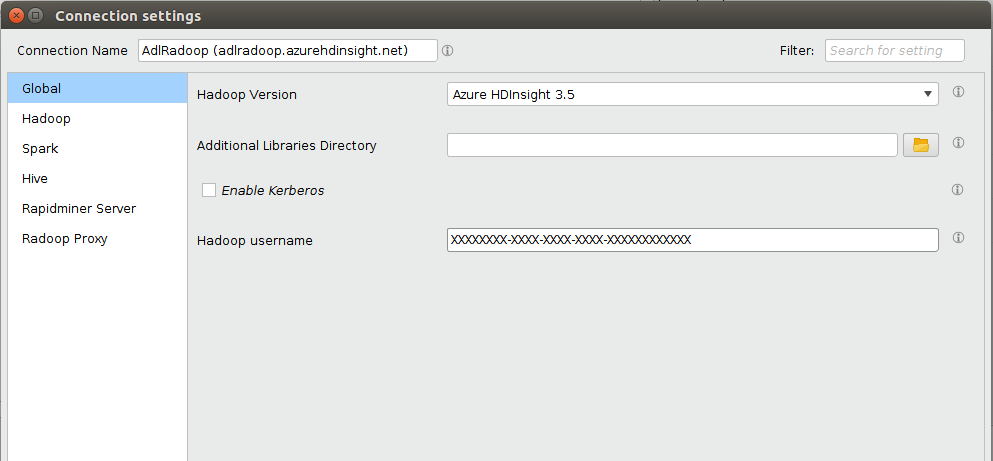
Finally, go to the HDInsight cluster main page, and click Data Lake Store access in the menu. Provide the value of Service Principal Object ID as Hadoop Username.
Connecting to a Premium cluster (having Kerberos enabled)
If you have set up or have a Premium HDInsight cluster (subscription required), some additional connection settings are required for Kerberos-based authentication.
- Configuring Kerberos authentication section describes general Kerberos-related settings.
- As for all Hortonworks distribution based clusters, you also have to apply a Hive setting (
hive.security.authorization.sqlstd.confwhitelist.append) described in this section. Please note that a Hive service restart will be needed. - We strongly advise to use
 Import from Cluster Manager option for creating a Radoop connection to the Kerberized cluster. The import process covers some necessary changes in Advanced Hadoop Parameters that are required for the connection to work as expected.