Using the Salesforce Connector
The Salesforce Connector allows you to connect to Salesforce directly from Altair AI Studio. It supports all CRUD operations (Create, Read, Update, and Delete) and provides an editor for building custom queries in the Salesforce Object Query Language (SOQL).
This document will walk you through how to:
Connect to your Salesforce account
You can connect to your Salesforce account using either of the following:
your account credentials - To connect using your account credentials, you will need the connection details of your account (username, password, security token, URL).
the Salesforce OAuth Device Flow - To connect using OAuth you will need the client ID of a so-called Connected App configured by your Salesforce administrator.
Altair AI Studio uses the same connection objects for both mechanisms.
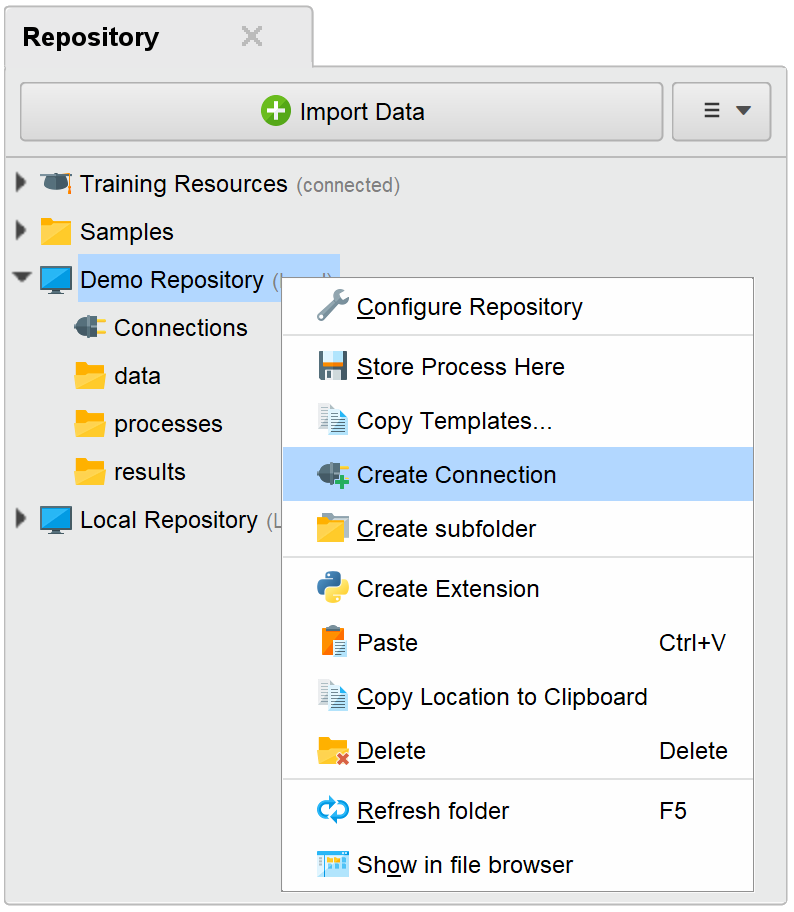
To create a new connection object, right-click on the repository
where you want to store your Salesforce Connection and choose
![]() Create Connection:
Create Connection:
Alternatively, you can click on Connections > Create Connection ![]() and select the Repository from the dropdown of the following dialog.
and select the Repository from the dropdown of the following dialog.
Choose a name for the new connection and set the Connection Type to ![]() Salesforce:
Salesforce:
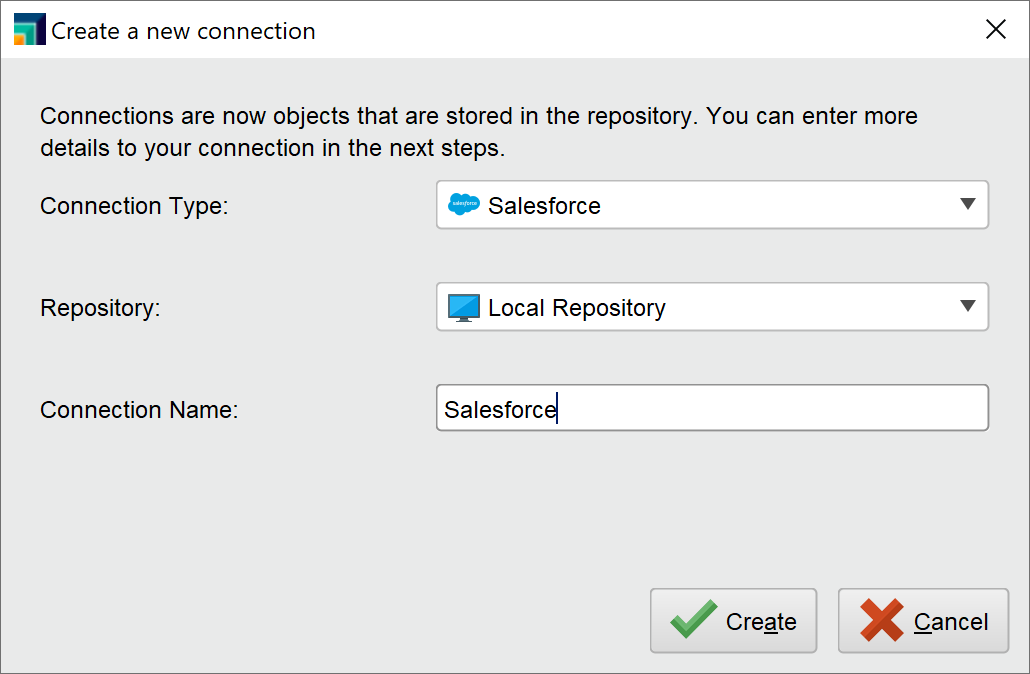
Click on ![]() Create and switch to the Setup tab in the Edit connection dialog.
Create and switch to the Setup tab in the Edit connection dialog.
Connect using your account credentials
Fill in the Connection details of your Salesforce configuration using HTTP Basic Authentication as Authentication method:
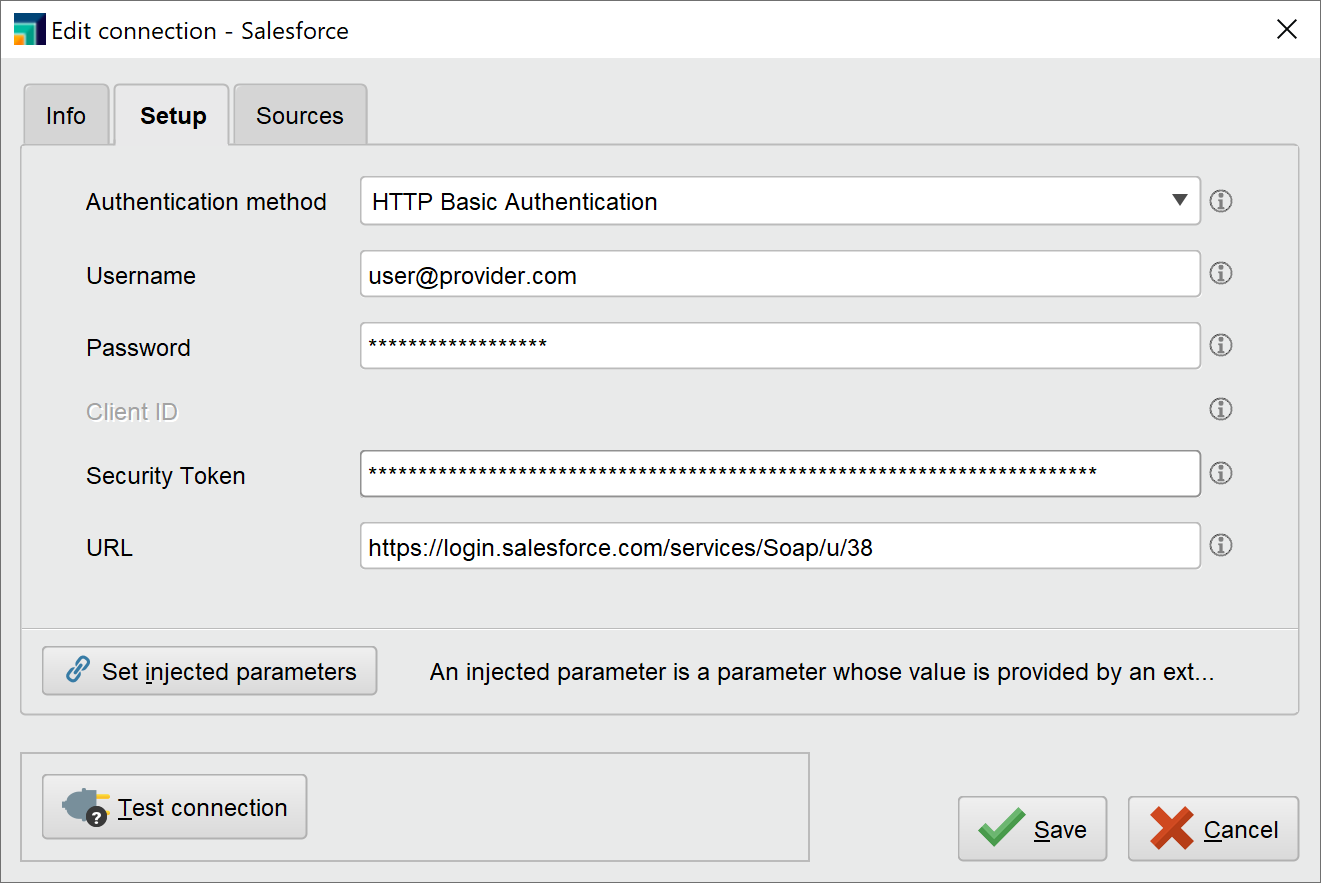
The username and password are the same credentials you use for the Salesforce website. Your Salesforce account includes a security token that is needed to make a connection. You can get the security token from your Salesforce registration email. If you do not have the registration email, you can reset the security token.
We recommend testing your new Salesforce Connection by clicking the
![]() Test connection button.
If the test fails, please check whether the details you provided are correct.
Test connection button.
If the test fails, please check whether the details you provided are correct.
Click ![]() Save
to save the connection and close the Edit connection dialog.
Save
to save the connection and close the Edit connection dialog.
You're ready to start using the Salesforce operators!
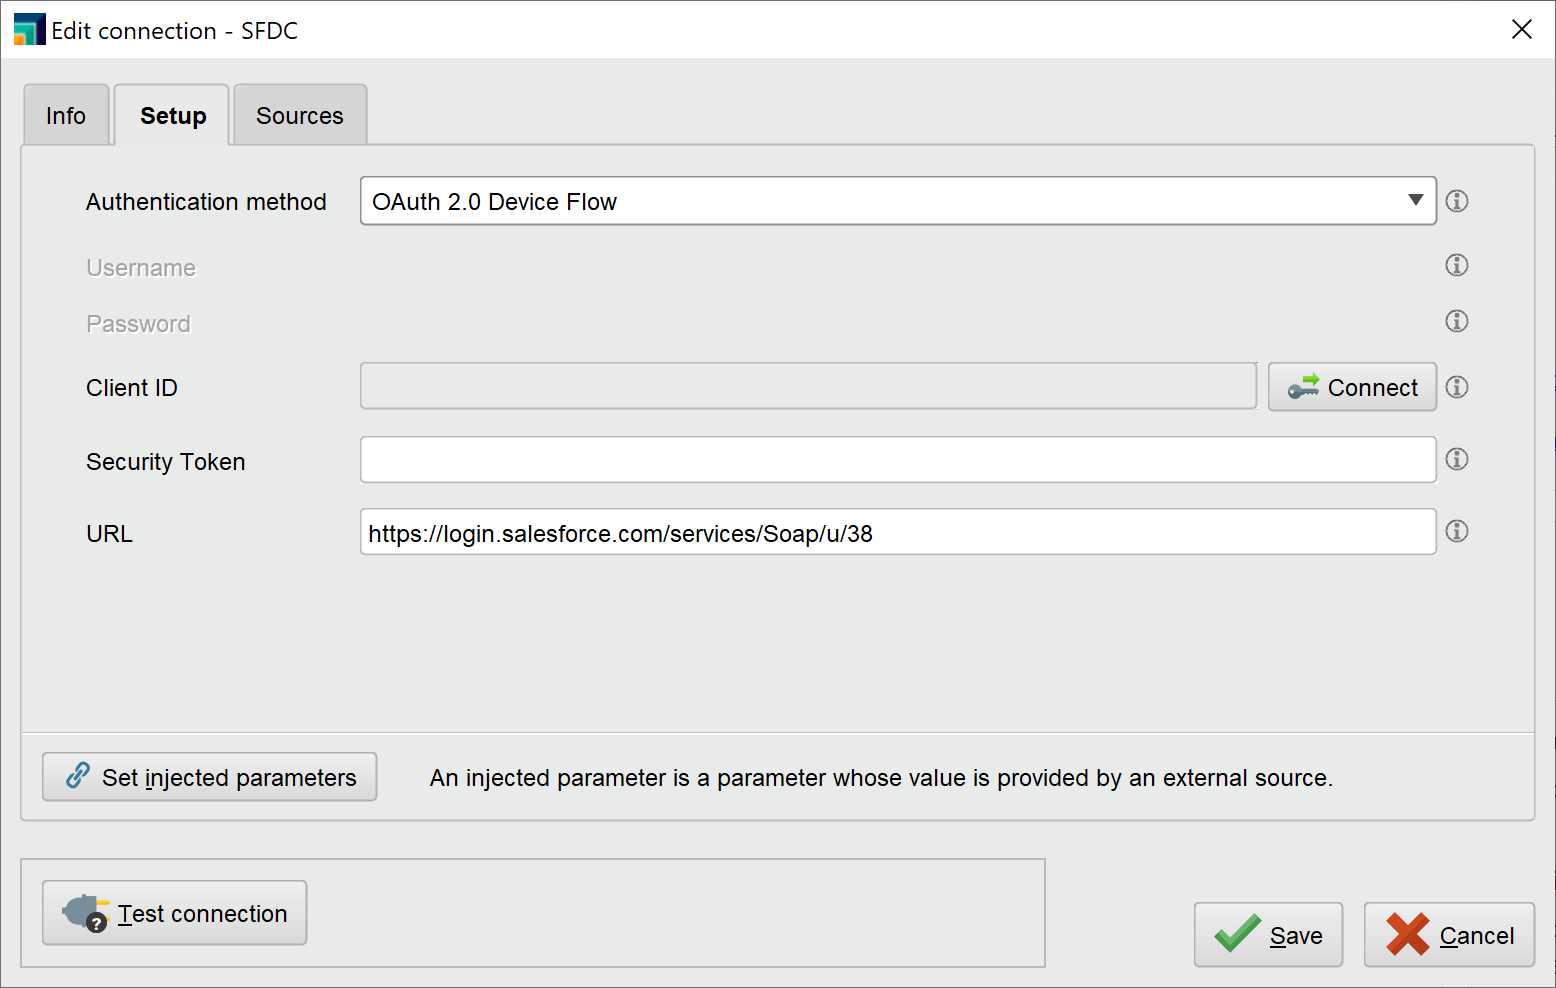
Connect using OAuth
To connect using OAuth you will need the client ID (consumer ID) of a Connected App configured for use with Altair AI Studio. Connected Apps are usually configured by your Salesforce administrator (see appendix).
Change the Authentication method to OAuth 2.0 Device Flow. This will disable the username and password fields and enable the Connect button for the Client ID field:
Click on the Connect button to open the Device Flow dialog.
Enter the Client ID in the respective field.
When using a sandbox, you might furthermore need to change the Endpoint to https://test.salesforce.com.
Next, click the Initialize button to start the authorization flow:

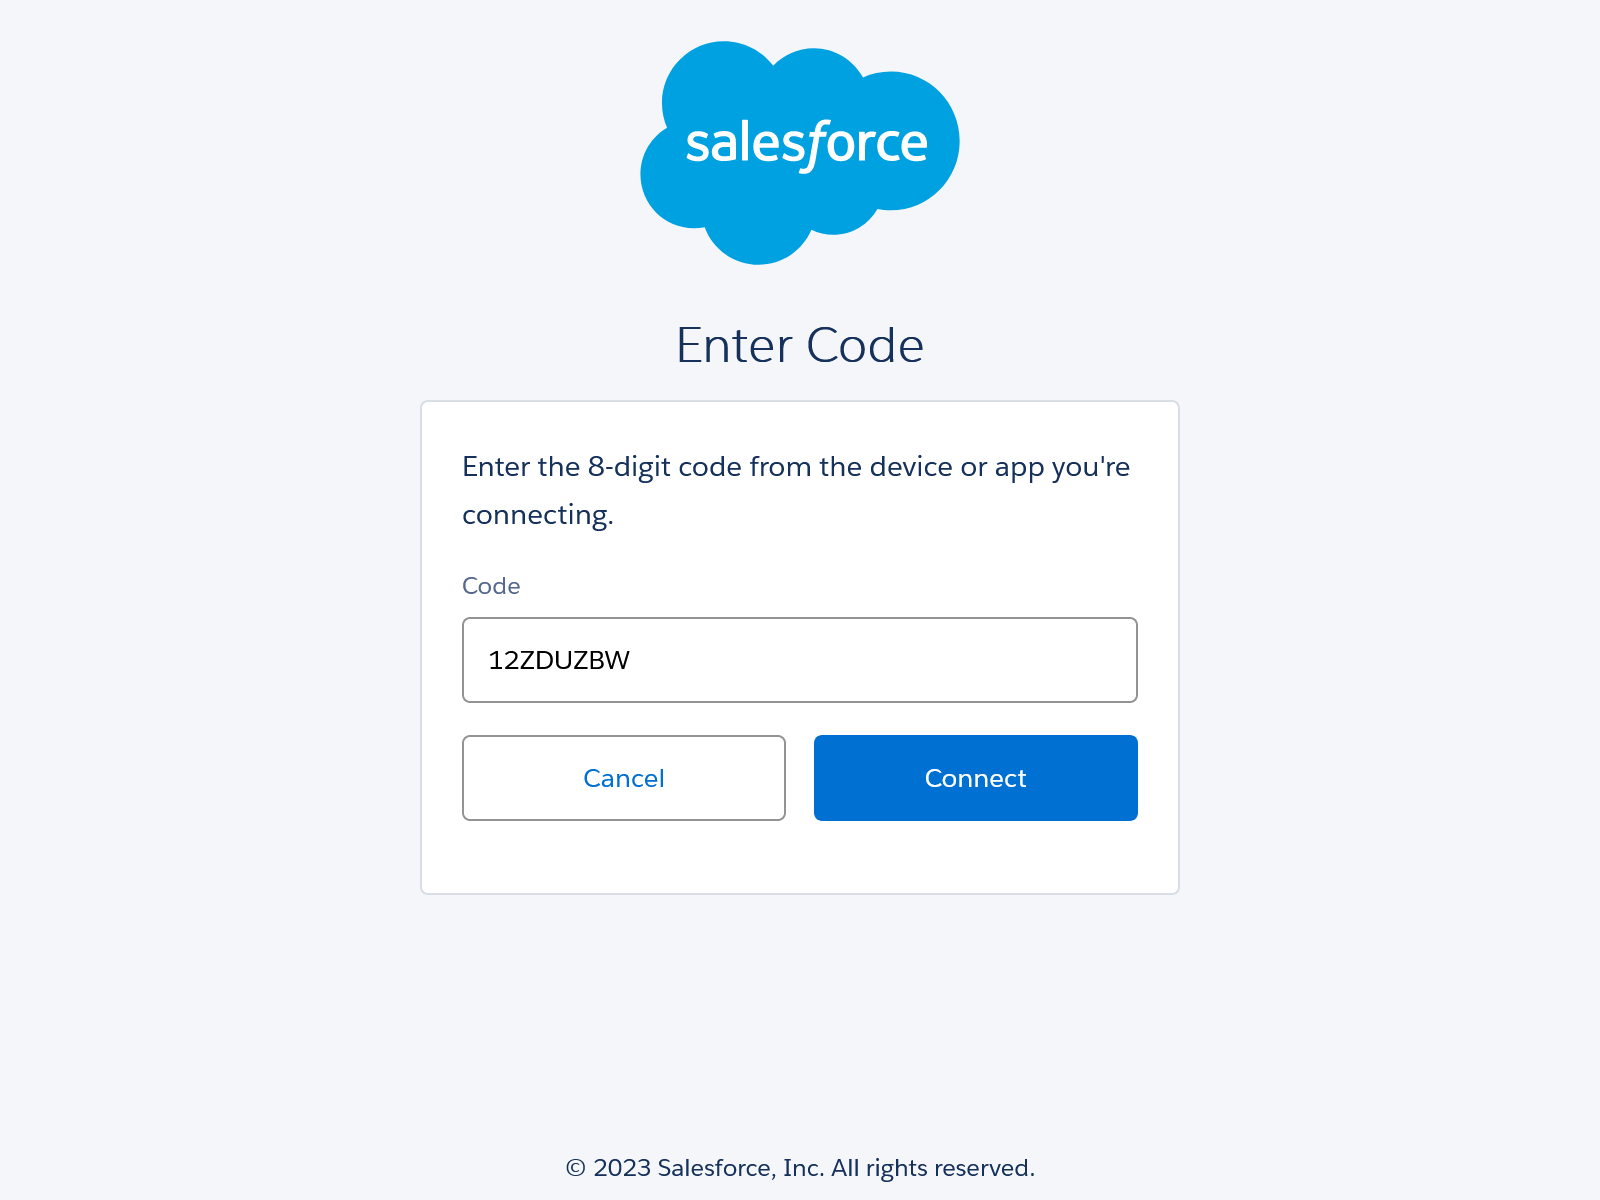
If the initialization was successful, the Verification link and Code fields should now be populated with a link and alpha-numeric code respectively. The code is valid for 10 minutes.
Open the verification link in your browser. Salesforce might ask you to log in.
Once logged in, Salesforce will ask you to enter the code shown in Altair AI Studio:
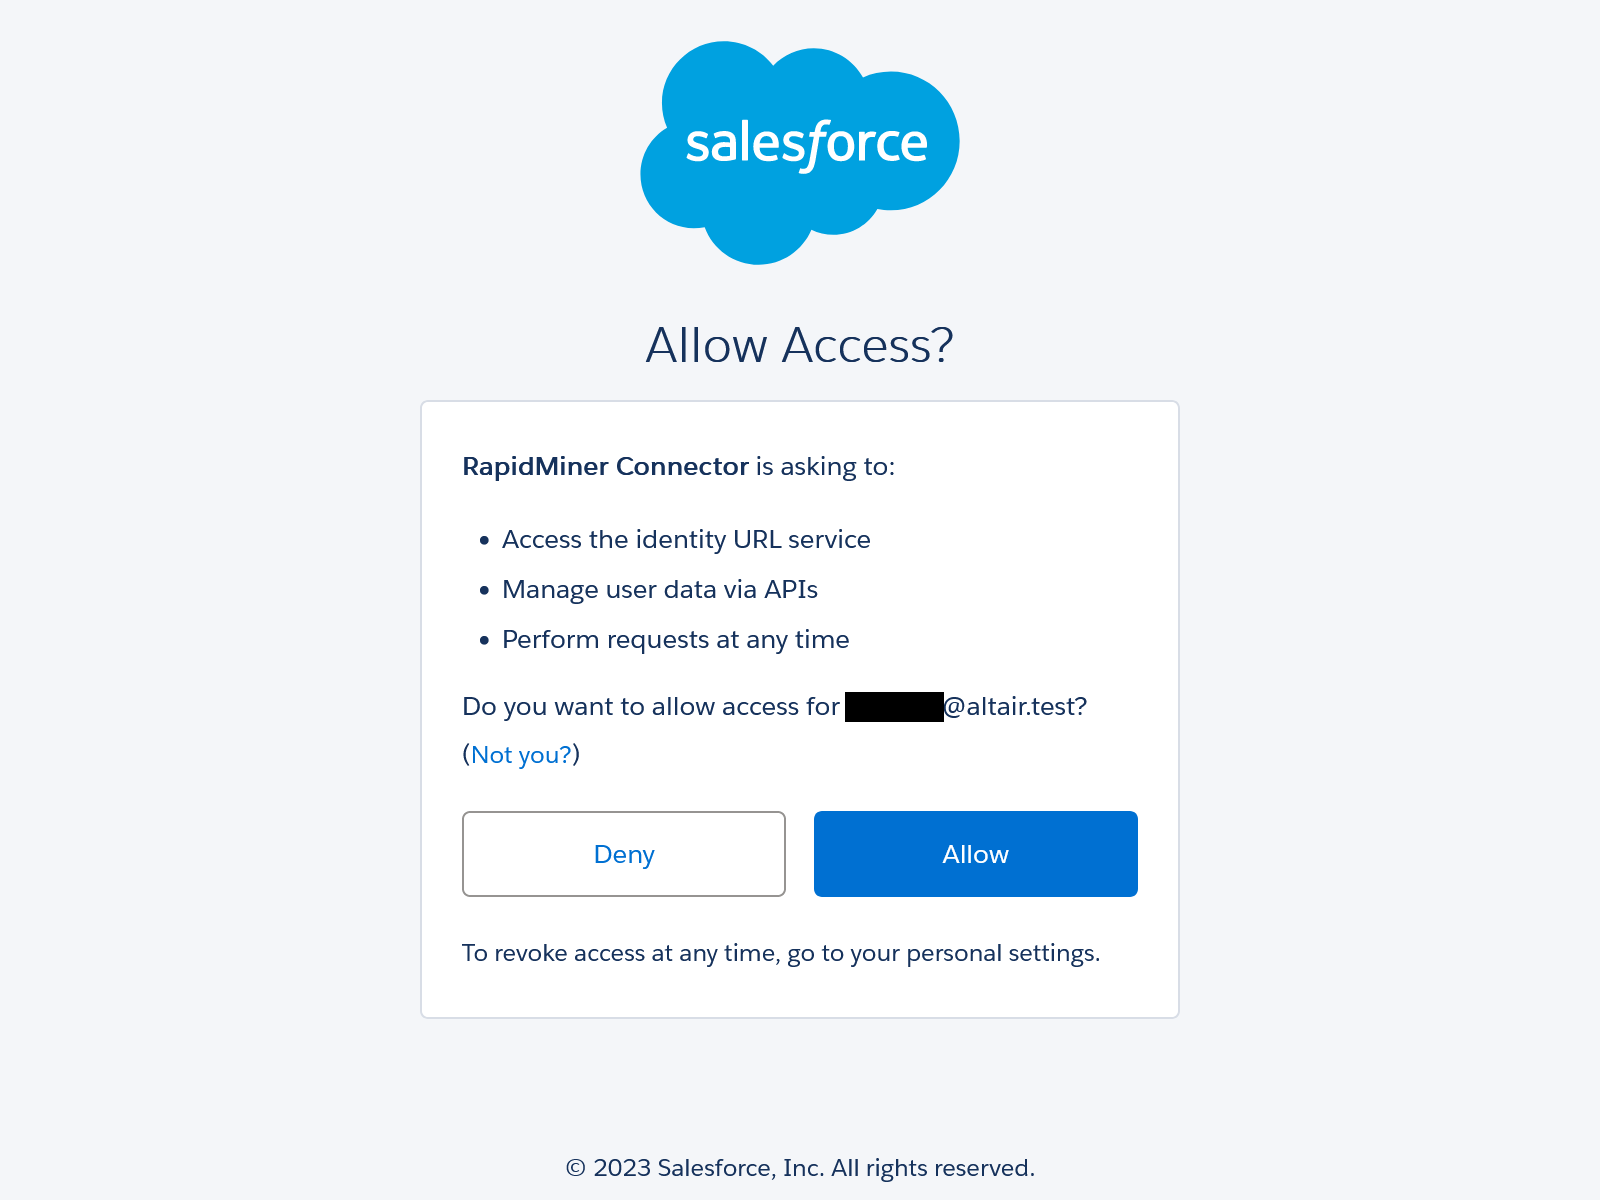
Next, Salesforce will ask you to grant the Connected App access to your account. It will list all scopes requested by the app (see the appendix above for an explanation of the scopes).
Take note that the name of the Connected App might differ as it is chosen by your administrator:
Once you reach the following screen you can go back to Altair AI Studio:
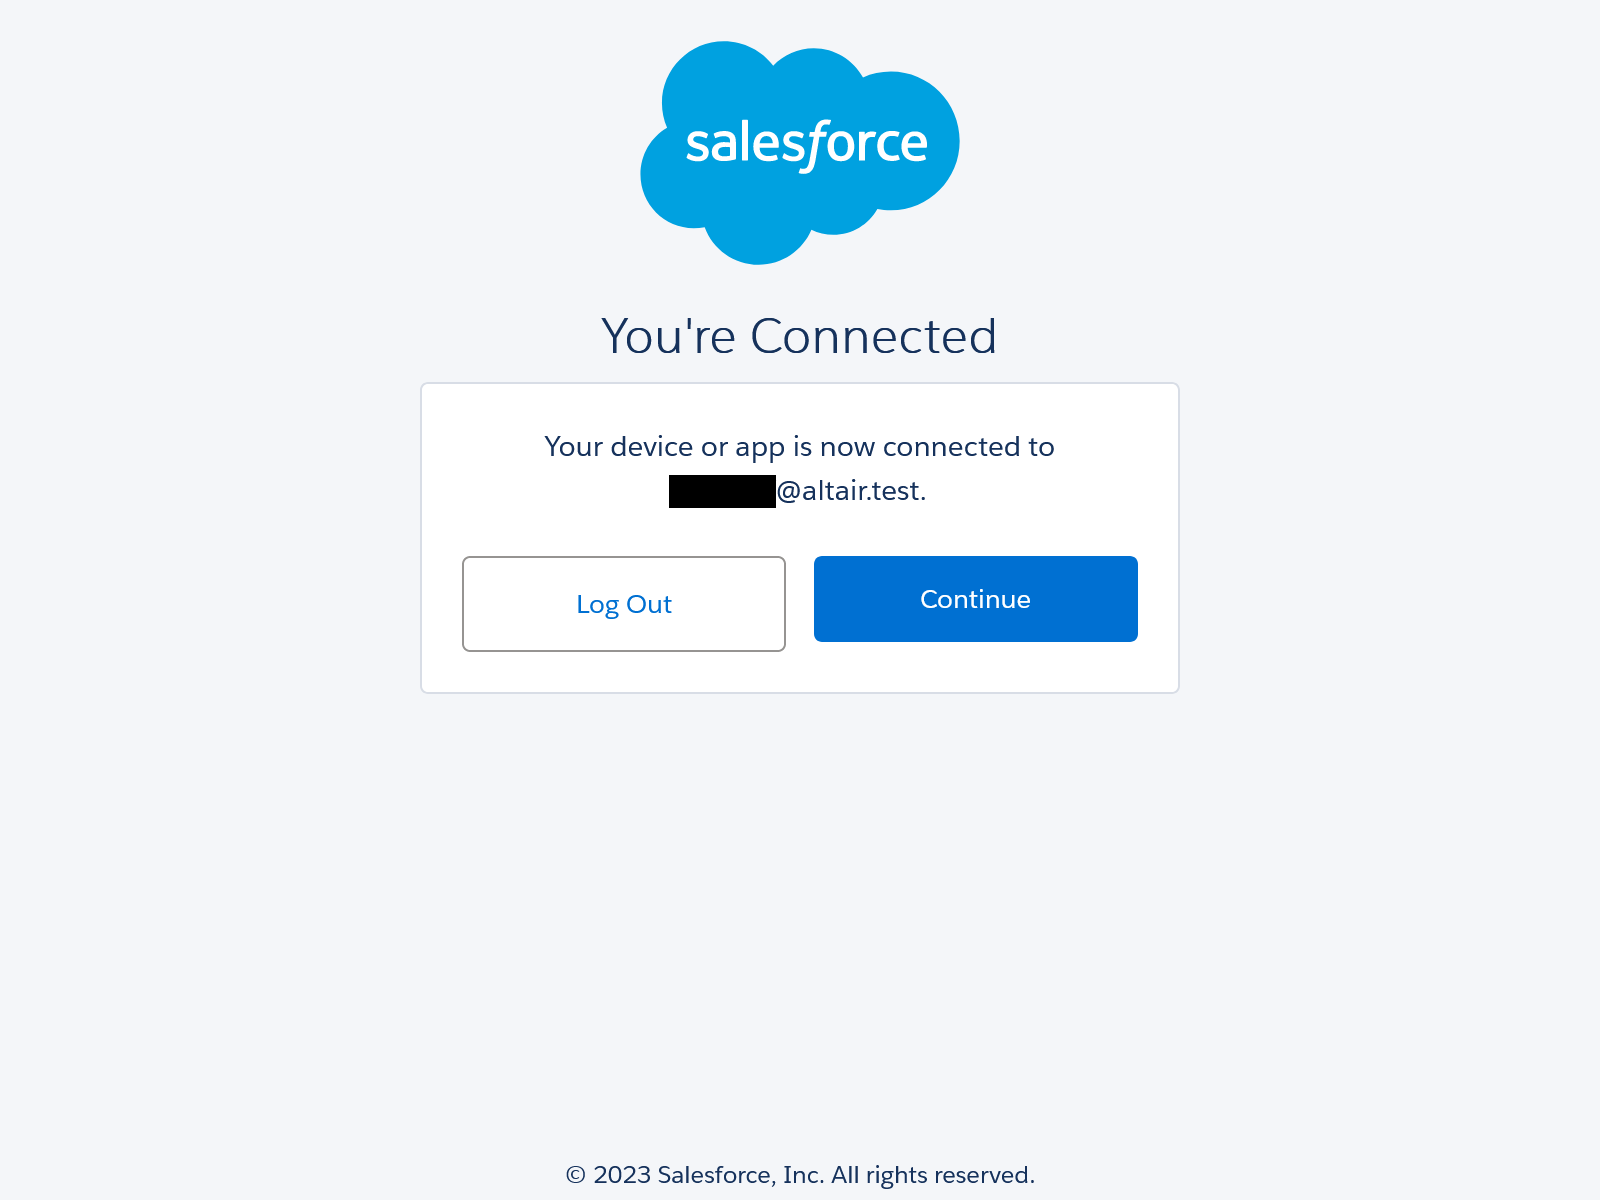
Back in Altair AI Studio, click on Refresh and save to complete the authorization flow:
This will close the Device Flow dialog and update the security token and URL fields in the setup tab.
You can test the token in the same dialog by clicking the ![]() Test connection button:
Test connection button:
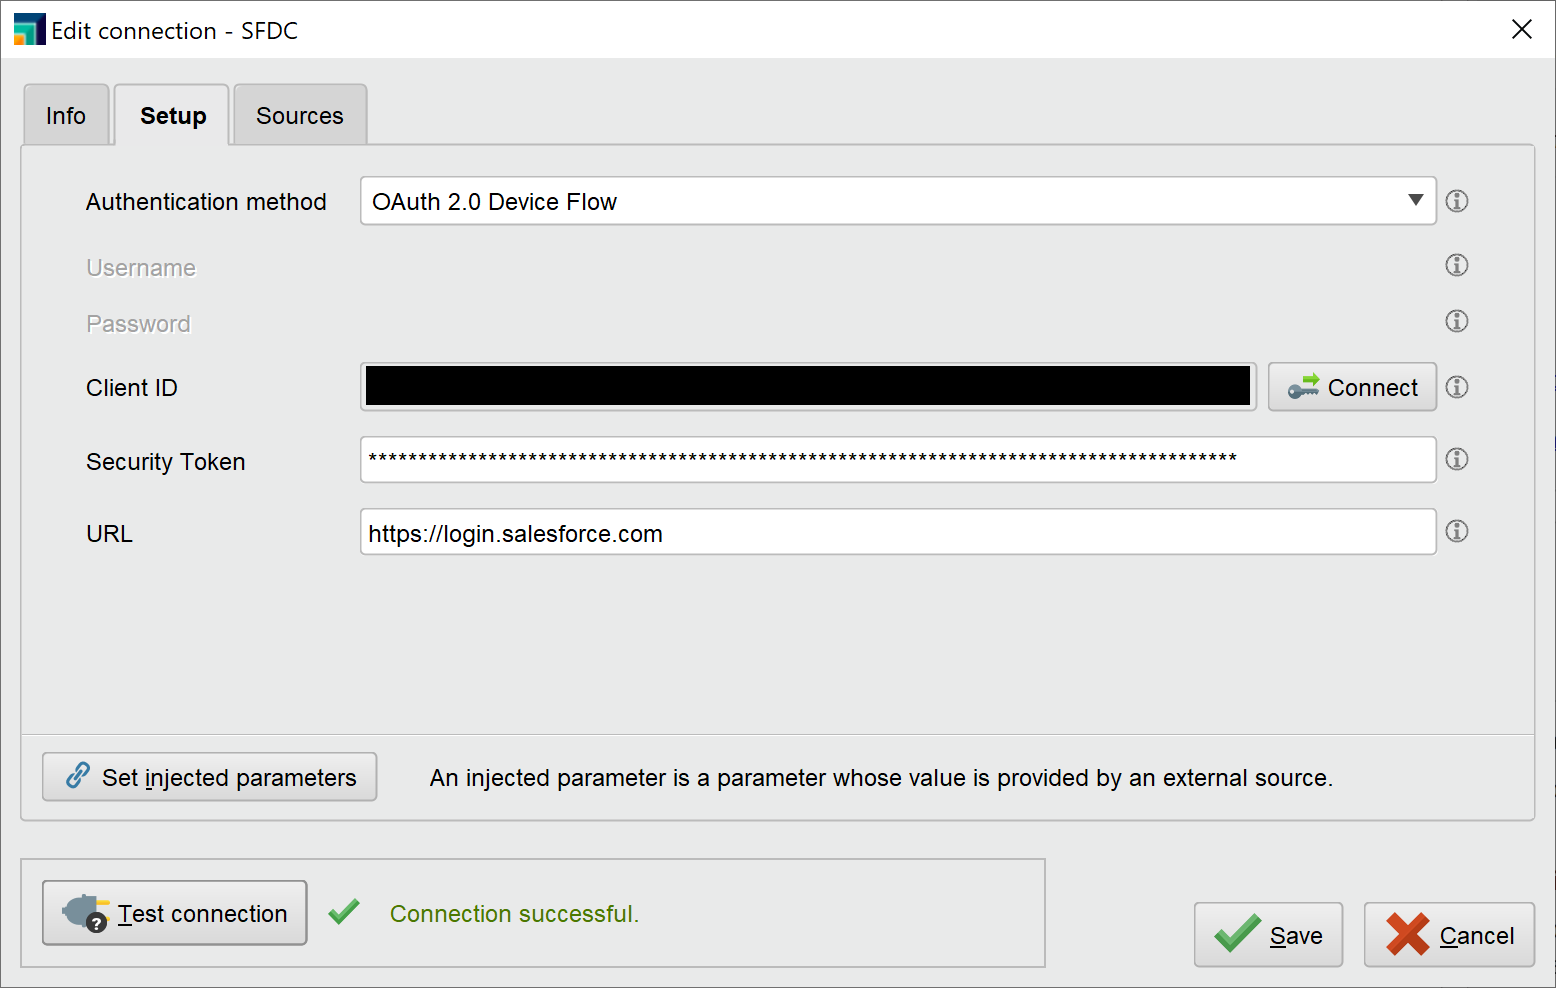
Please take note that the security token is not the same as your account security token. Instead, it is a newly generated token intended for offline use (no user interaction) that only works with the Connected App it was generated for.
All generated offline tokens can be viewed and revoked by the administrator of the Connected App.
Once you ![]() Save the connection, it is ready for use with the Salesforce operators.
Save the connection, it is ready for use with the Salesforce operators.
The new connection object only contains the offline token and no user credentials. However, the security token is linked to the user account used during the authorization flow.
Read from Salesforce
The Read Salesforce operator allows you to read data from Salesforce. Let us start with reading some demo data:
Drag a Read Salesforce operator into the Process Panel. Select your Salesforce Connection for the connection entry parameter from the Connections folder of the repository you stored it in by clicking on the
 button next to it:
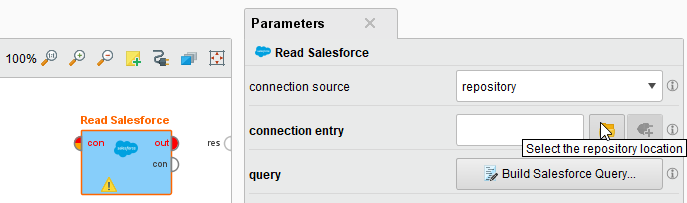
Alternatively, you can drag the Salesforce Connection from the repository into the Process Panel and connect the resulting operator with the Read Salesforce operator.
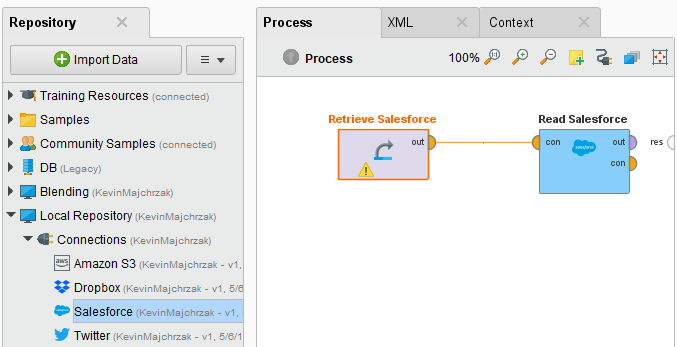
Connect the operator's output port to the result port of the process:
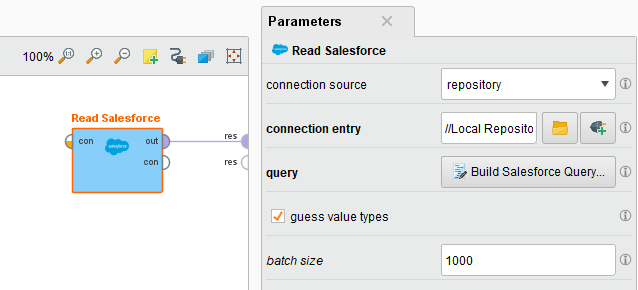
Click on the
 Build Salesforce Query button to open the query editor.
This dialog allows you to create a Salesforce SOQL query.
Simple mode (tab at the left of the window) provides you with an interface to build your query; Advanced mode allows you to write your own query.
Build Salesforce Query button to open the query editor.
This dialog allows you to create a Salesforce SOQL query.
Simple mode (tab at the left of the window) provides you with an interface to build your query; Advanced mode allows you to write your own query.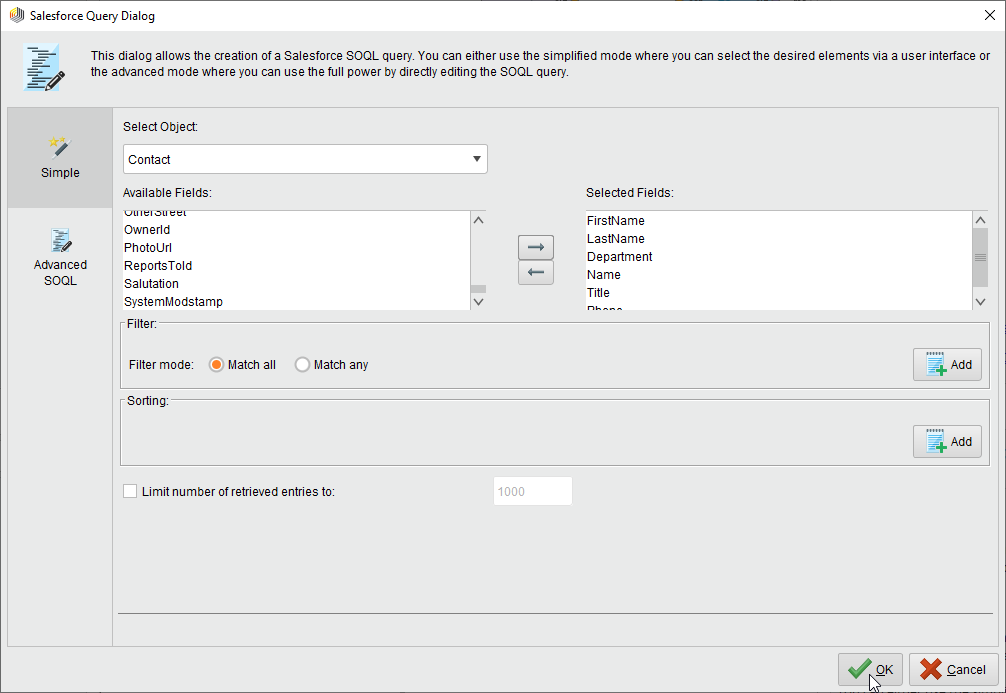
Run
 the process! In the Result Perspective, you should see the result of your query:
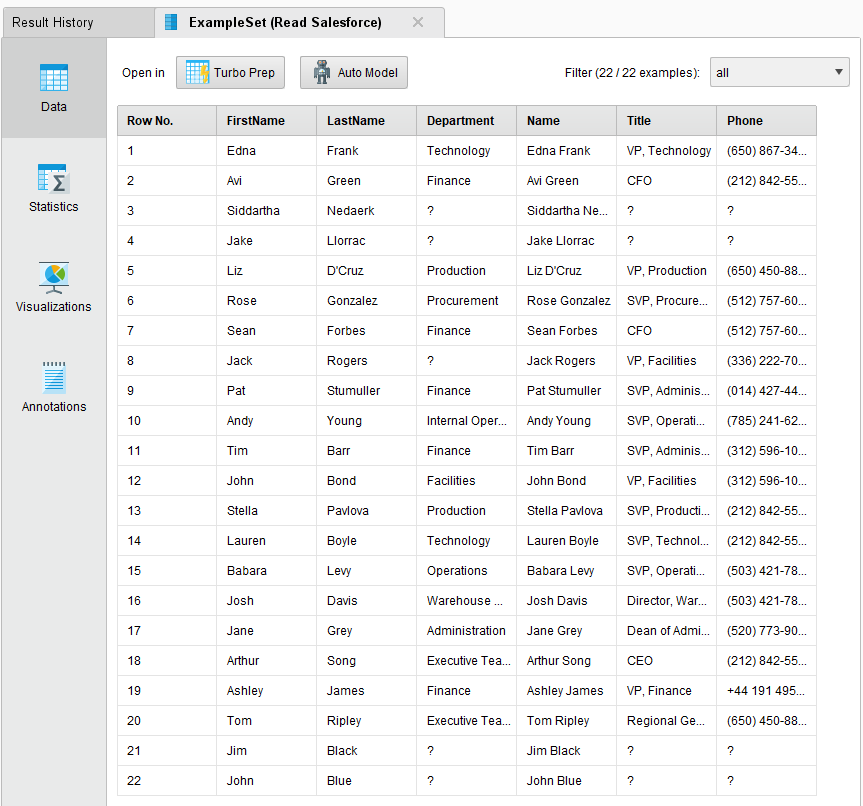
Write to Salesforce
Writing an example set to Salesforce is straightforward: Load the example set and pass it to the Write Salesforce operator. The following example illustrates how to write an Excel sheet with demo data to Salesforce.
Create an Excel sheet with the following data:

Open a new process
 in Altair AI Studio.
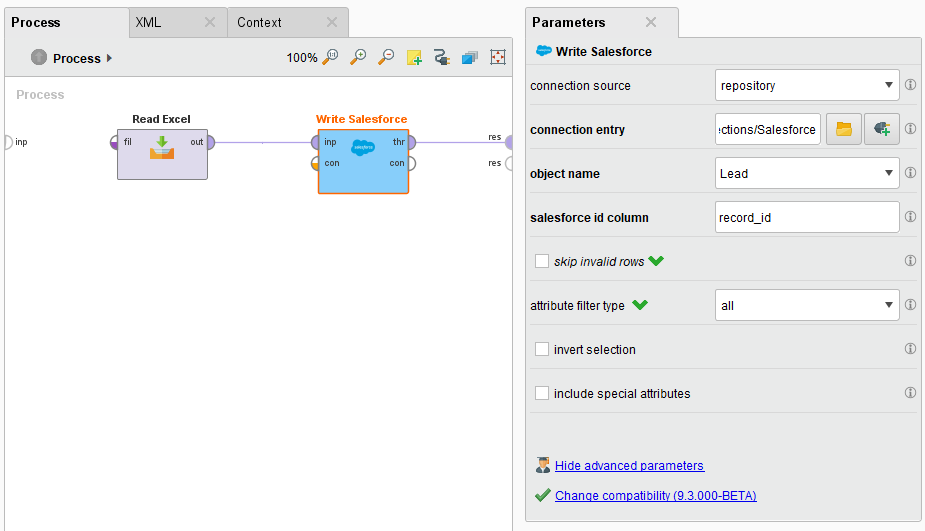
Read the created Excel sheet by using the Read Excel operator. Add a Write Salesforce operator to the process and connect the operators accordingly. Select your configured Salesforce Connection and configure the properties as shown on the screen shot:
Run
the process!
In the Results perspective, you should see the written entity: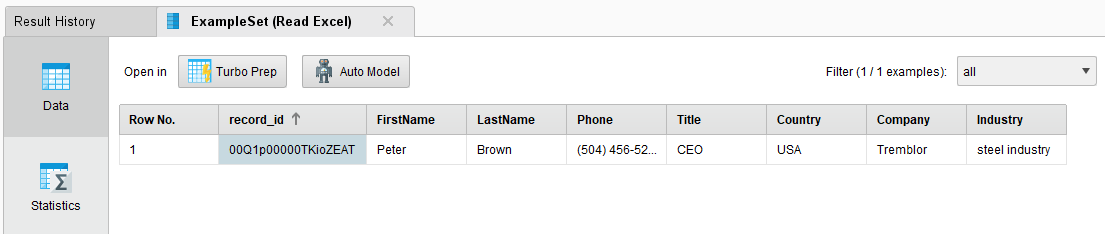
Appendix
Configure a Connected App
The connector only works with Connected Apps that support the so-called
Device Flow for IoT Integration and requires the Perform requests at any time (refresh_token, offline_access) scope to generate offline tokens.
The Device Flow is one of the few authorization flows that work with applications that are not web based. It also does not require the end user to enter their account credentials in Altair AI Studio.
Offline tokens allow the connector to be used in scenarios where repeated user interaction is not feasible. For example, consider an automated workflow running on Altair AI Hub that builds a report using data from Salesforce.
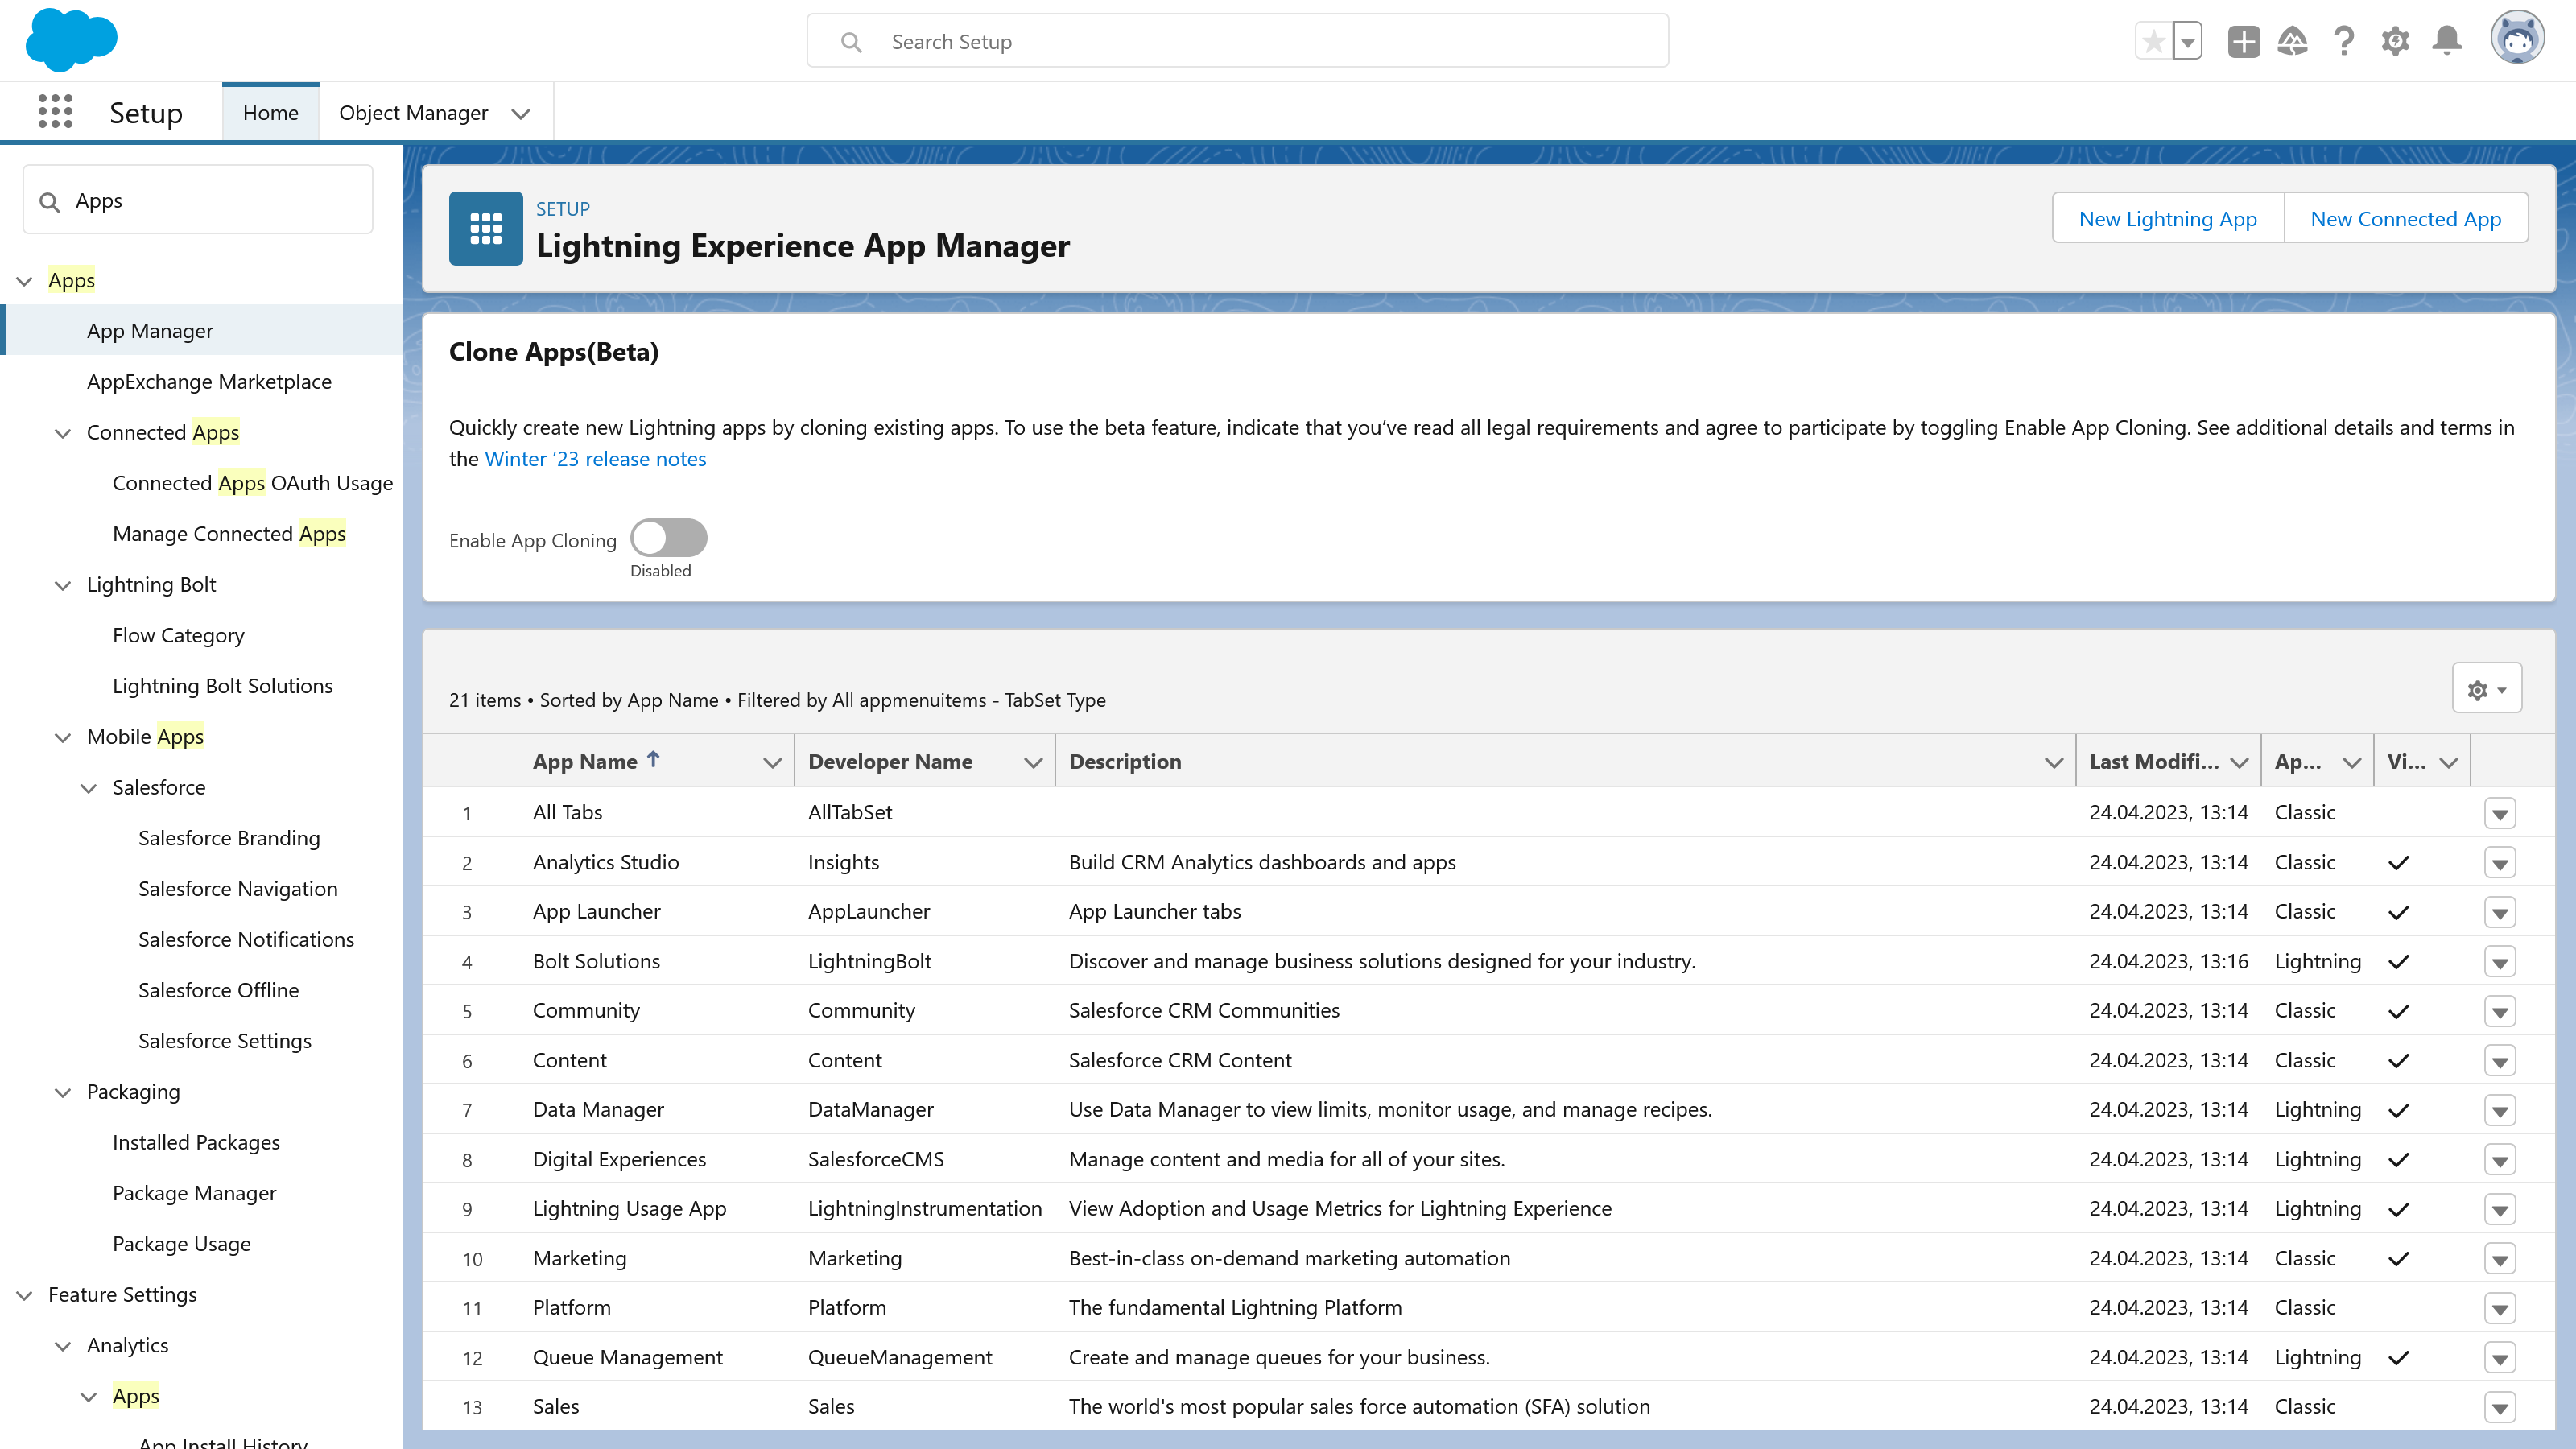
You can create a New Connected App in the Salesforce App Manager. You can find the App Manager in the Setup page of your Salesforce account:
You can choose an arbitrary name for the new Connected App. Take note that the app name will be displayed when users connect their accounts. Thus, it is recommended to use an app name that hints at its intended use:
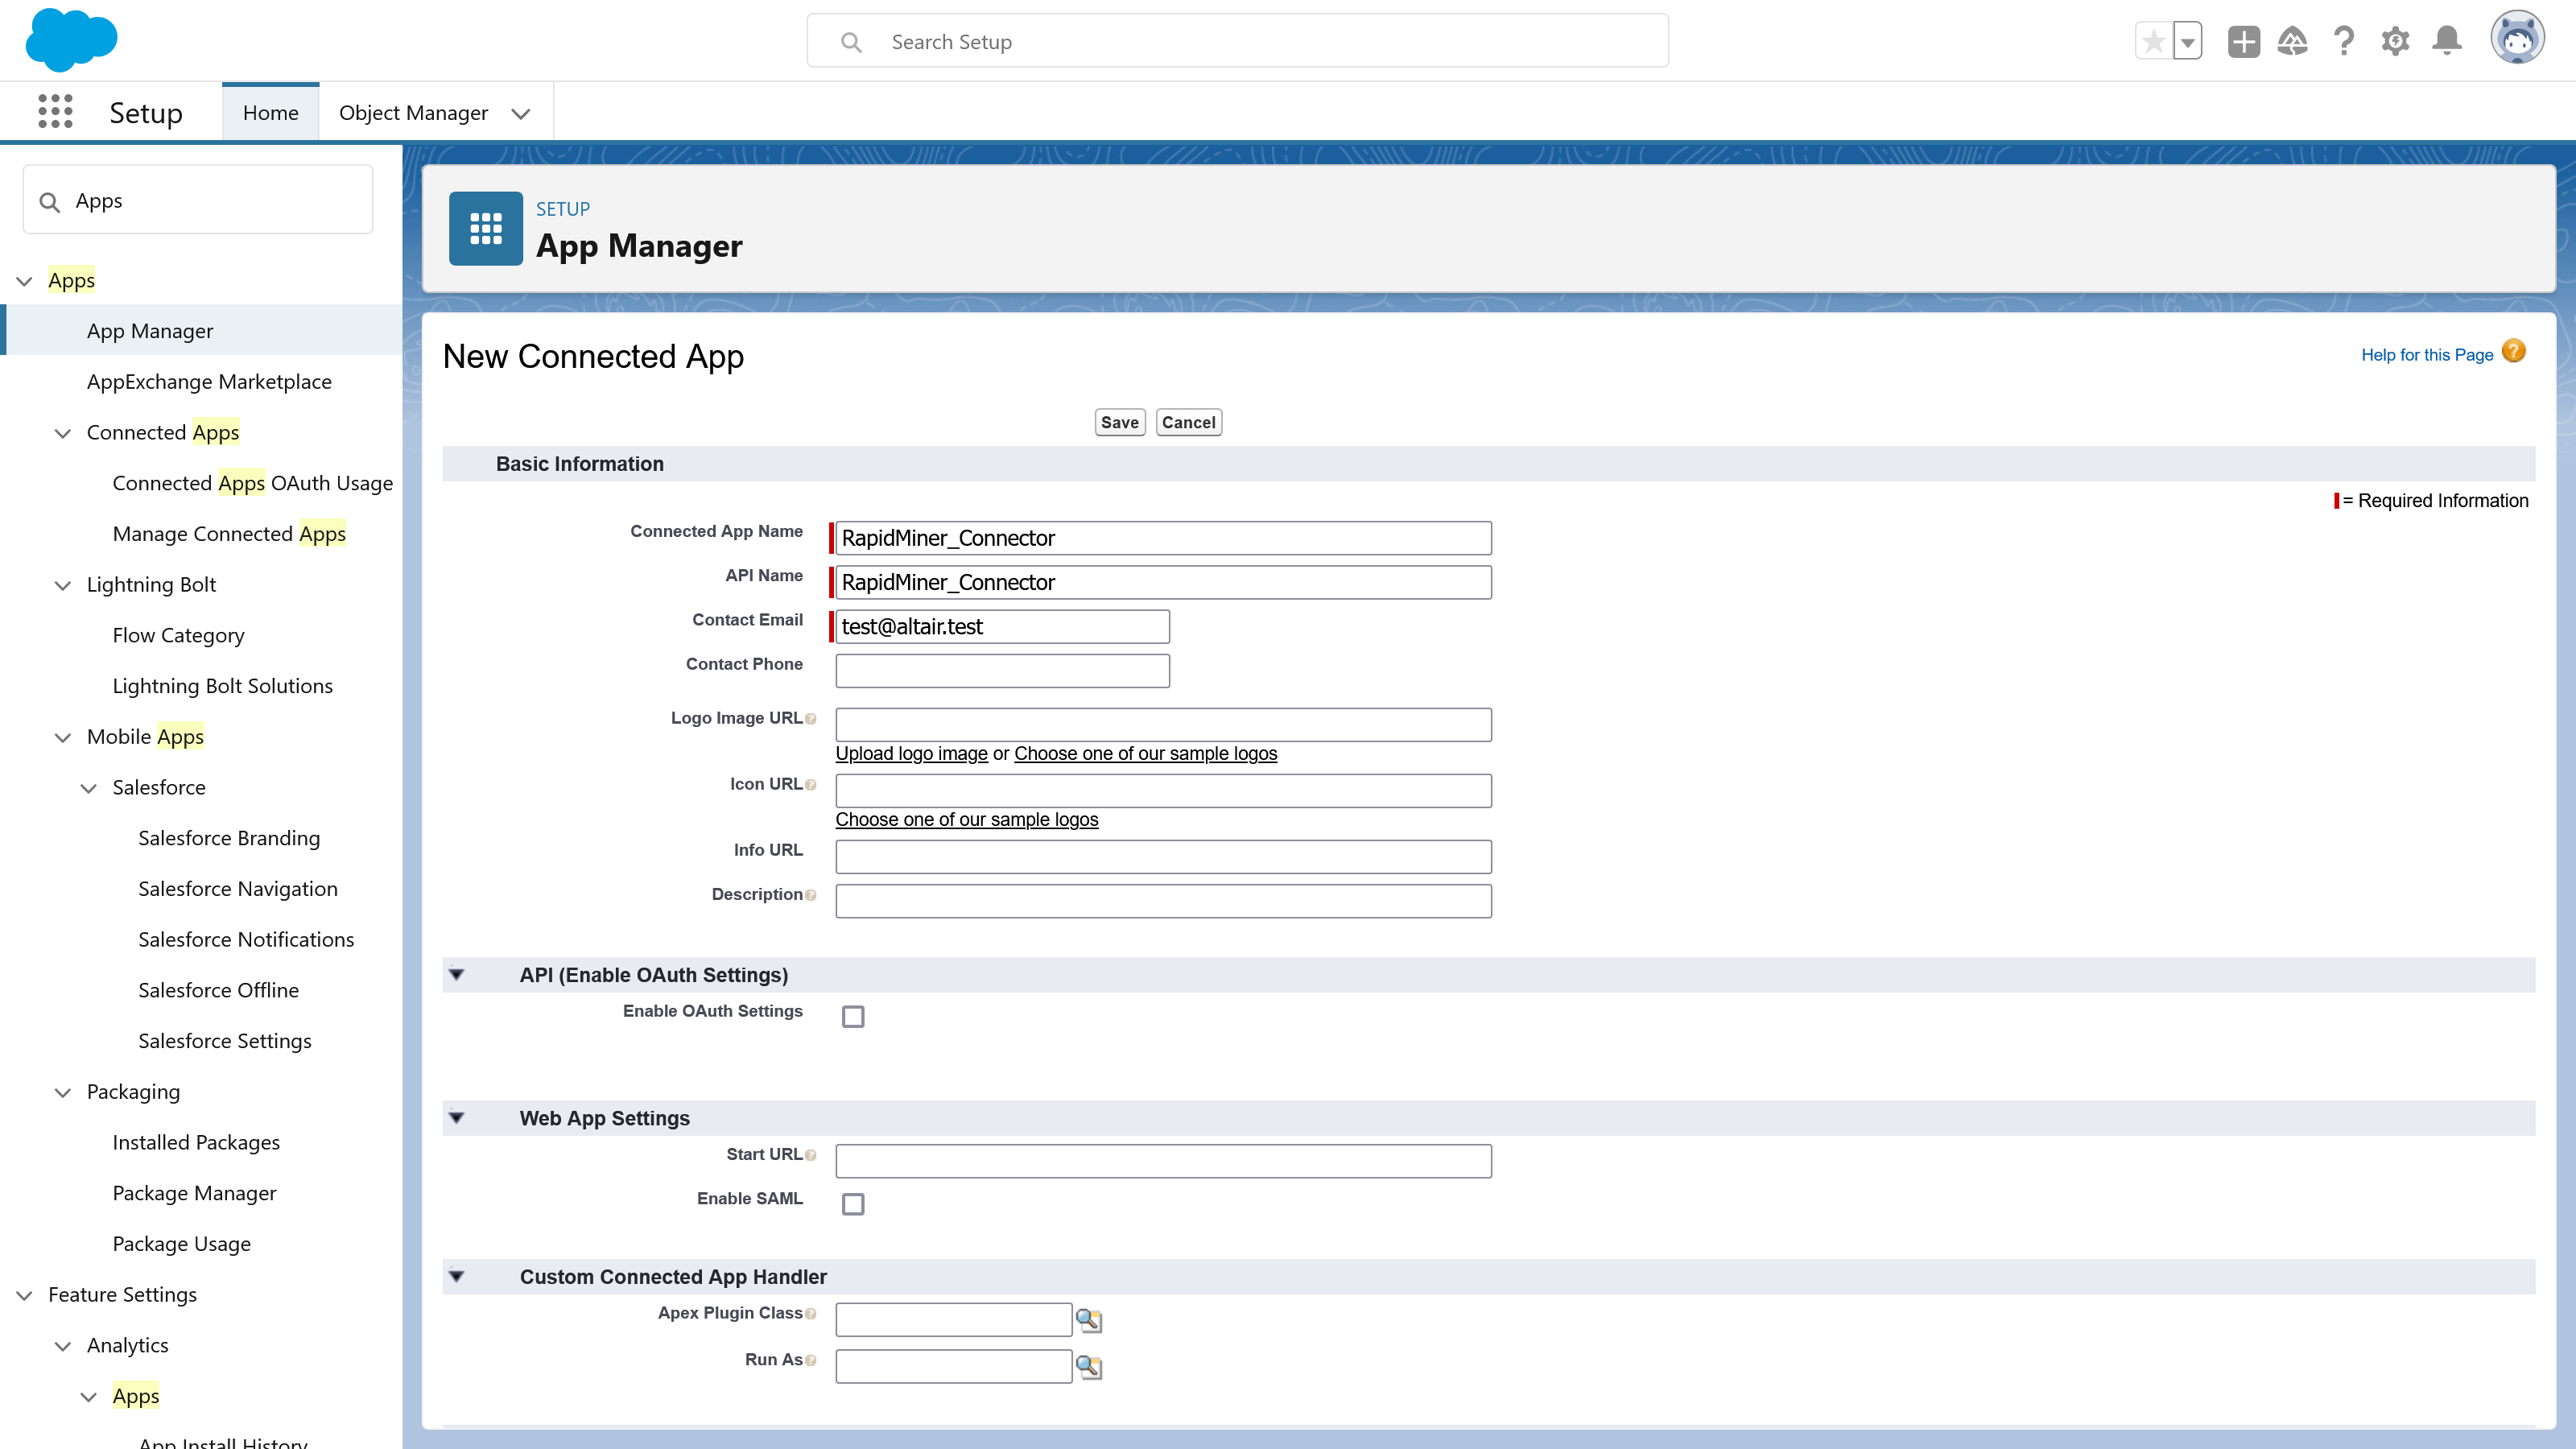
Check Enable OAuth Settings and Enable for Device Flow. This will automatically populate the Callback URL field.
Next, add the following scopes to the Selected OAuth Scopes:
- Access the identity URL service: Required to look up the correct SOAP API endpoint.
- Perform requests at any time: Required to request offline tokens (long-lived refresh tokens).
- Manage user data via API: Allows the connector to query and update data via the SOAP API.
The first two scopes are required to initialize connections. The last scope might be narrowed down for some use cases. See OAuth Tokens and Scopes for details on the OAuth scopes.

Finally, uncheck Require Secret for Refresh Token Flow. This will allow usage of generated offline tokens without providing the client secret (consumer secret).
With most web-based applications, the client secret adds another layer of security: the secret is only stored on the web server, where it is inaccessible to the end user. However, with desktop applications, the client secret would be stored on the client machine next to the client ID (consumer ID) -– making it effectively just another ID. For this reason the Salesforce connector does not use the client secret.
At this point you can save the configuration. The newly created Connected App is not tied to any user account and can be used by multiple users.
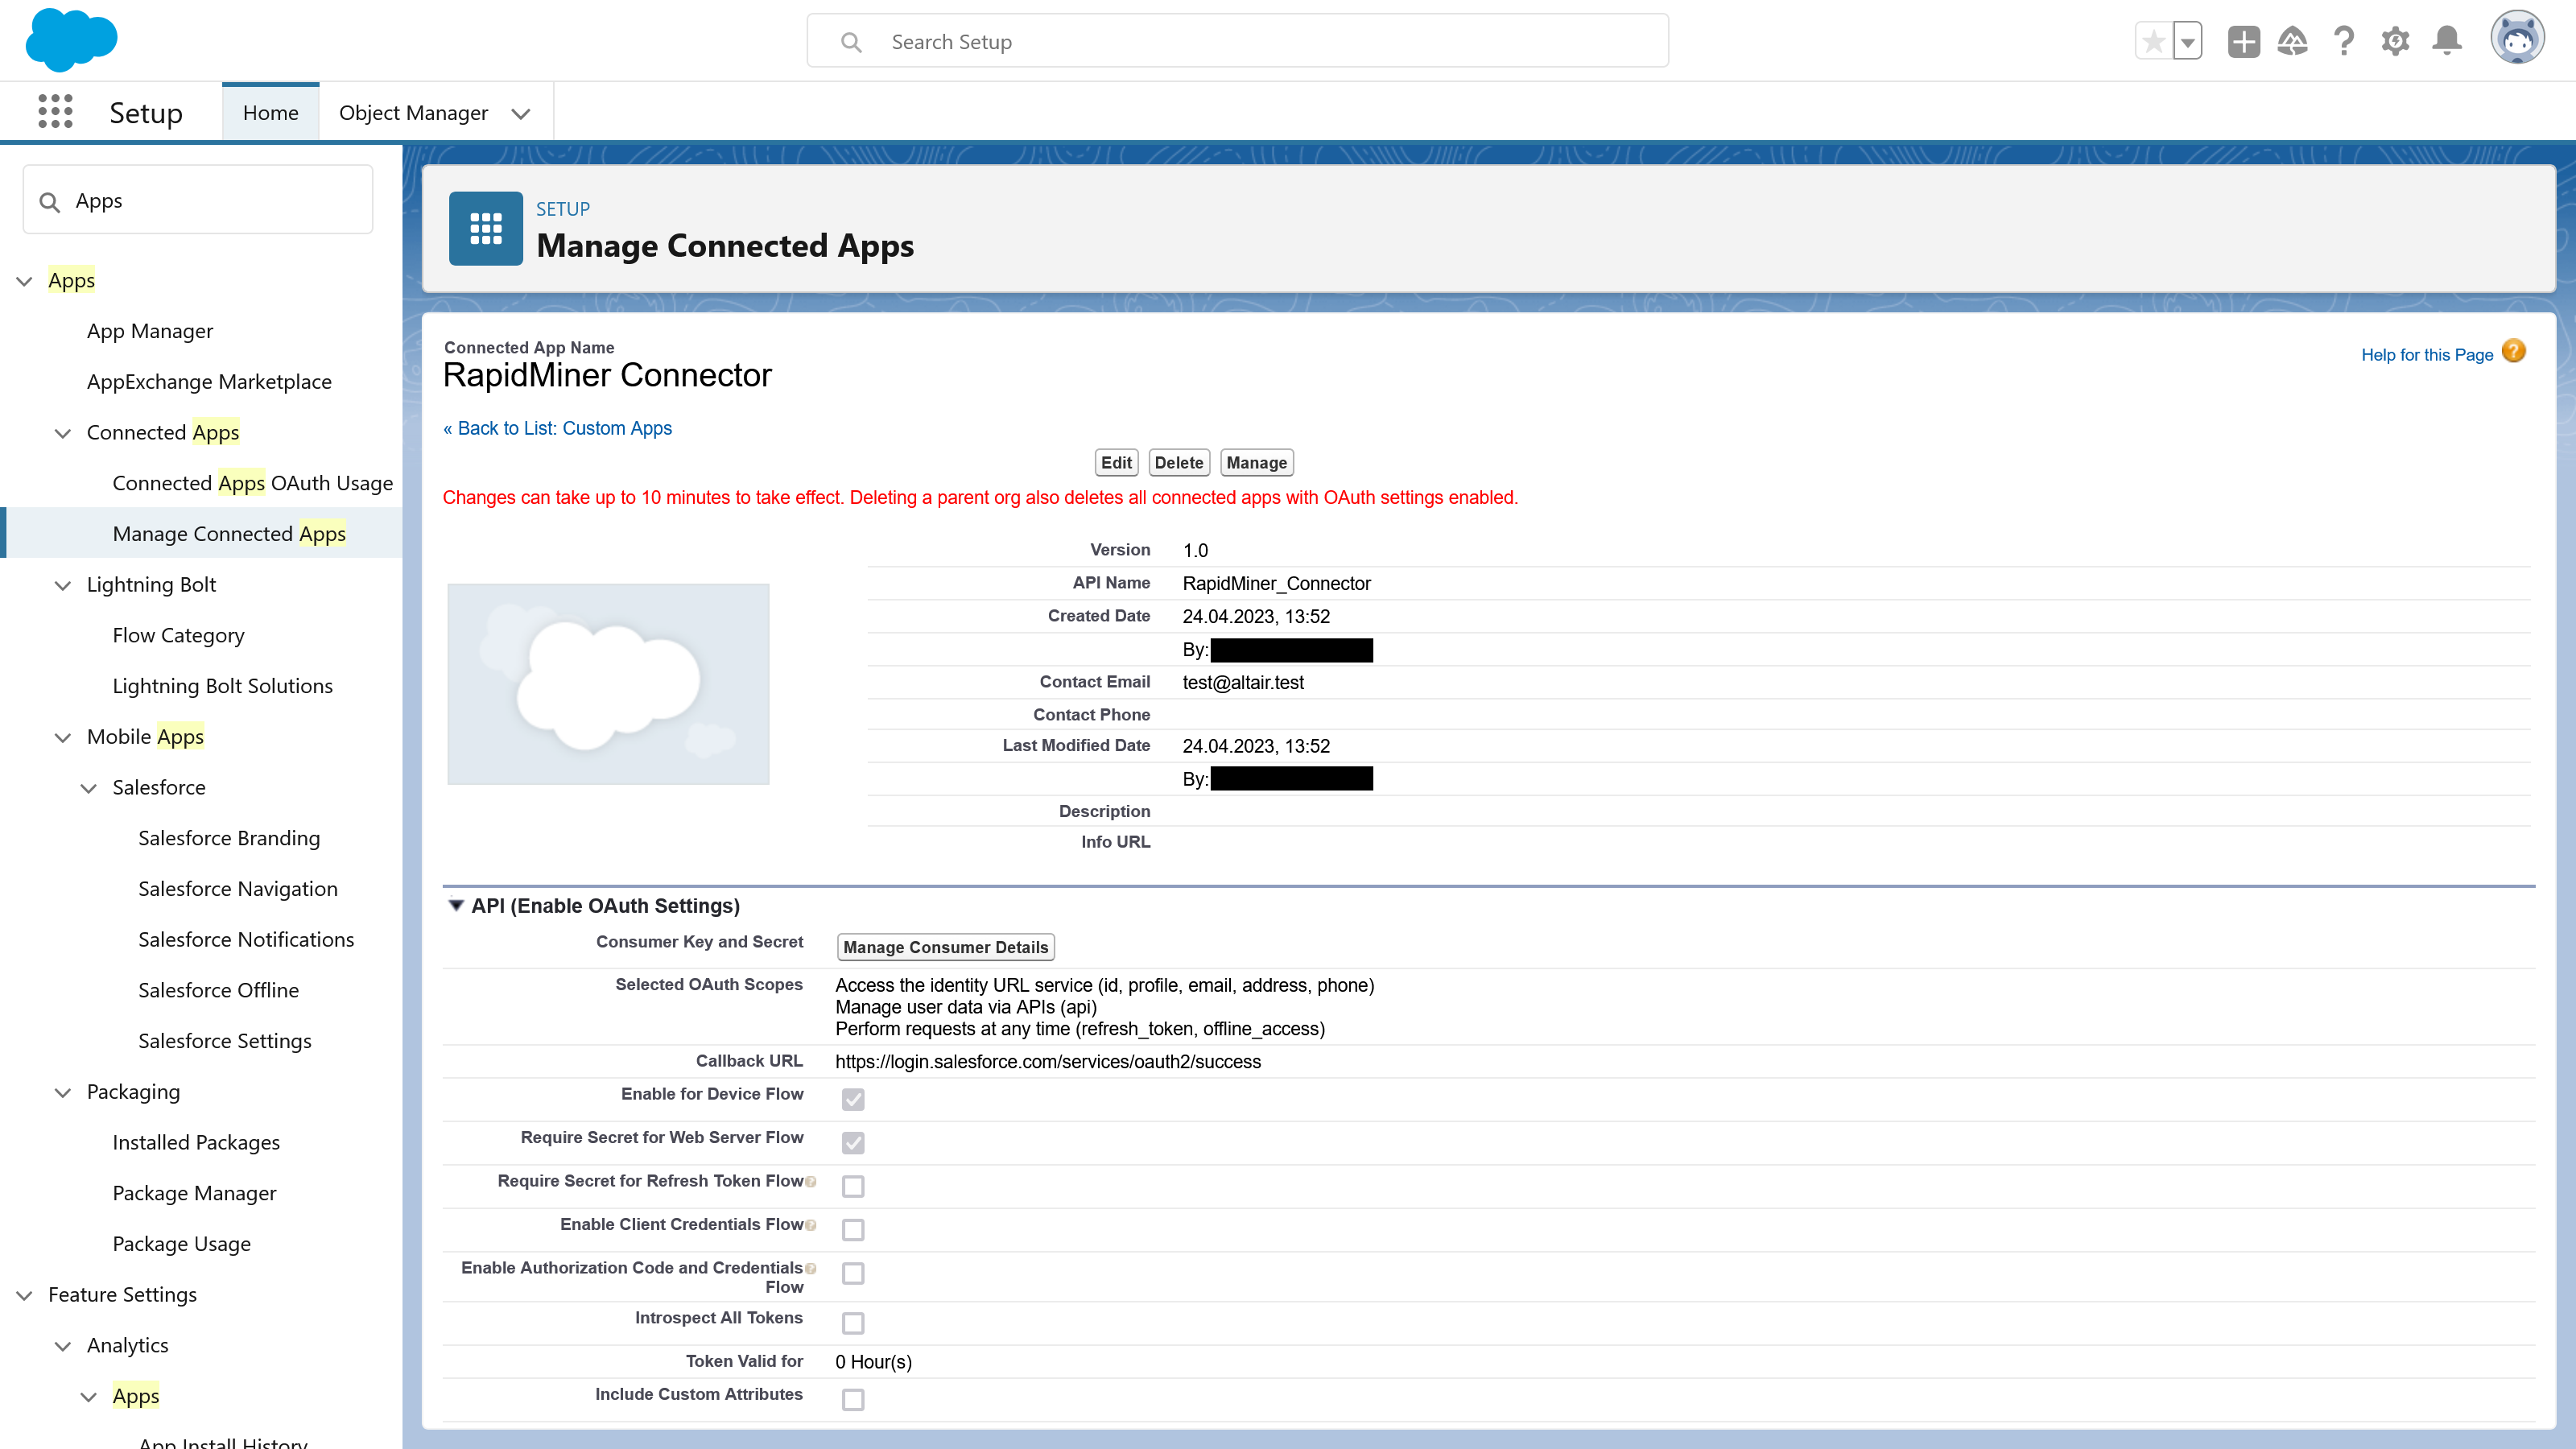
To set up the connection, users will need to have access to the Salesforce instance used to create the Connected App and need to know its client ID (consumer ID). You can click on Manage Consumer Details to look up the newly generated client ID.
Reset the security token
You can reset your Salesforce security token from the Salesforce website. This is a useful feature if you've lost your existing token or you want to disconnect from all applications using the token.
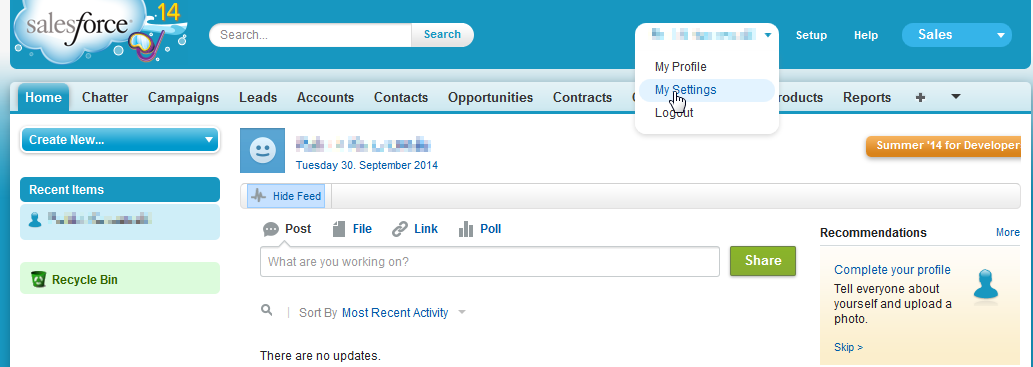
Make sure you are logged in to the Salesforce website.
Click on your account name and select Settings:
Open the Personal group and click on Reset My Security Token:
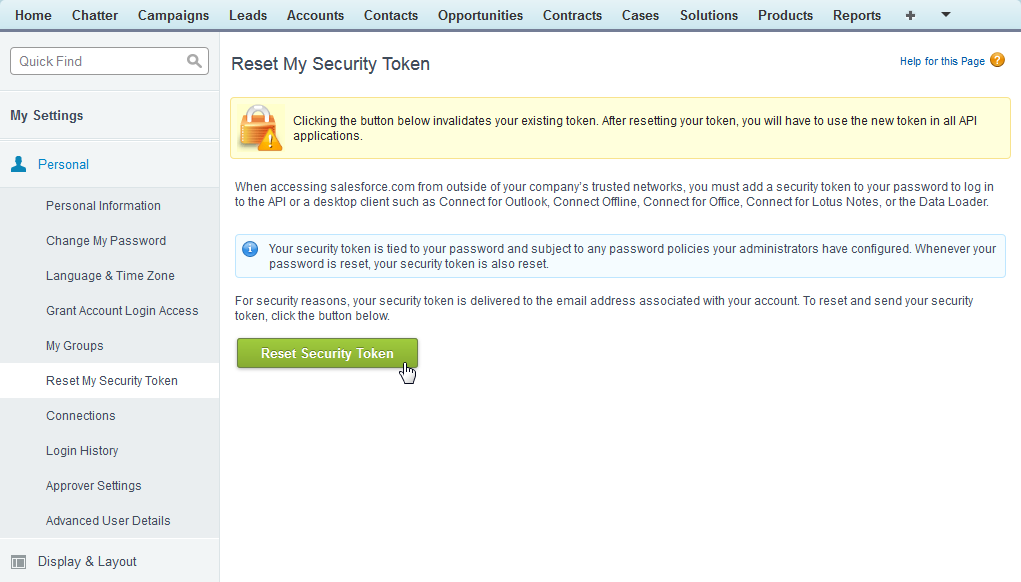
Finally, click on Reset Security Token to get a new token via email.
Note that after you reset your token, applications will no longer be able to connect to your account until you re-enter the new security token.